Hi, I'm Rei! I produce the virtual rock band WASHABI using AI tools.
For the music video of "Singularity (English Ver.)" (59.6 seconds)—an English re-arrangement of WASHABI's very first song—we wanted to create a grand visual scale: thousands of warm lights rising from a sprawling night metropolis toward a giant whale swimming across the sky.
At first, we tried animating the city and the rising lights purely with video generation AI (such as H3 MAX on fal.ai). However, every time the camera panned or tilted, the shapes and layout of the skyscrapers morphed into different buildings, and it proved difficult to control the motion and speed of thousands of rising lights the way we envisioned.
To solve both problems, we built all 615 city buildings and up to 5,246 rising washi-paper lanterns in 3D (Blender), painted the city textures with image AI, and used video AI (H3 MAX / H3 MAX Turbo) strictly for our vocalist Roku—compositing everything under the exact same 3D camera!
Best of all, all 3D rendering and final video compositing ran locally on a single fanless laptop—a 15-inch MacBook Air (Apple M4, 2025 / 24 GB RAM)—without touching a desktop workstation. *(Note: Cloud AI services were used for painting the background plates and generating Roku's character clips.)*
Throughout this article you'll see steps like "placing 615 buildings," "blinking tens of thousands of windows via math shaders," and "driving 5,246 lanterns in a spiral wave"—none of which I modeled by hand.
I never opened the Blender GUI once. Instead, I worked iteratively with an AI coding agent (Claude Code, Codex, Antigravity, etc.), reviewing test renders and giving feedback like "make the lantern edges softer" or "have them spiral into the whale," while the agent wrote and refined every step as Python scripts.
At the end of this article, you'll find a starter prompt specification to build a similar pipeline with your own AI agent (treat it as a starting point—you'll still want to inspect each step and tune it to your song).
1. What Can You Build with Step 0 + These 3 Steps?
First, here is the finished 59.6-second music video for "Singularity (English Ver.)"!
Even as the camera dives from a back-alley fire escape up to the rooftop of a 250 m skyscraper and out toward the giant sky whale, all 615 buildings stay spatially consistent while thousands of paper lanterns rise at their own organic pace.
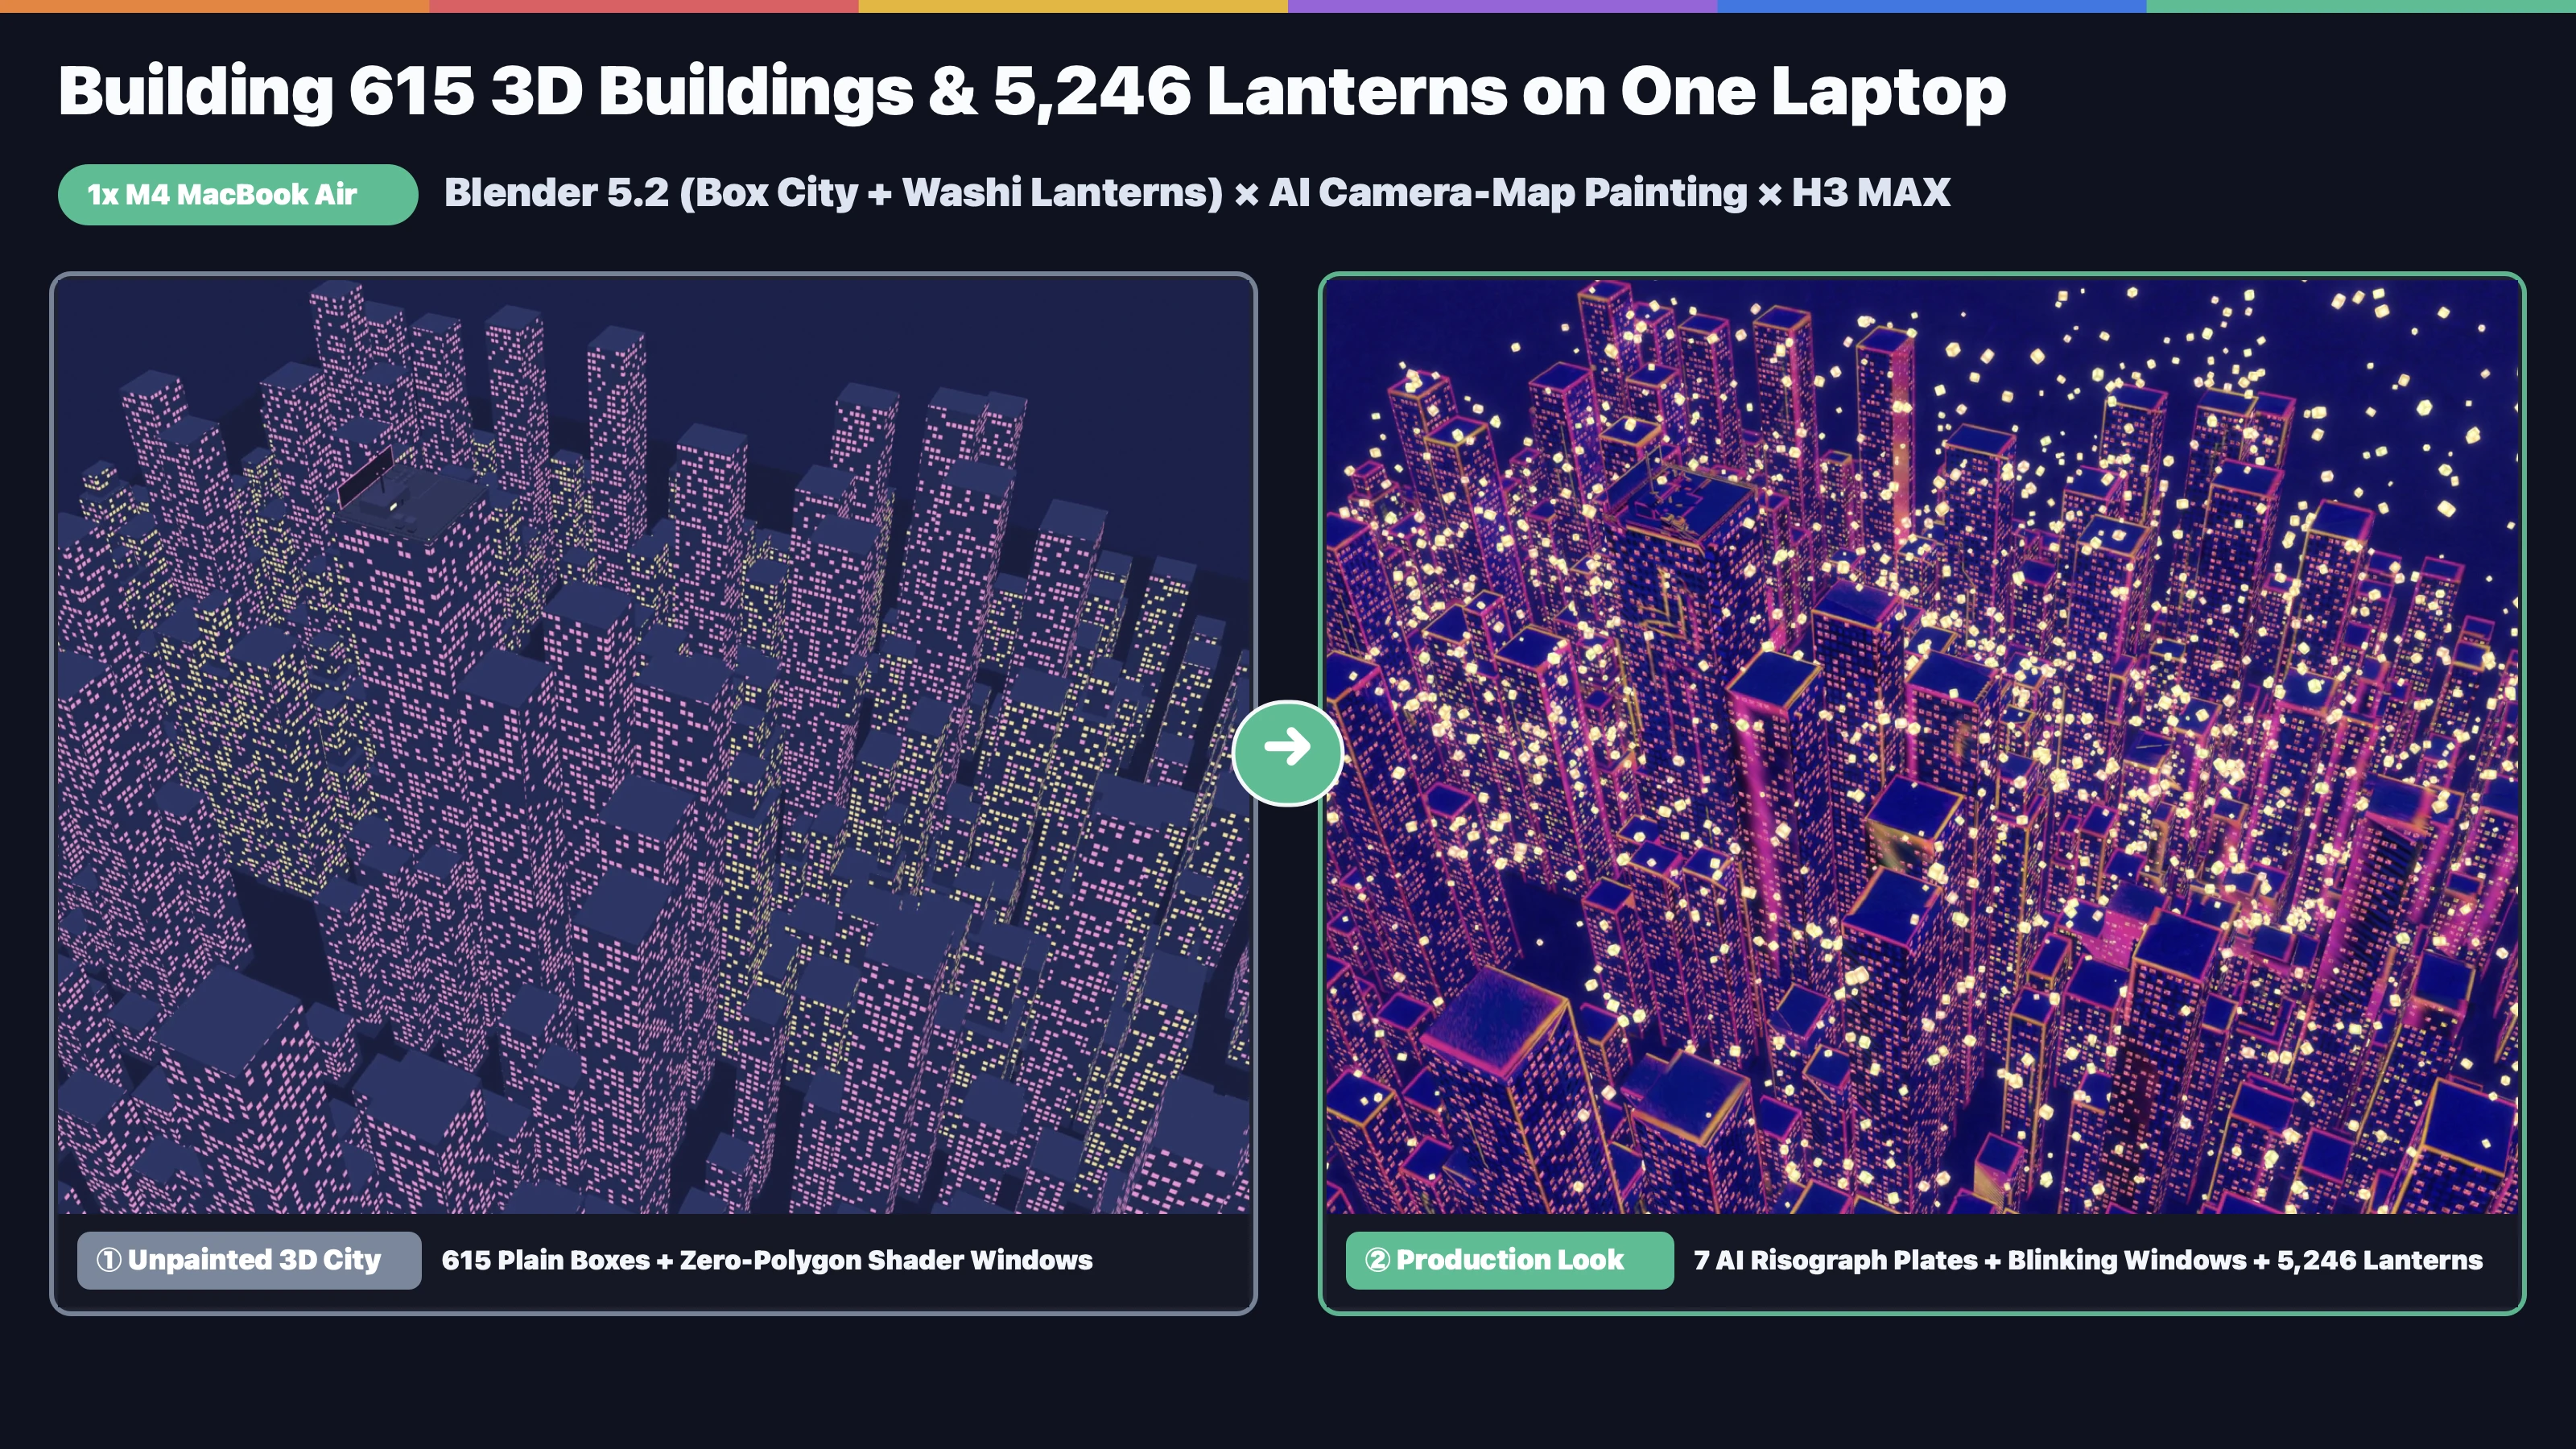
And here is a 14-second 270-degree aerial flyover rendered specifically for this article using the exact same 3D city set (615 buildings + 5,246 lanterns). Compare the unpainted 3D boxes on the left with the full production look on the right!
615 simple rectangular boxes with procedural window grids calculated purely in the material shader (render time on M4 MacBook Air: 2 min 47 sec).
The exact same camera path with 7 camera-mapped AI risograph paintings, per-window blinking, and 5,246 washi lanterns rising in an outward wave (11 min city + 6 min lanterns + 3.5 min composite).
With Step 0 + 3 Steps below, you can run a massive city and thousands of individually animated lights smoothly on a single everyday laptop.
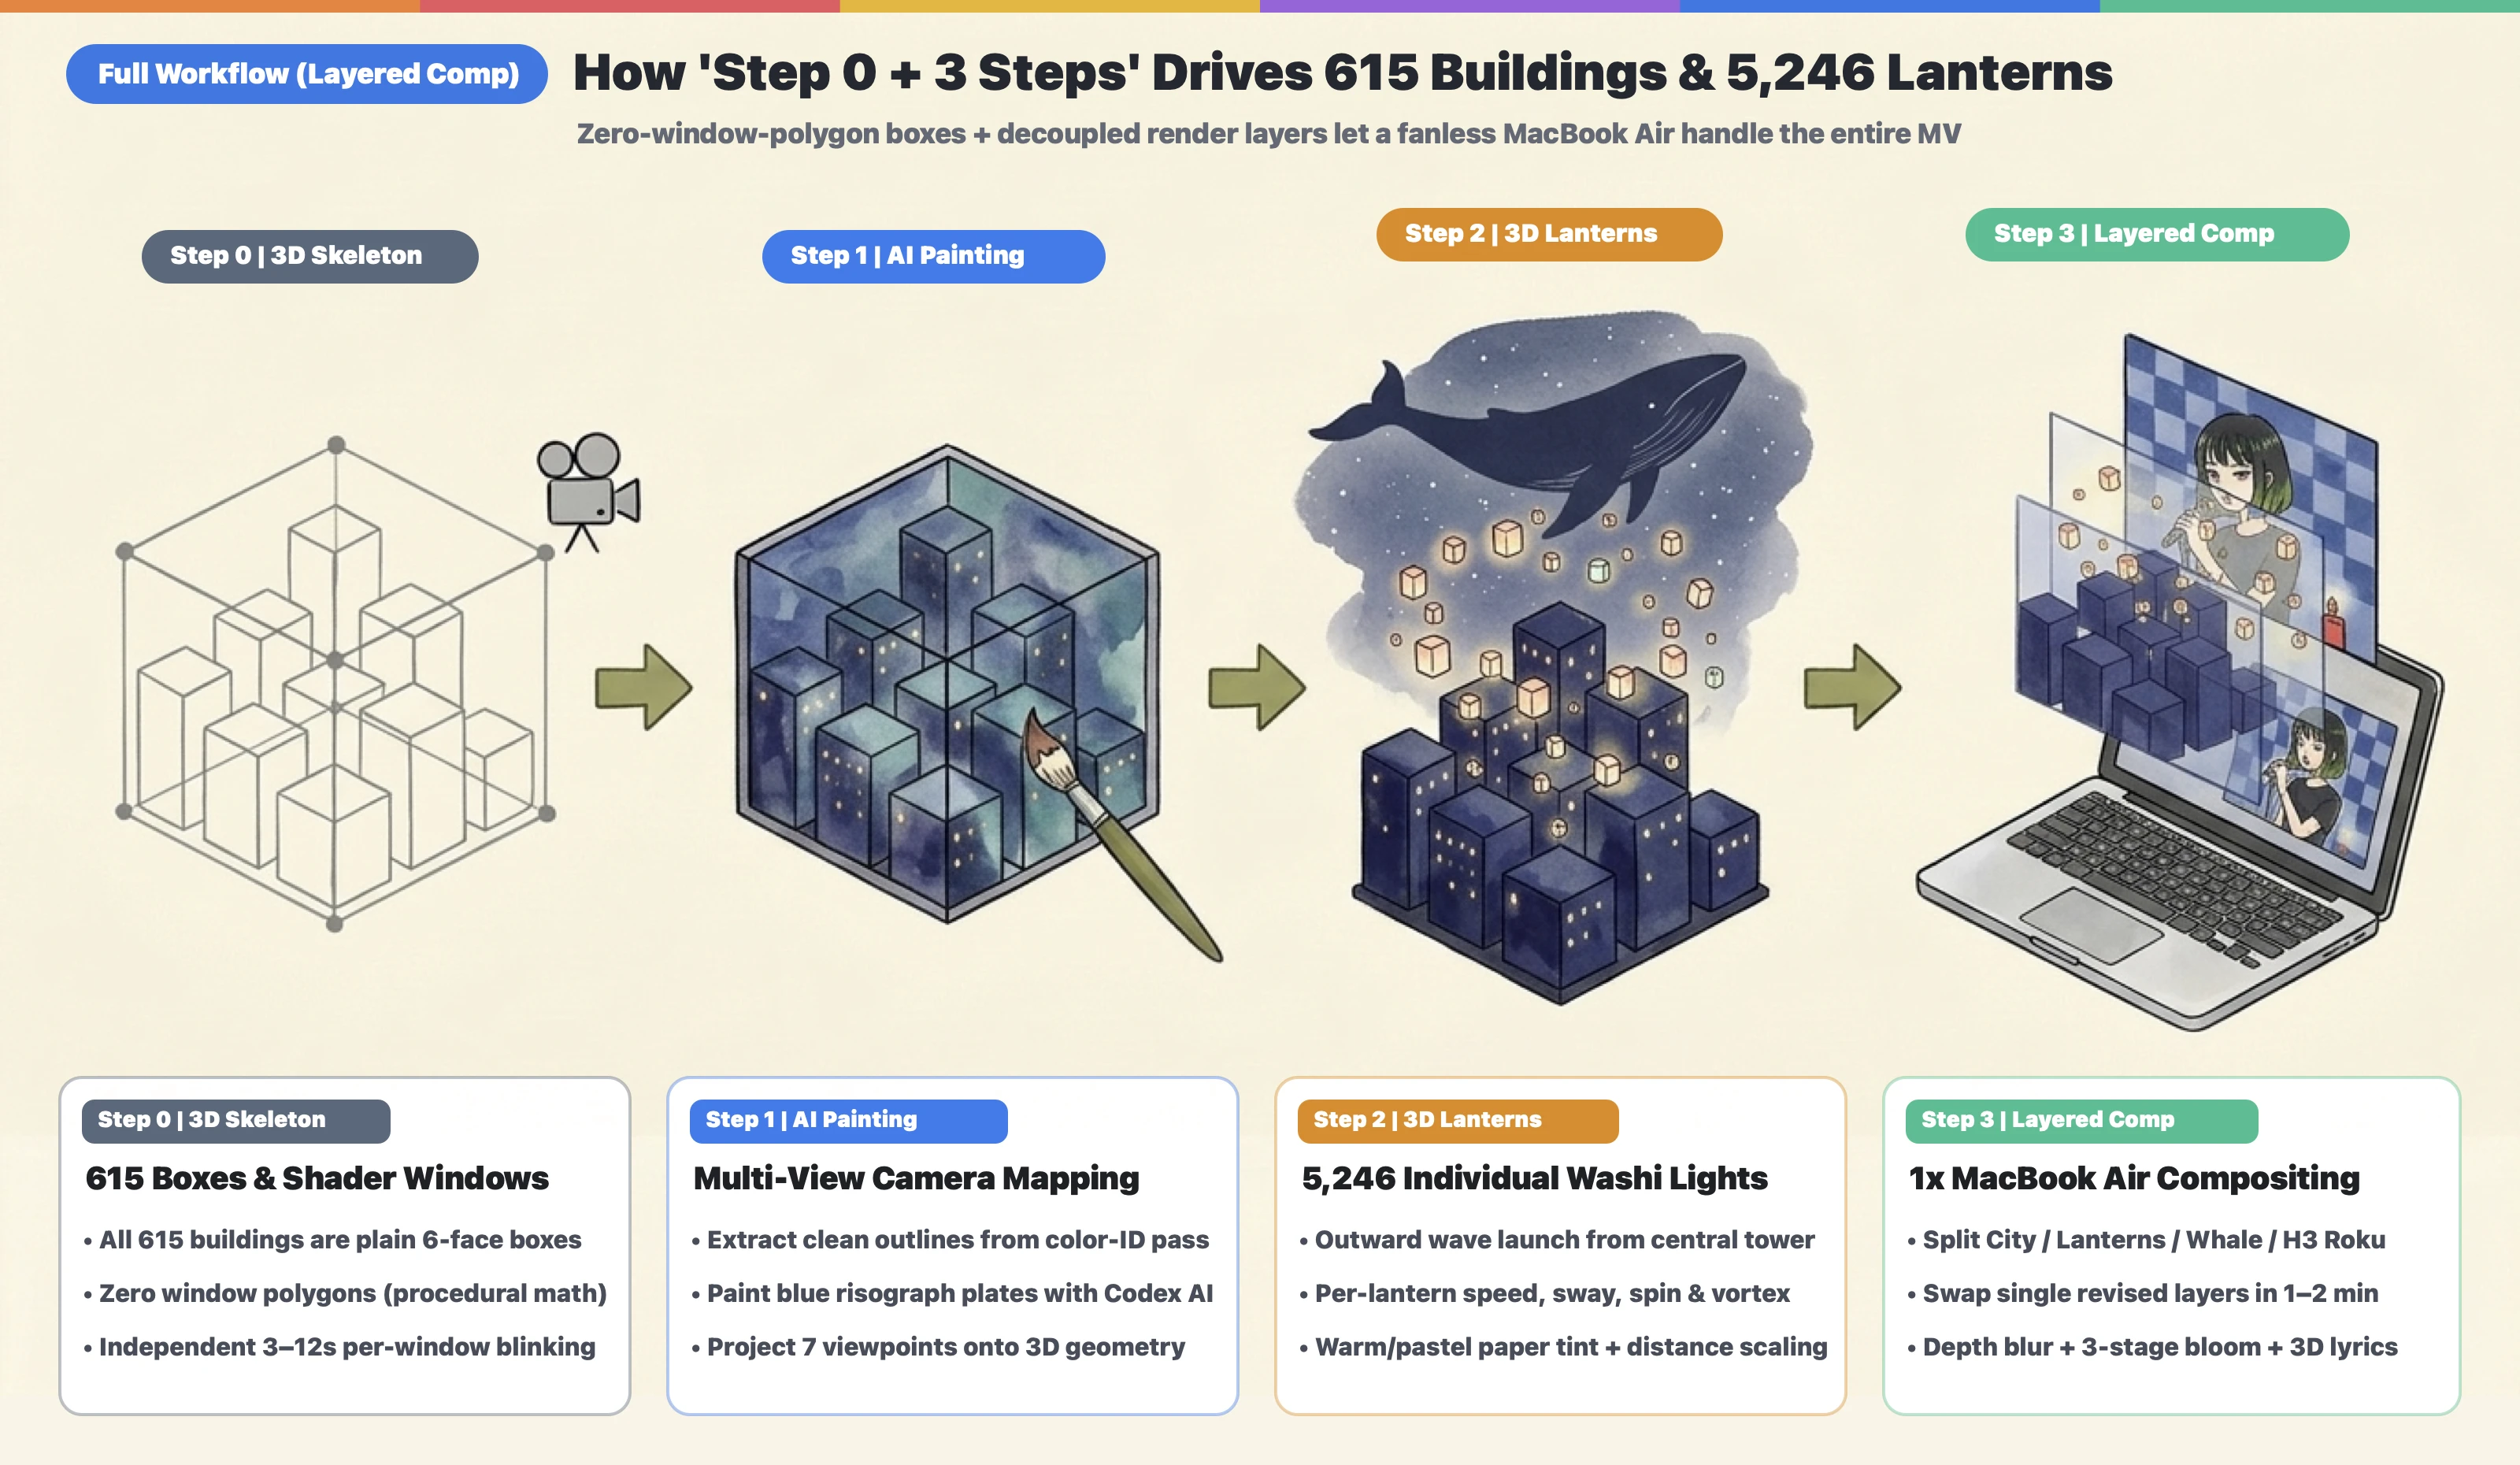
- First, in Step 0 (Lightweight 3D City & Shader Windows): We place 615 plain rectangular boxes across a 520 m × 1,020 m district and generate tens of thousands of blinking windows purely through shader math—adding zero window polygons.
- In Step 1 (Multi-View AI Camera-Map Painting): We export clean outline drawings of the 3D boxes, paint them in a blue risograph illustration style with image AI, and project them back onto the 3D city from multiple viewpoints.
- In Step 2 (Individual Control of Up to 5,246 Washi Lanterns): We place rounded washi-paper lanterns in Blender and calculate each lantern's launch wave timing, climb speed, spiral vortex, warm/pastel tint, flicker, and rotation individually.
- In Step 3 (Layered Rendering & H3 Character Compositing): We split the city, lanterns, sky whale, and video-AI character (
H3) into separate render layers so any tweak only re-renders a 1–2 minute slice on a single laptop.
2. Step 0 (3D City Skeleton): 615 Plain Boxes and Tens of Thousands of Zero-Polygon Math Windows
The single biggest reason a 600-building metropolis runs effortlessly on a fanless laptop is simple: keep every building a plain rectangular box, and model zero window geometry.
Here is the exact breakdown of the 3D city set:
| Item | Scale & Specs | Role & Optimization |
|---|---|---|
| Total Buildings | 615 buildings (512 downtown + 56 surrounding high-rises + 1 central 250 m tower + 1 Roku building + 45 low-rise outer blocks) | Every building is a plain 6-sided rectangular box rising from the ground. |
| Footprint & Height | Approx. 520 m (E–W) × 1,020 m (N–S) / Height: 2.8 m to 250.0 m (151 buildings over 100 m) | Placing 56 high-rises (154–225 m) around the central 250 m rooftop stage (36 m × 36 m) fills eye-level shots with deep city skyline. Dark bay water and distant forest ridges seal the horizon. |
| Tens of Thousands of Windows | 0 extra polygons (procedural shader math) | Instead of cutting window meshes, the shader hashes each building's ID and wall UV coordinates to draw window grids. Each window blinks on its own 3–12 s cycle (55% lit ratio, ±18% shimmer). |
| Rooftop Props | Guardrails, penthouse, antenna mast, 10 HVAC units, water tanks, neon sign frame | Only close-up rooftop props near Roku are built from boxes and cylinders, locking their positions across every camera cut. |
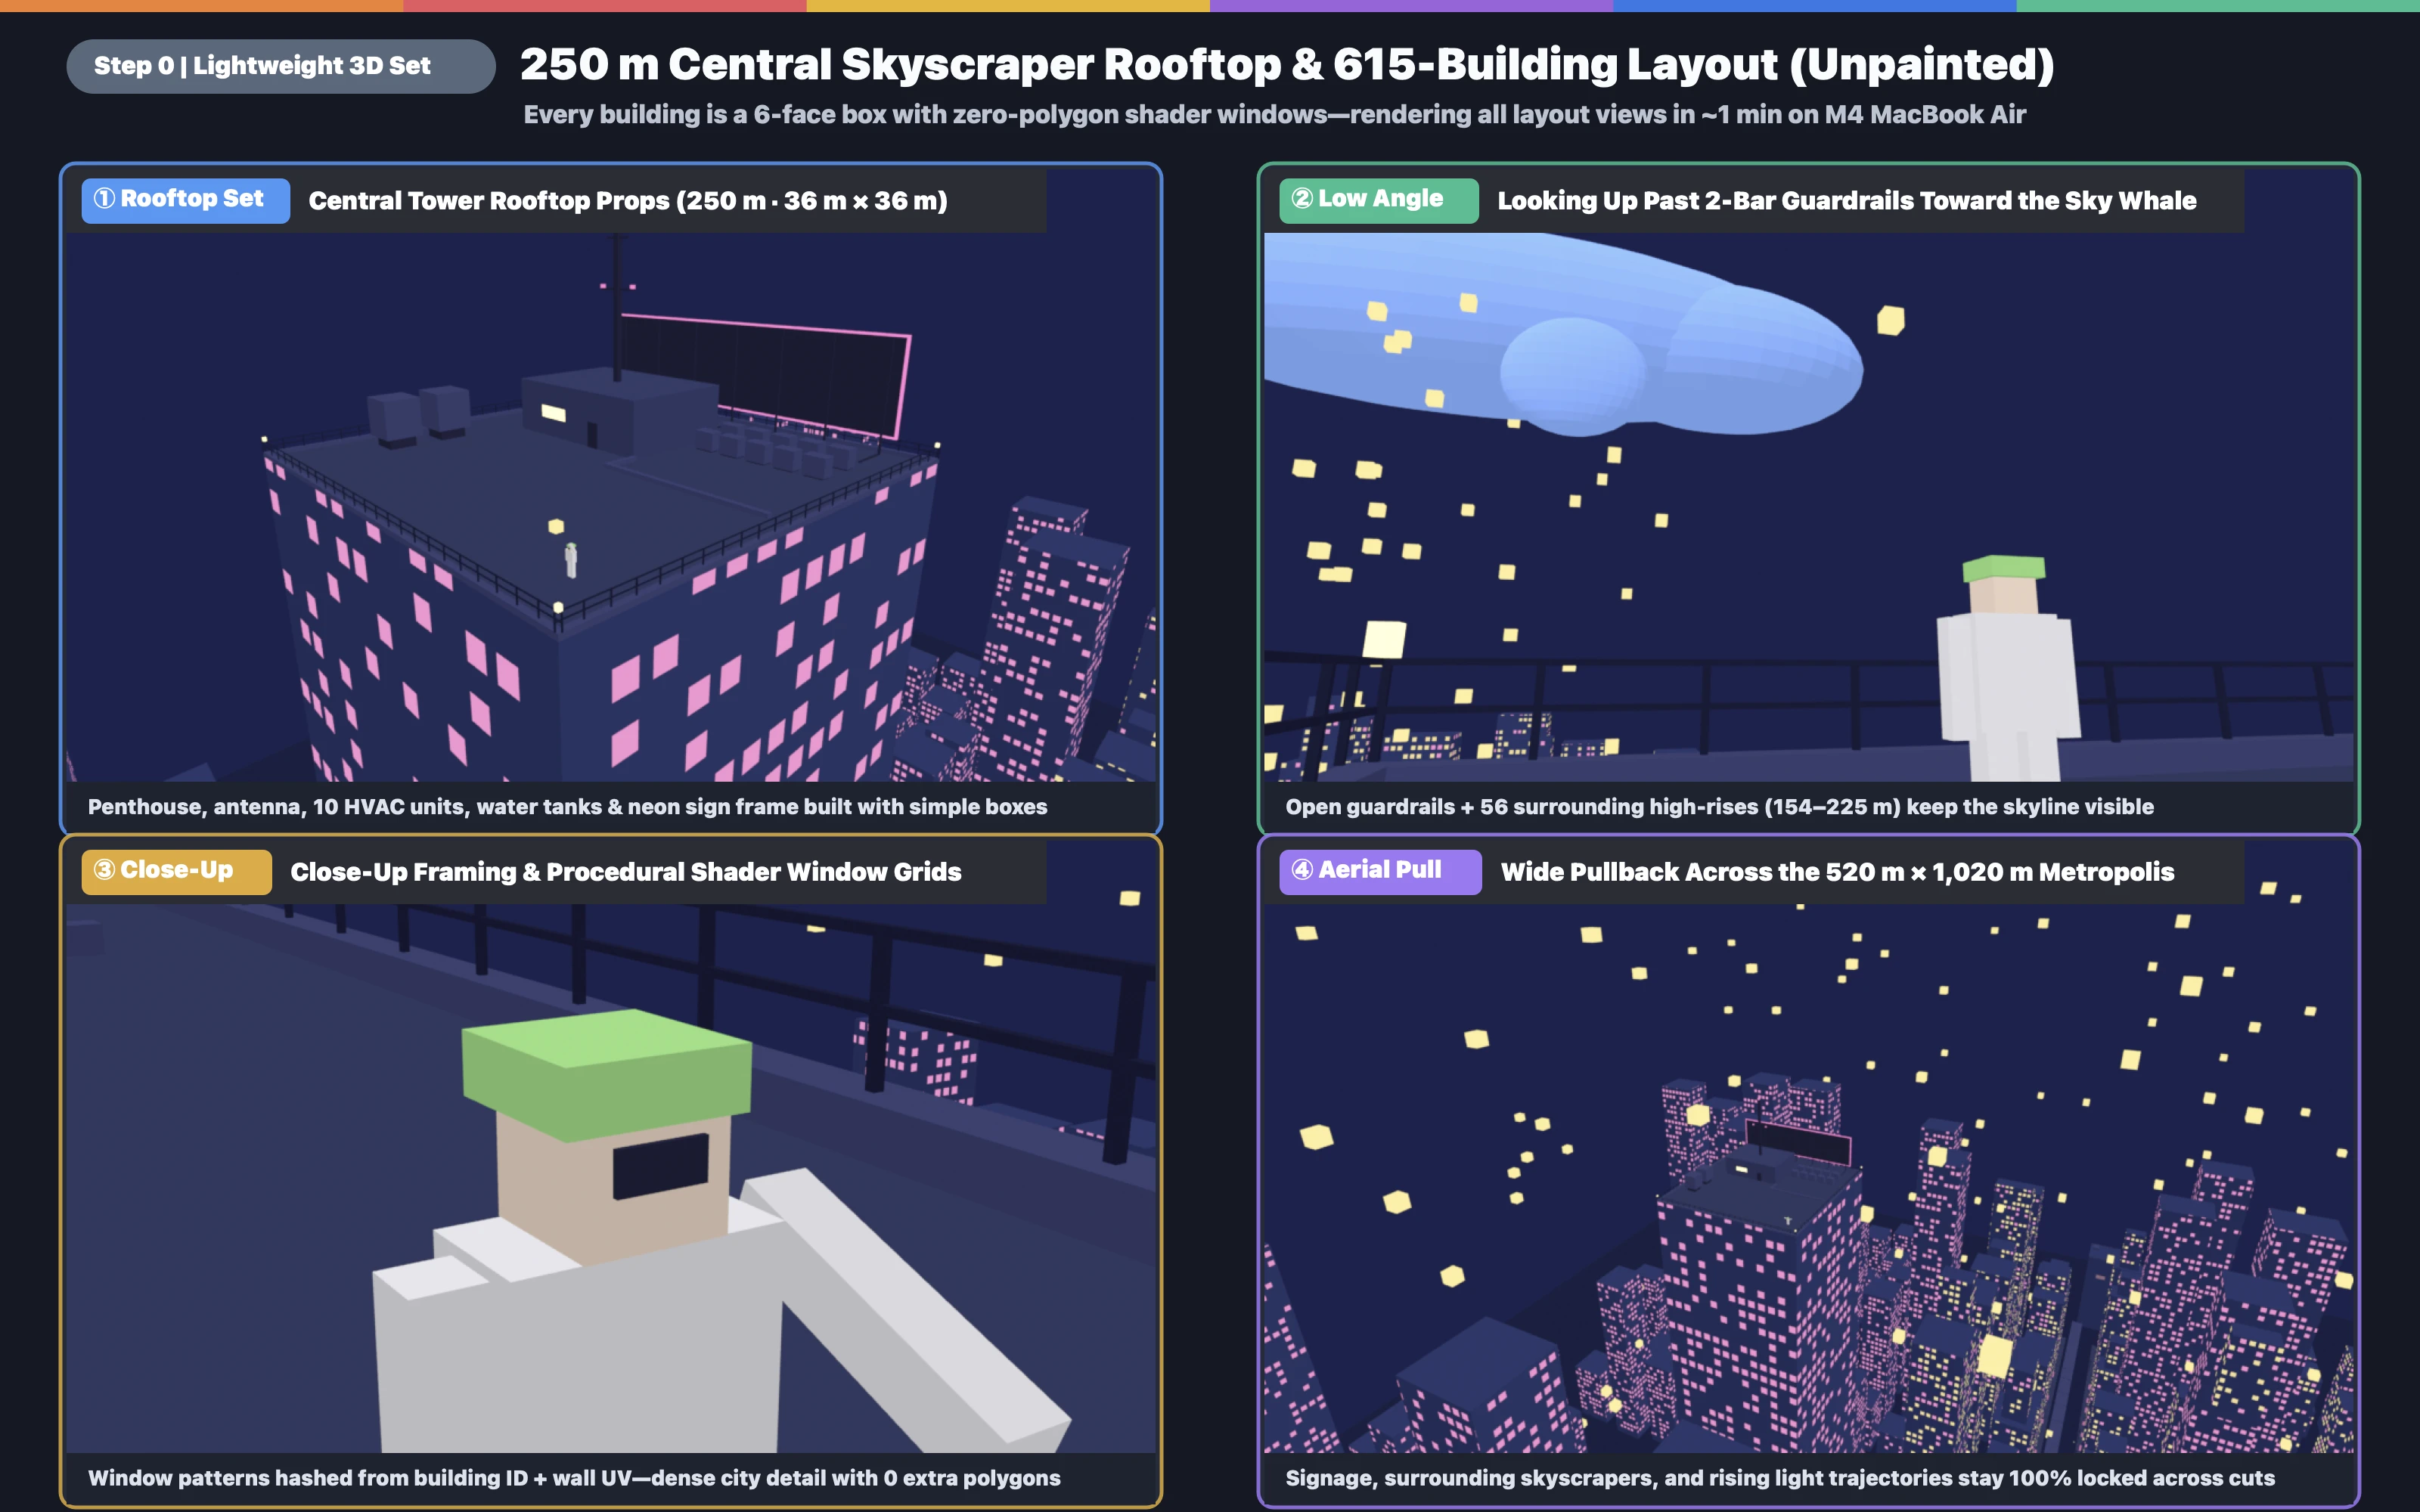
Modeling physical windows across 615 skyscrapers would balloon into millions of polygons. Generating them procedurally in the shader keeps each building at 6 faces—so previewing all rooftop camera angles takes about 1 minute on an M4 MacBook Air, and rendering the 336-frame unpainted flyover takes just 2 minutes 47 seconds.
3. Step 1 (Painting the City): Painting 3D Outlines with Image AI and Projecting Them Back
On its own, Step 0 still looks like clean CG boxes with glowing dots. In Step 1, we dress the geometry in a blue risograph print illustration texture using Codex's built-in image generation tool.
We do this in three clean stages:
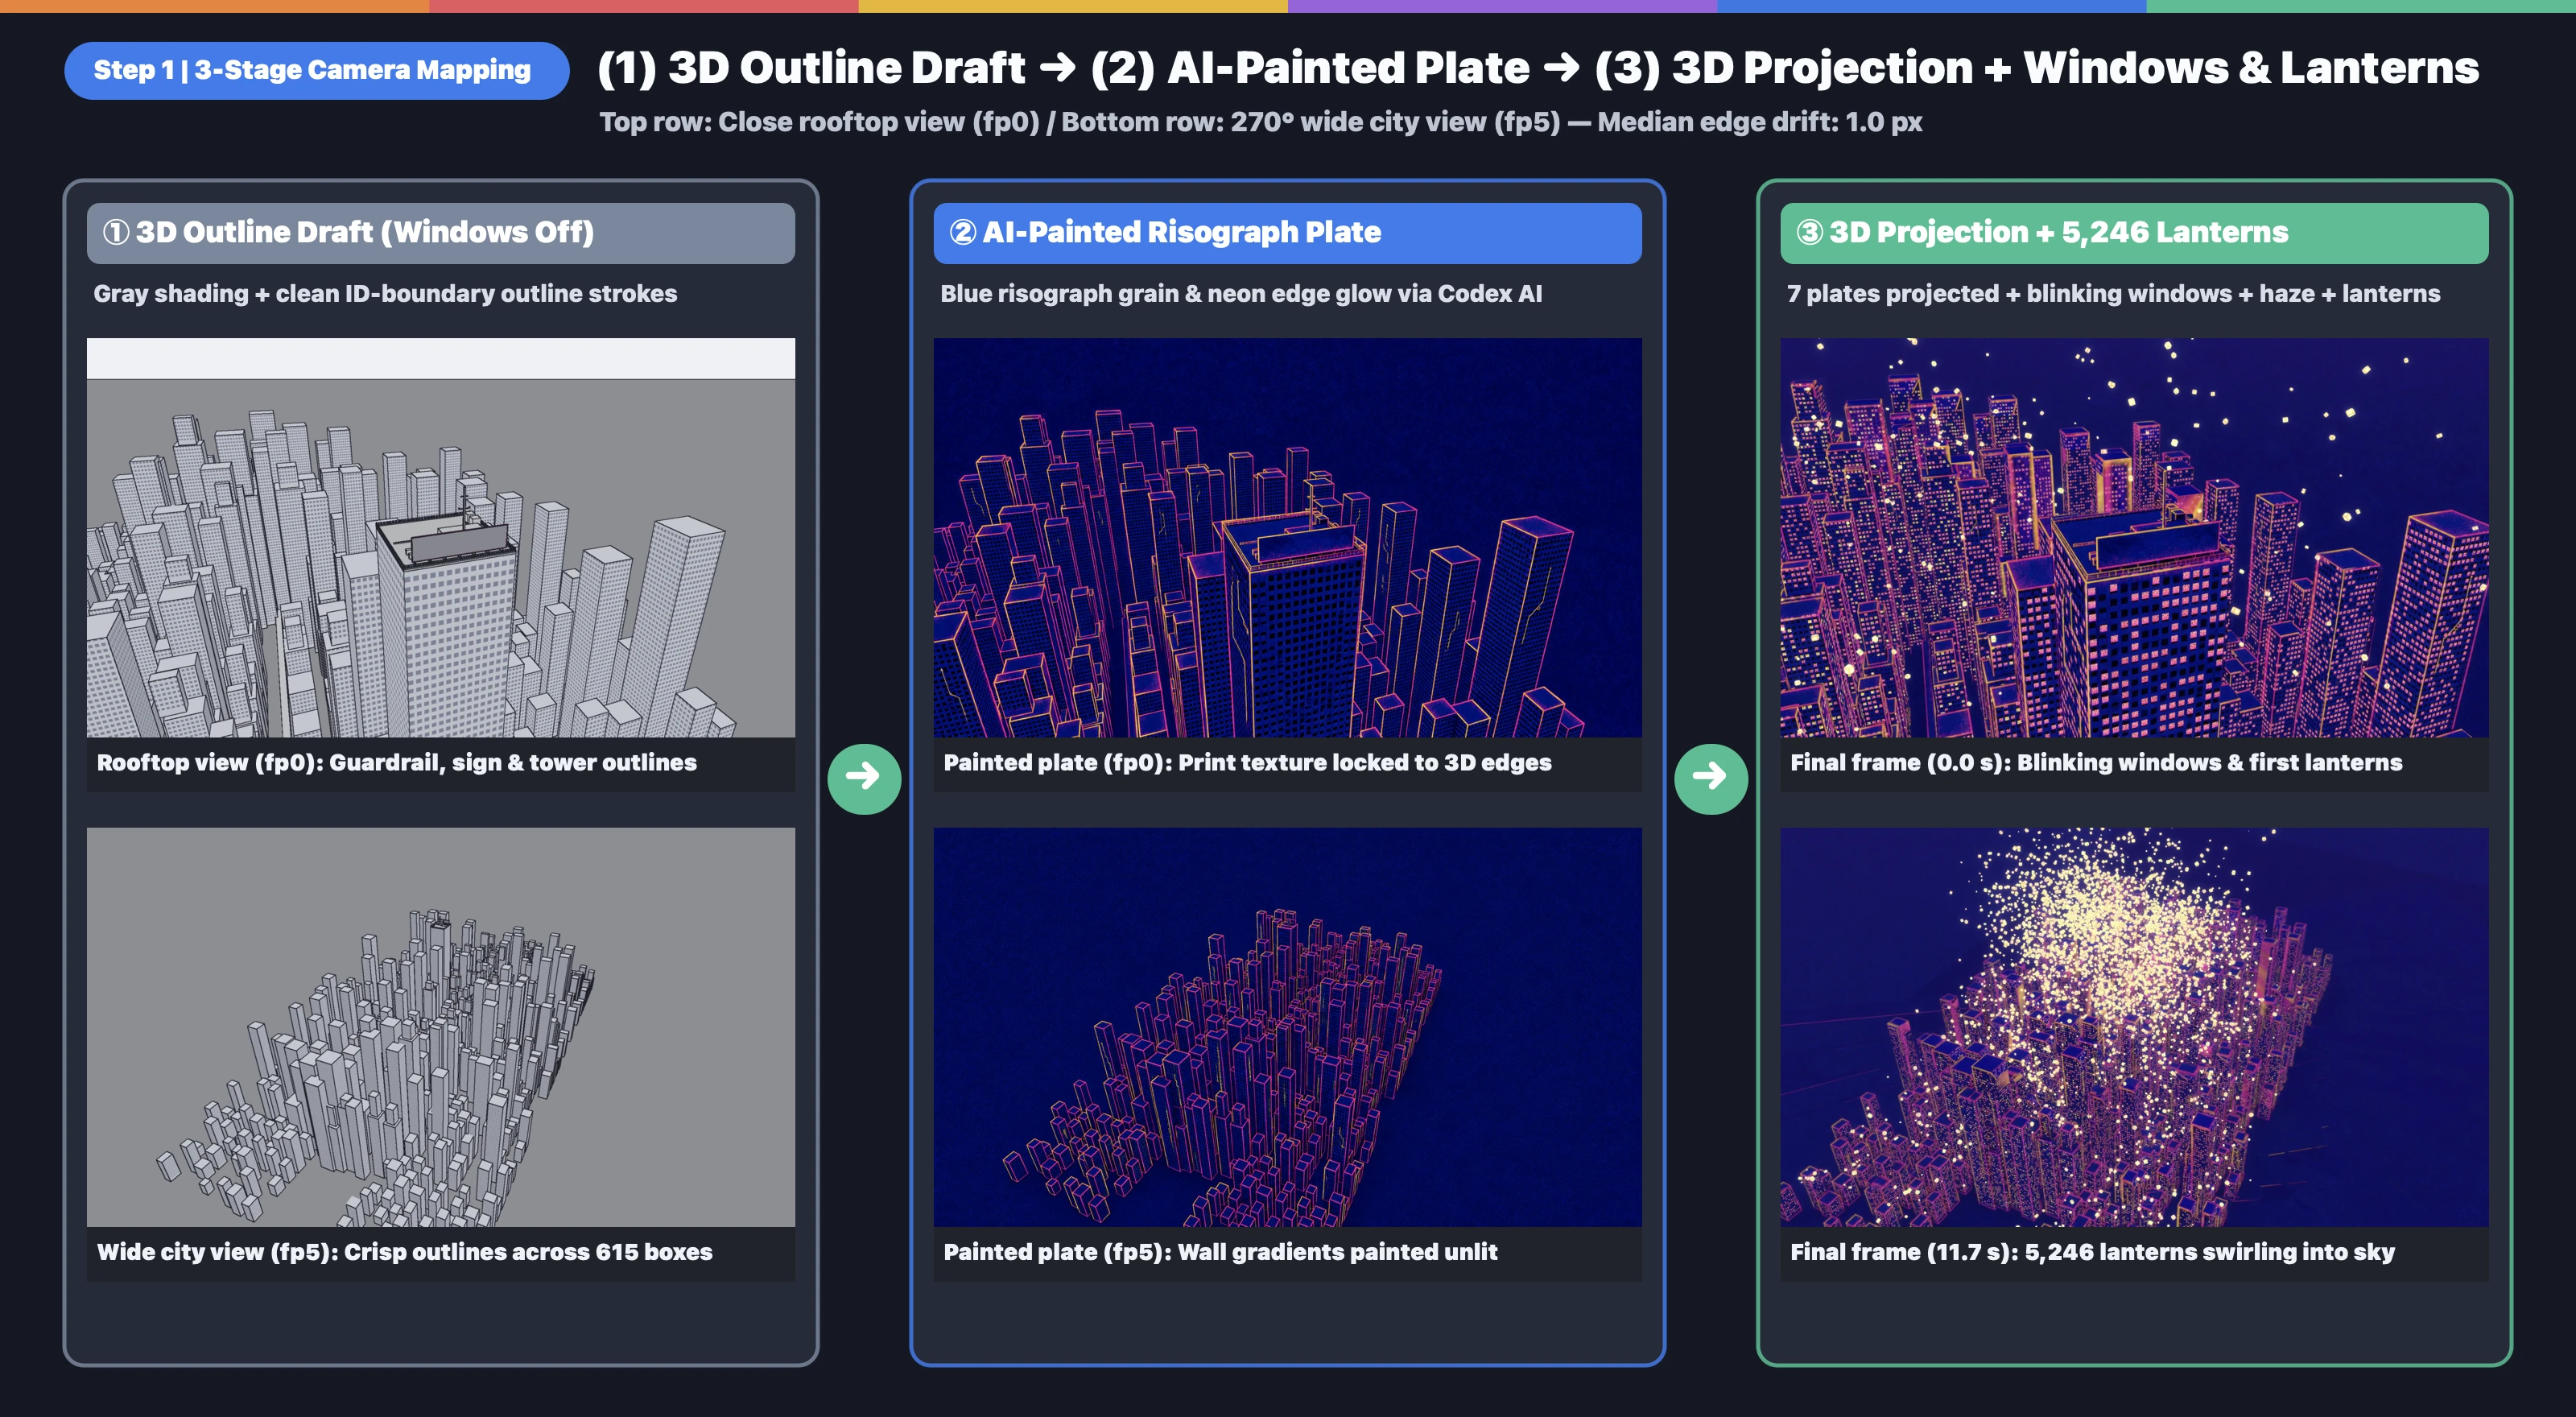
1. ① Export gray shading + clean ID-boundary outlines along the camera path:
- We pick key viewpoints along the camera trajectory (6 viewpoints for the rooftop cuts; 7 viewpoints for the 270-degree aerial flyover) and render unlit gray buildings with crisp outline strokes.
- Key trick: Blender's built-in Freestyle line renderer caused lower buildings to bleed through the rooftop floor in top-down shots. Instead, we rendered a flat color-ID pass per building/face and extracted pixel-perfect outlines from the color boundaries.
2. ② Paint risograph wall textures with image AI ($0 extra API cost):
- Feeding each outline draft plus a style reference into Codex image generation produces grainy indigo-blue risograph walls and neon edge glow. Because the AI follows the exact 3D line art, alignment drift stays at a median of just 1.0–1.4 px.
3. ③ Camera-map the plates from multiple angles and layer the blinking windows on top:
- Each painted plate is projected onto the 3D boxes from its matching camera. Every surface point automatically samples whichever visible camera viewpoint is physically closest—preventing sudden texture pops as the camera moves (with 7 viewpoints across a 270-degree orbit, unprojected blind spots cover only 1.2–3.0% of the screen).
- Compositing Step 0's procedural blinking window pass and distance haze on top turns simple boxes into a hand-illustrated night city whose windows breathe and flicker.
4. Step 2 (5,246 Washi Lanterns): Controlling Every Washi Lantern in Blender for Exact Motion & Timing
Next comes the emotional climax of the MV: thousands of lights detaching from building windows across the city and spiraling upward into the giant whale in the night sky (Cut 16 through the outro).
Initially, we painted the rising lights into start and end keyframes and let video AI (H3) interpolate the motion—which exposed two challenges in our first test:
As the camera tilts up, skyscraper silhouettes and the whale's proportions morph mid-shot, and in this test the lights ended up drifting upward at roughly the same flat speed.
City buildings and the whale stay rock-solid while 5,246 rounded paper lanterns peel off windows in a staggered wave, varying in speed, sway, and spin as they swirl into the whale.
Realizing that particle choreography belongs in 3D rather than video AI, we generated up to 5,246 rounded washi-paper lantern meshes (96 vertices / 98 faces each—approx. 500,000 vertices total) in Blender and gave every single lantern its own motion and shader parameters:
1. Outward "Wave" Launch Timing:
- Instead of launching all at once, an invisible wave expands outward from Roku's central skyscraper (at 260 m/s in Cut 16; 110 m/s in the aerial flyover). As the wave reaches each building, lanterns peel away from windows with a 0.6 s random spread (with 12–30% already airborne at frame 0 so the sky vortex feels alive immediately).
2. Per-Lantern Climb Speed, Sway, Spin & Vortex:
- Climb speed (9–46 m/s), horizontal sway (0.4–3.2 m), and gentle 3D tumbling (0.25–0.85 rad/s around random axes) vary per lantern. As they approach the whale, all lanterns curl 63–138 degrees in the same rotational direction, forming one cohesive celestial whirlpool.
3. Warm Washi-Paper Shader & Subtle Color Variation:
- Plain glowing cubes looked like retro video-game pixels, so after testing glass and frosted glass, we built a rounded washi-paper lantern shader—creamy warm white at the center of each face, deeper orange along the edges, with subtle paper fiber streaks.
- To keep the palette rich without looking chaotic, roughly 20% shift slightly toward mint green and 20% toward warm coral/pink, while each lantern breathes on its own dual-sine-wave flicker.
4. Distance Scale Compensation (FAR_GROW):
- At true physical scale (0.4–1.25 m per lantern), lanterns rising 300 m away shrink below 1–2 pixels and vanish. Scaling lanterns gently with camera distance keeps distant neighborhoods shimmering clearly.
5. Natural Occlusion Behind Skyscrapers (Holdout Mask):
- Rendering the lantern pass with all 615 buildings set as a black holdout mask ensures lanterns rising behind skyscrapers stay naturally hidden until they clear the rooftops.
5. Step 3 (Layered Pipeline & H3 Character Compositing): Finishing a 59.6s MV on One MacBook Air
Cramming 615 buildings, thousands of lanterns, a 360 m 3D whale, and 2D anime character animation into one monolithic scene would bring a fanless laptop to its knees.
The reason the entire MV ran smoothly on a single 15-inch MacBook Air (M4, 24 GB RAM) is that we isolated every visual element into independent layers, tuned lantern counts to each camera's field of view, and re-rendered only the exact layer and cut being tweaked.
| Layer | Where & How It Runs | Contents & M4 MacBook Air Render Time |
|---|---|---|
| ① City, Windows & Depth | Local (Blender 5.2 EEVEE) | 615 3D buildings + multi-view AI camera-map plates + blinking windows + depth pass (11 min 23 sec for the 336-frame flyover). |
| ② Washi Lantern Pass | Local (Blender 5.2) | Lanterns rendered against black building holdouts: 5,246 lanterns for full-city flyover & Cut 16 (6 min 9 sec for 336 frames), 760 for intro cuts (02–04), and 1,800 for chorus/outro cuts (16–21, ~2 sec/frame). Can run in parallel with Layer ①. |
| ③ Sky Whale & Companion | Local (Blender 5.2) | Separate 3D pass for the 360 m dark-city-fragment whale scattered with tiny lights and Roku's glowing companion (Cue). |
| ④ Roku Anime Character | Cloud (fal.ai H3 MAX / H3 MAX Turbo) | Generated from blue-checkerboard 3D camera guides (or start/end keyframes) + Roku's model sheet + vocal audio, then chroma-keyed onto the matching 3D camera. |
| ⑤ Final Python Composite | Local (Python / OpenCV / FFmpeg) | Combines Layers ①–④ with depth-of-field blur (up to 9 px background blur on close-ups), 3-stage lantern bloom (3 / 10 / 30 px), and 3D-tracked neon handwriting lyrics (3 min 30 sec for the 336-frame flyover). |
Because both layers and cuts are decoupled, whenever we thought *"let's soften the lantern corners a bit"* or *"let's retake Roku's expression in this one shot,"* we never touched the heavy 615-building city render or neighboring cuts—we simply swapped the modified layer for that single cut in 1–2 minutes and iterated as many times as we wanted!
6. AI Agent Prompt Specification: "Large-Scale 3D City × Controlled Lanterns × H3 MV" (Starter Template)
Below is a starter specification you can hand to an AI coding agent (Claude Code, Codex, Antigravity, etc.) to build a similar pipeline combining lightweight 3D urban geometry, AI camera-map painting, thousands of individually controlled 3D lights, and H3 character compositing. Adapt the parameters to your song and hardware, and review test renders at each step.
# For AI Agents: Lightweight 3D Metropolis × AI Camera-Map Painting × Thousands of 3D Lights × H3 Character MV Spec

You (the AI agent) combine headless Blender (`bpy`), image generation AI, video generation AI (fal.ai `H3 MAX` / `H3 MAX Turbo`), and Python compositing (OpenCV/NumPy/FFmpeg) to build a 2D-illustrated music video pipeline capable of animating hundreds of buildings and thousands of glowing 3D objects smoothly on a standard laptop.

## Step 0: Zero-Window-Polygon 3D City & Procedural Shader Windows
1. Generate urban buildings (hundreds of structures) strictly as plain 6-face rectangular boxes; model detailed geometry only for close-up stage props (rooftop guardrails, units, signage).
2. Add zero window geometry. Inside the building shader, compute window grids and lit masks procedurally from `(building_id, wall_uv)`—keeping `building_id` within safe floating-point hash precision. Animate per-window ON/OFF cycles (3–12 s) and subtle shimmer.
3. Render a fast mannequin previz synced to the song's beat map for user approval before running paid video AI.

## Step 1: ID-Boundary Line Art, AI Painting & Multi-View Camera Mapping
1. Along the camera trajectory (6–7 viewpoints), render unlit gray shading plus a color-ID pass, extracting clean outline art from ID boundaries (avoiding Freestyle hidden-line bleed-through).
2. Paint the outline drafts with image AI in a consistent illustration style and verify median edge alignment (~1–2 px).
3. Pack `RGB = painted plate` and `Alpha = viewpoint depth (16-bit PNG)` into single textures to stay under EEVEE's per-material texture slot limit. Project from all viewpoints, selecting the nearest visible viewpoint per surface fragment, and composite Step 0's blinking window pass + distance fog on top.

## Step 2: Per-Instance 3D Choreography for Thousands of Glowing Objects
1. To finely control the motion, speed, and timing of individual lights, instantiate 1,000–5,000 rounded 3D lantern meshes in Blender.
2. Seed each instance independently for: (a) outward wave launch time + random jitter, (b) individual climb velocity and lateral sway, (c) shared vortex curl toward the sky target + random local spin, (d) multi-sine flicker and subtle warm/pastel paper color shifts, and (e) camera-distance scale compensation (`FAR_GROW`) so distant lights >300 m remain visible.
3. Set all city buildings as a black holdout mask when rendering the lantern pass for accurate occlusion, and shrink scale to zero (rather than dimming albedo) when lanterns dissolve.

## Step 3: Decoupled Layer Rendering & Python Final Composite
1. Render independent passes: (1) City + Windows + Depth, (2) Lanterns, (3) Distant Mega-Objects, and (4) Blue-Checkerboard-Guided H3 Character Clips. Re-render only modified layers/cuts during revisions.
2. In Python, chroma-key the character, apply depth-based lens blur on close-ups, add multi-radius bloom (3 / 10 / 30 px) to lanterns, composite 3D-tracked lyrics, and verify photosensitive flash safety (< 3 Hz) before final FFmpeg muxing.
7. Related Guides & Watch the Full MV
"Singularity (English Ver.)" is available on our MUSIC / MV page as well as YouTube, TikTok, and X (with free MP3 and full MV downloads on our official site). Enjoy the story of Roku, her tiny glowing companion, and the 5,246 lanterns rising across the night city!
For more deep dives into Blender camera mapping, one-shot interior MVs, and H3 character workflows, check out these guides:
- Zero-Polygon-Look MV Backgrounds with Meshy × Blender Camera Mapping (#033 "Maigomichi")
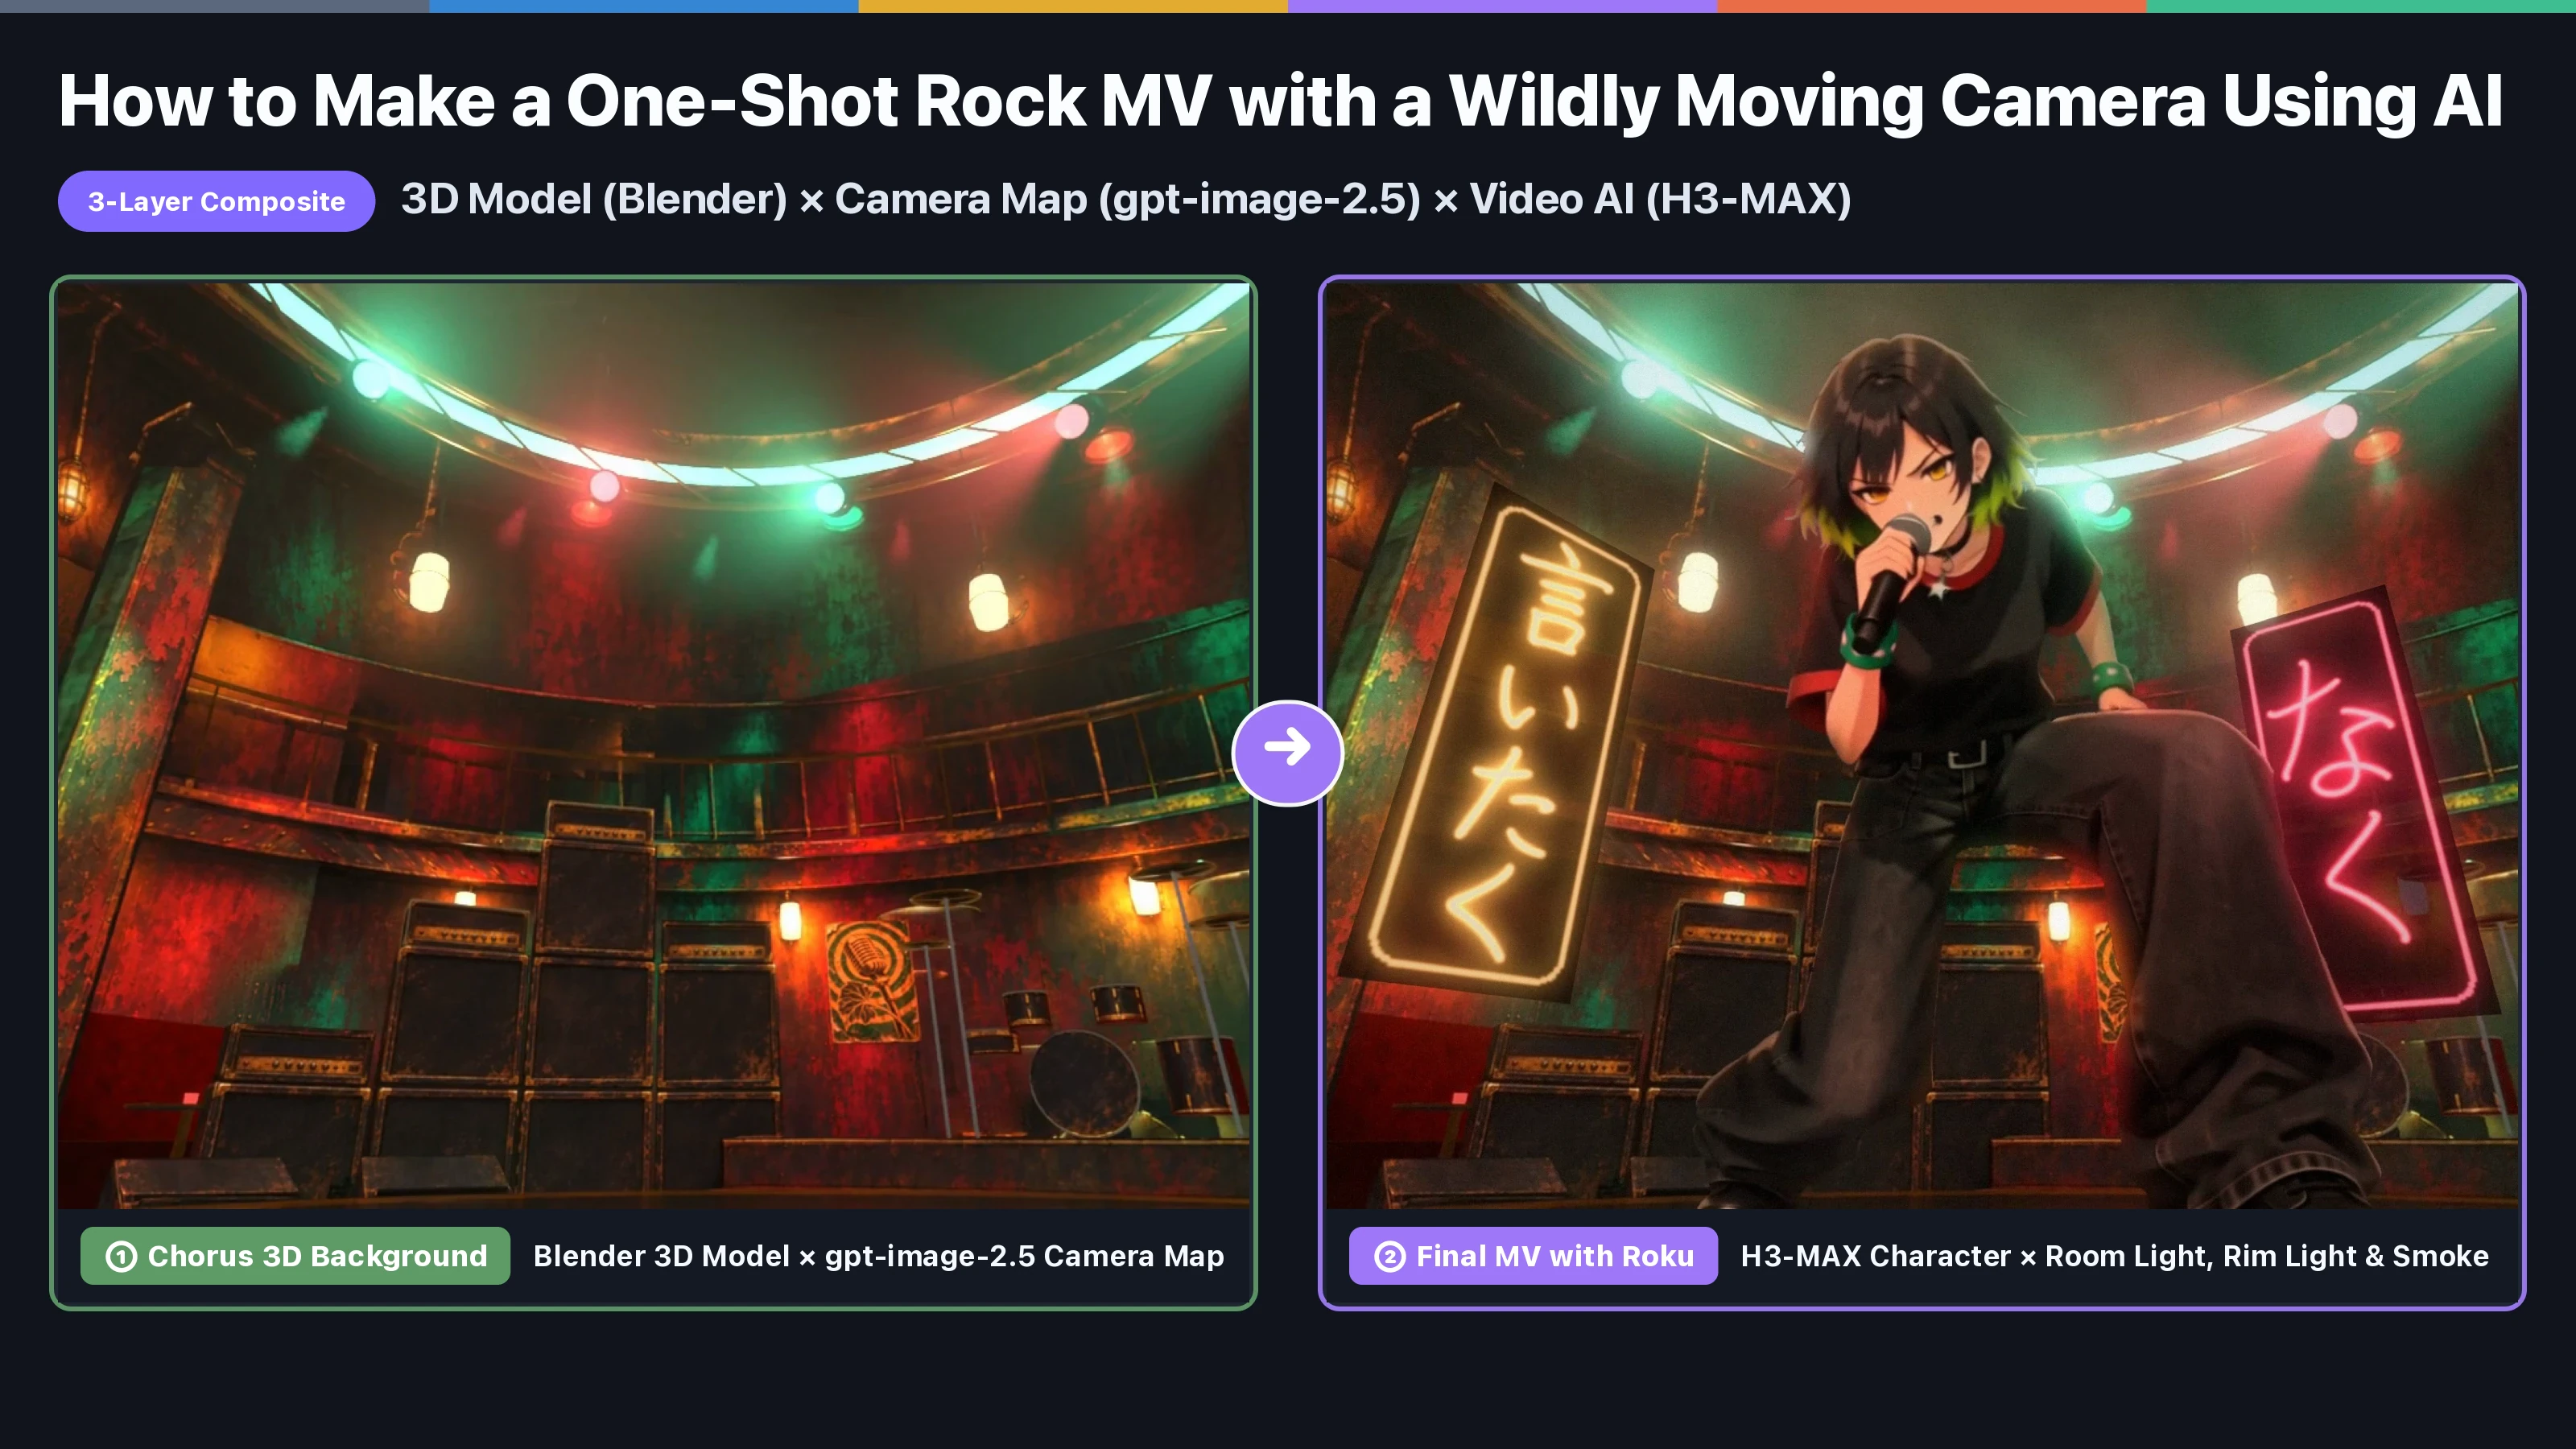
- How to Make a Dynamic One-Shot Rock MV with AI — 3-Layer Compositing with Blender 3D × Camera Mapping × H3 MAX (#035 "Secret")
- Blender 5.2 Crash Course for 2D Illustrators & MV Creators (JP)
- Image & Video AI Basics: Making Consistent Character Videos with gpt-image-2.5 and fal.ai H3 (JP)