Hi, I'm Rey! I produce a 6-piece virtual rock band called WASHABI using AI.
When you make an MV with video AI (for example H3 MAX or H3 MAX Turbo on fal.ai), wouldn't it be cool if, instead of stitching short cuts together, you could make a long-take, one-shot MV where the camera roams freely all around a single room?
The problem is that if you move the camera a lot with video AI alone, even a small sideways pan turns the room's walls and furniture into something else, so you can't keep the same space intact for a whole song.
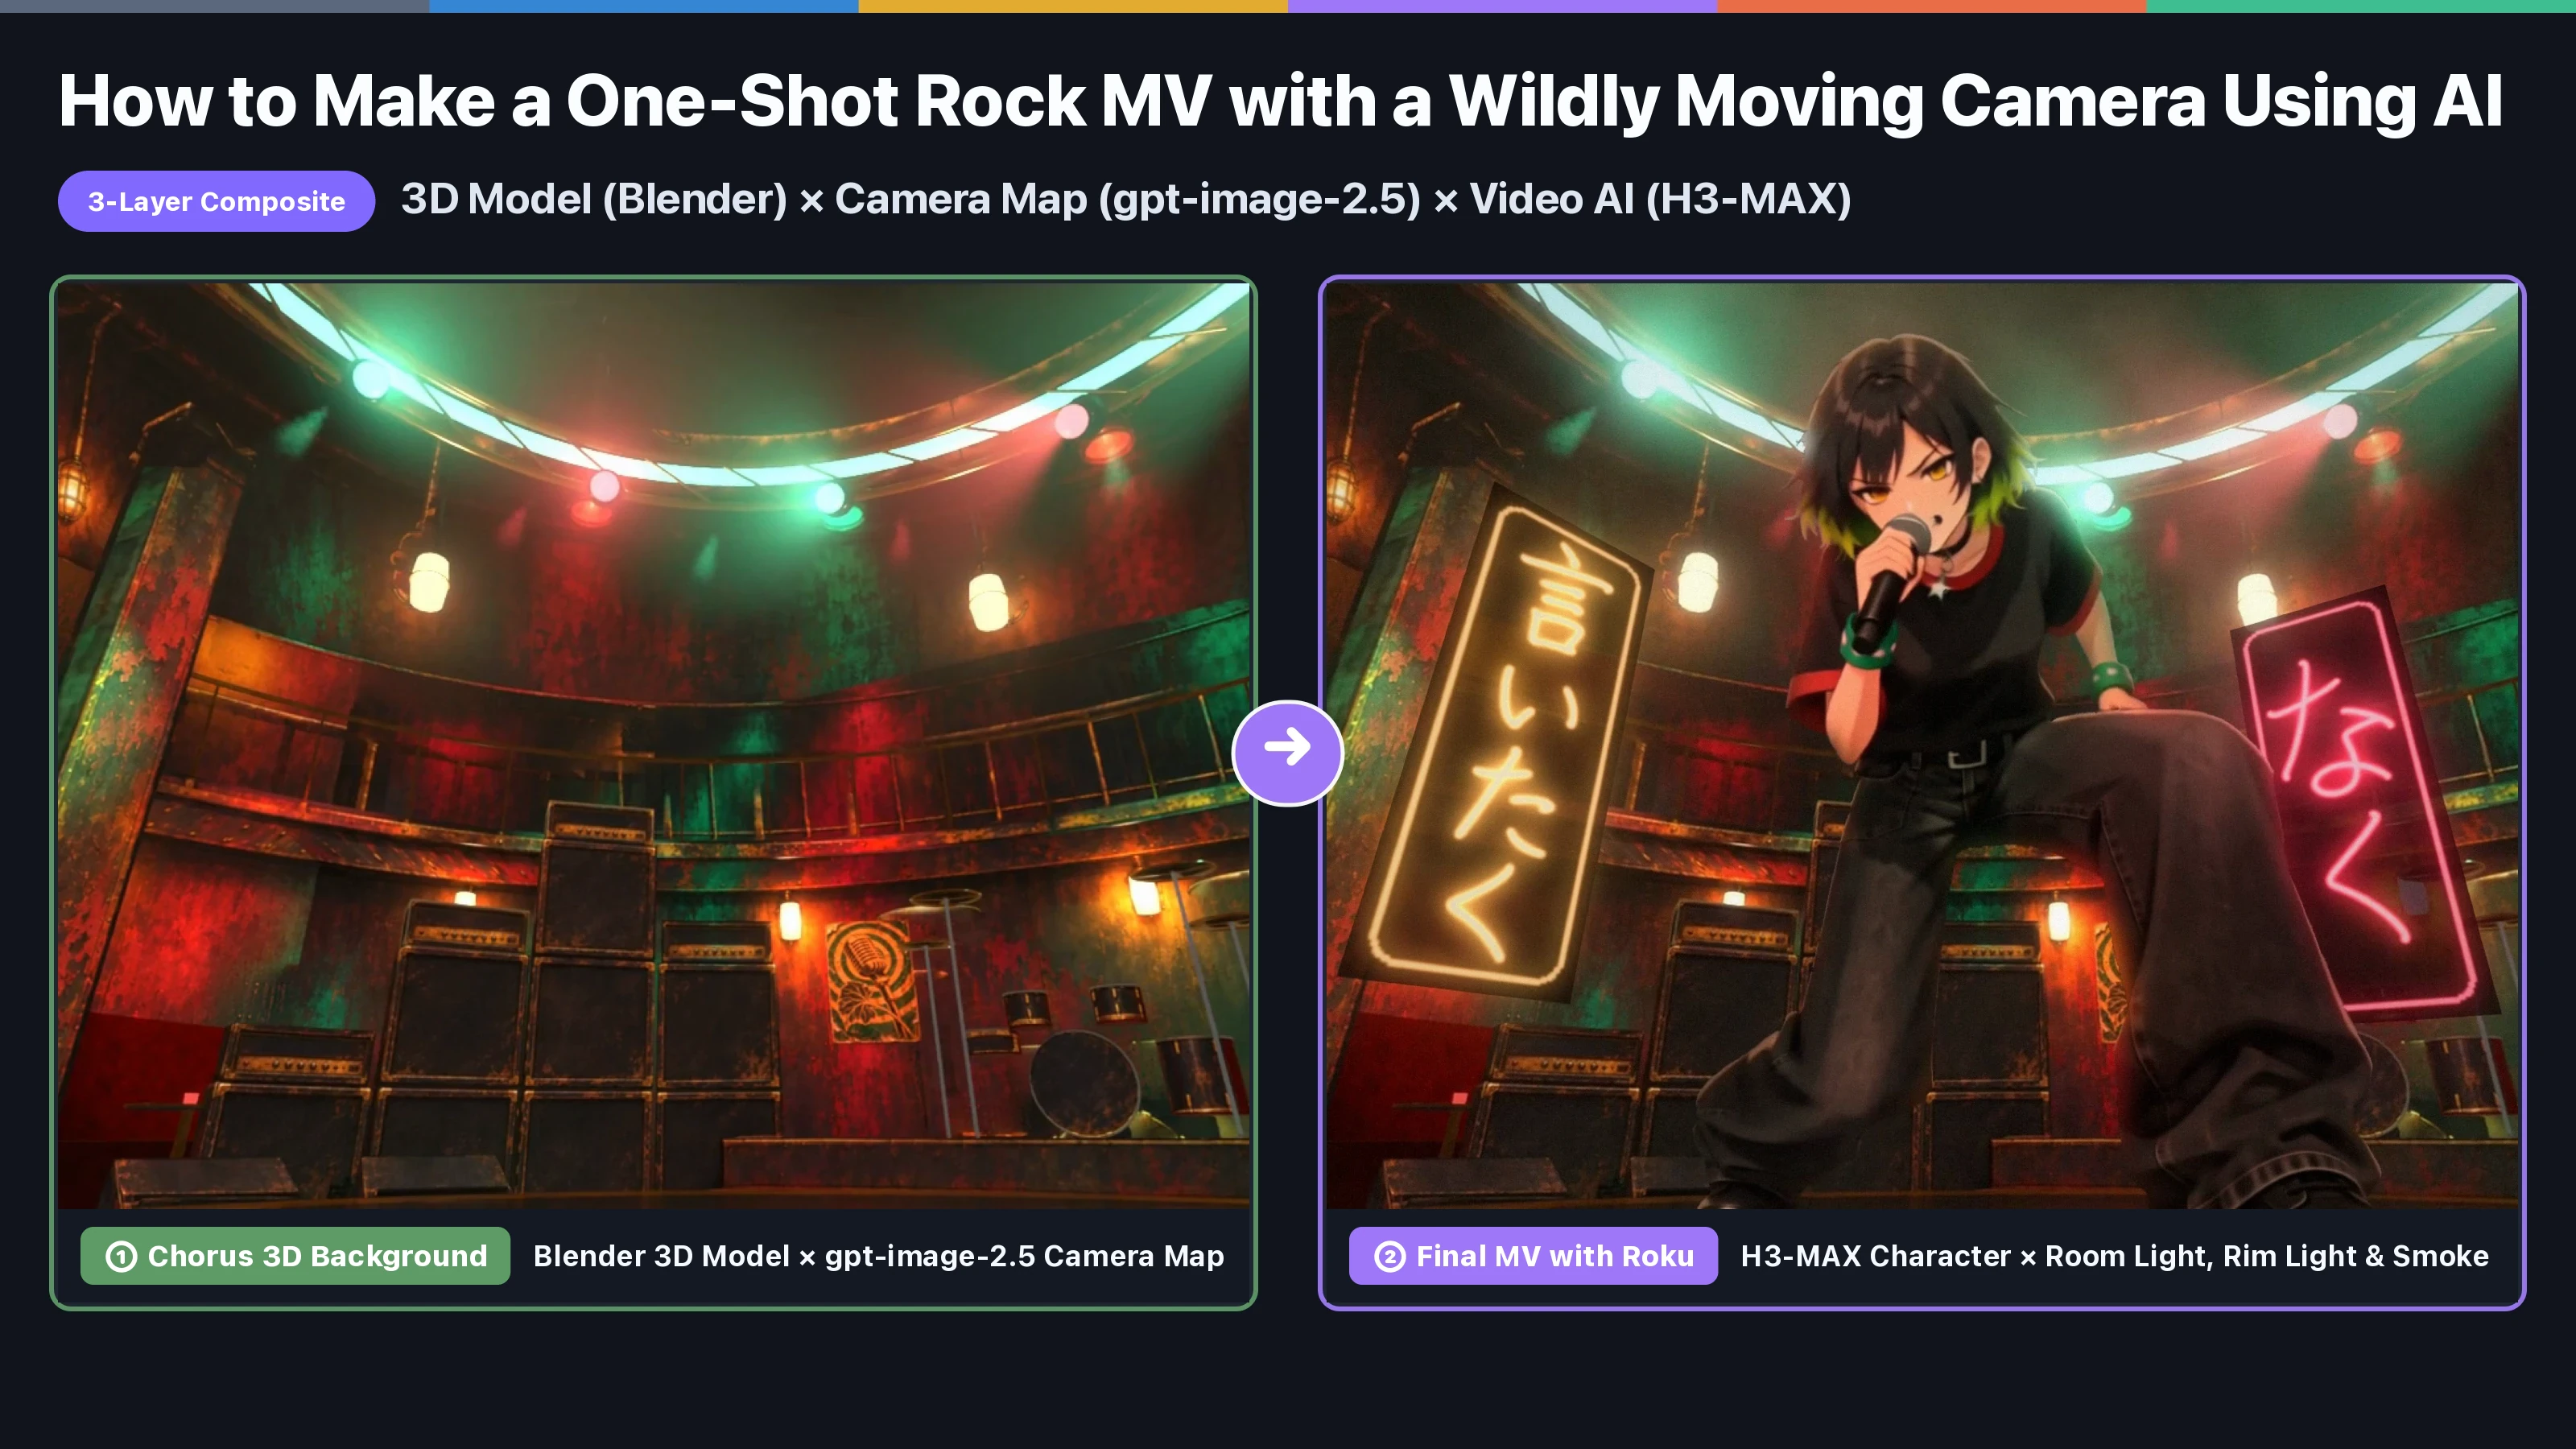
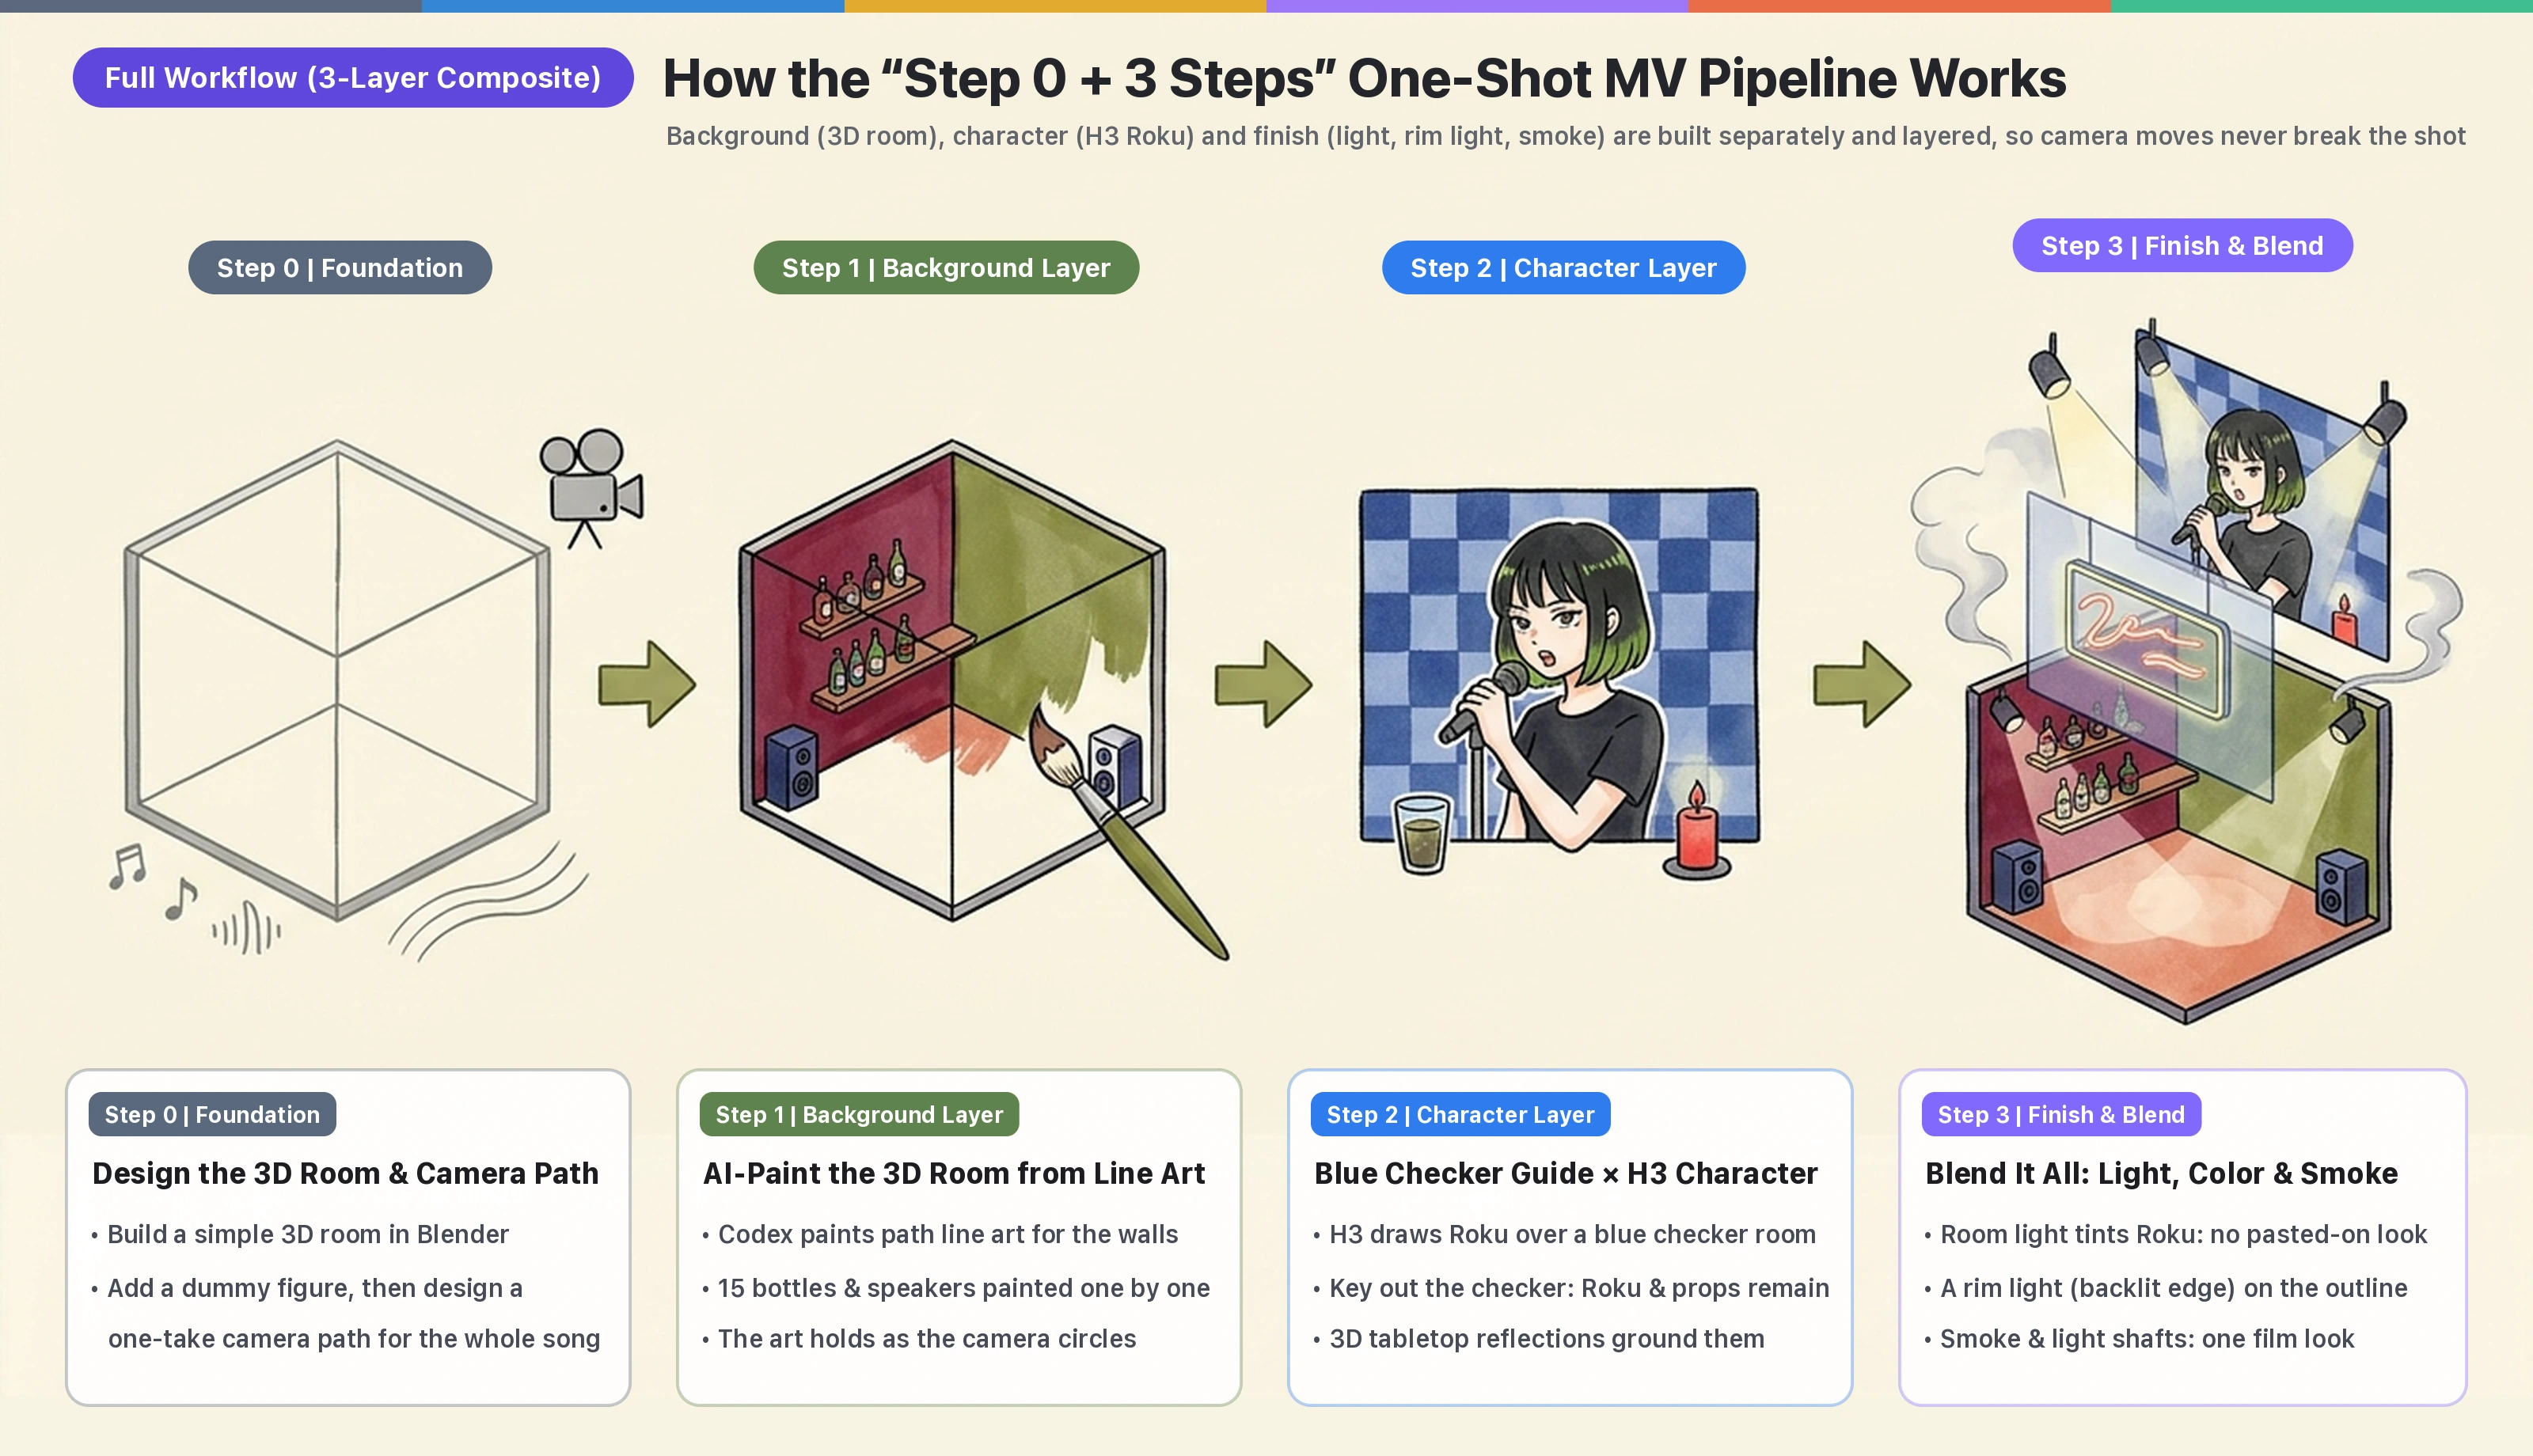
So for our new song "#035 Secret" (54.8 seconds, garage rock), I worked with our AI agent Maru to build a pipeline that splits the work into ① a 3D room (background), ② an H3 MAX character video shot against a blue checker guide (character), and ③ blending in the room's light colors, rim light and smoke (finish), then layers them all through the same 3D camera!
This post covers steps like "building a 3D room in Blender," "baking AI paintings onto each object," and "keying out a blue checkerboard and compositing," but I didn't do any of it by hand.
For this production, I (Rey) never opened the Blender window even once. I gave instructions to AI agents (Claude Code, Codex, Antigravity, etc.), checked what came back and asked for fixes, and over many rounds of that we built everything as Python scripts, from the 3D scene to painting, compositing and finishing.
At the end of the article you'll also find a starter prompt for having your own AI agent set up a similar pipeline (it won't produce a finished MV on its own; you'll still need to check and adjust each step).
1. What Can These 3 Steps (+ Step 0) Do?
First, take a look at the one-shot MV for "#035 Secret" (54.8 seconds in full) made with this method!
From the audience table at the start to the stage, the move during the interlude, the bar counter in verse 2, and the final shout & chorus, the camera keeps moving through the underground bar for 54.8 seconds, yet the brick walls, amps and bottles on the shelves never break, and everything holds together as one space.
With the "Step 0 + 3 steps" in this post, a space that starts out as a simple 3D model evolves, stage by stage, into "a 2D anime one-shot MV with zero breakage."
Here is how the actual verse 2 scene (at the bar counter) changes from Step 0 to Step 3, side by side!
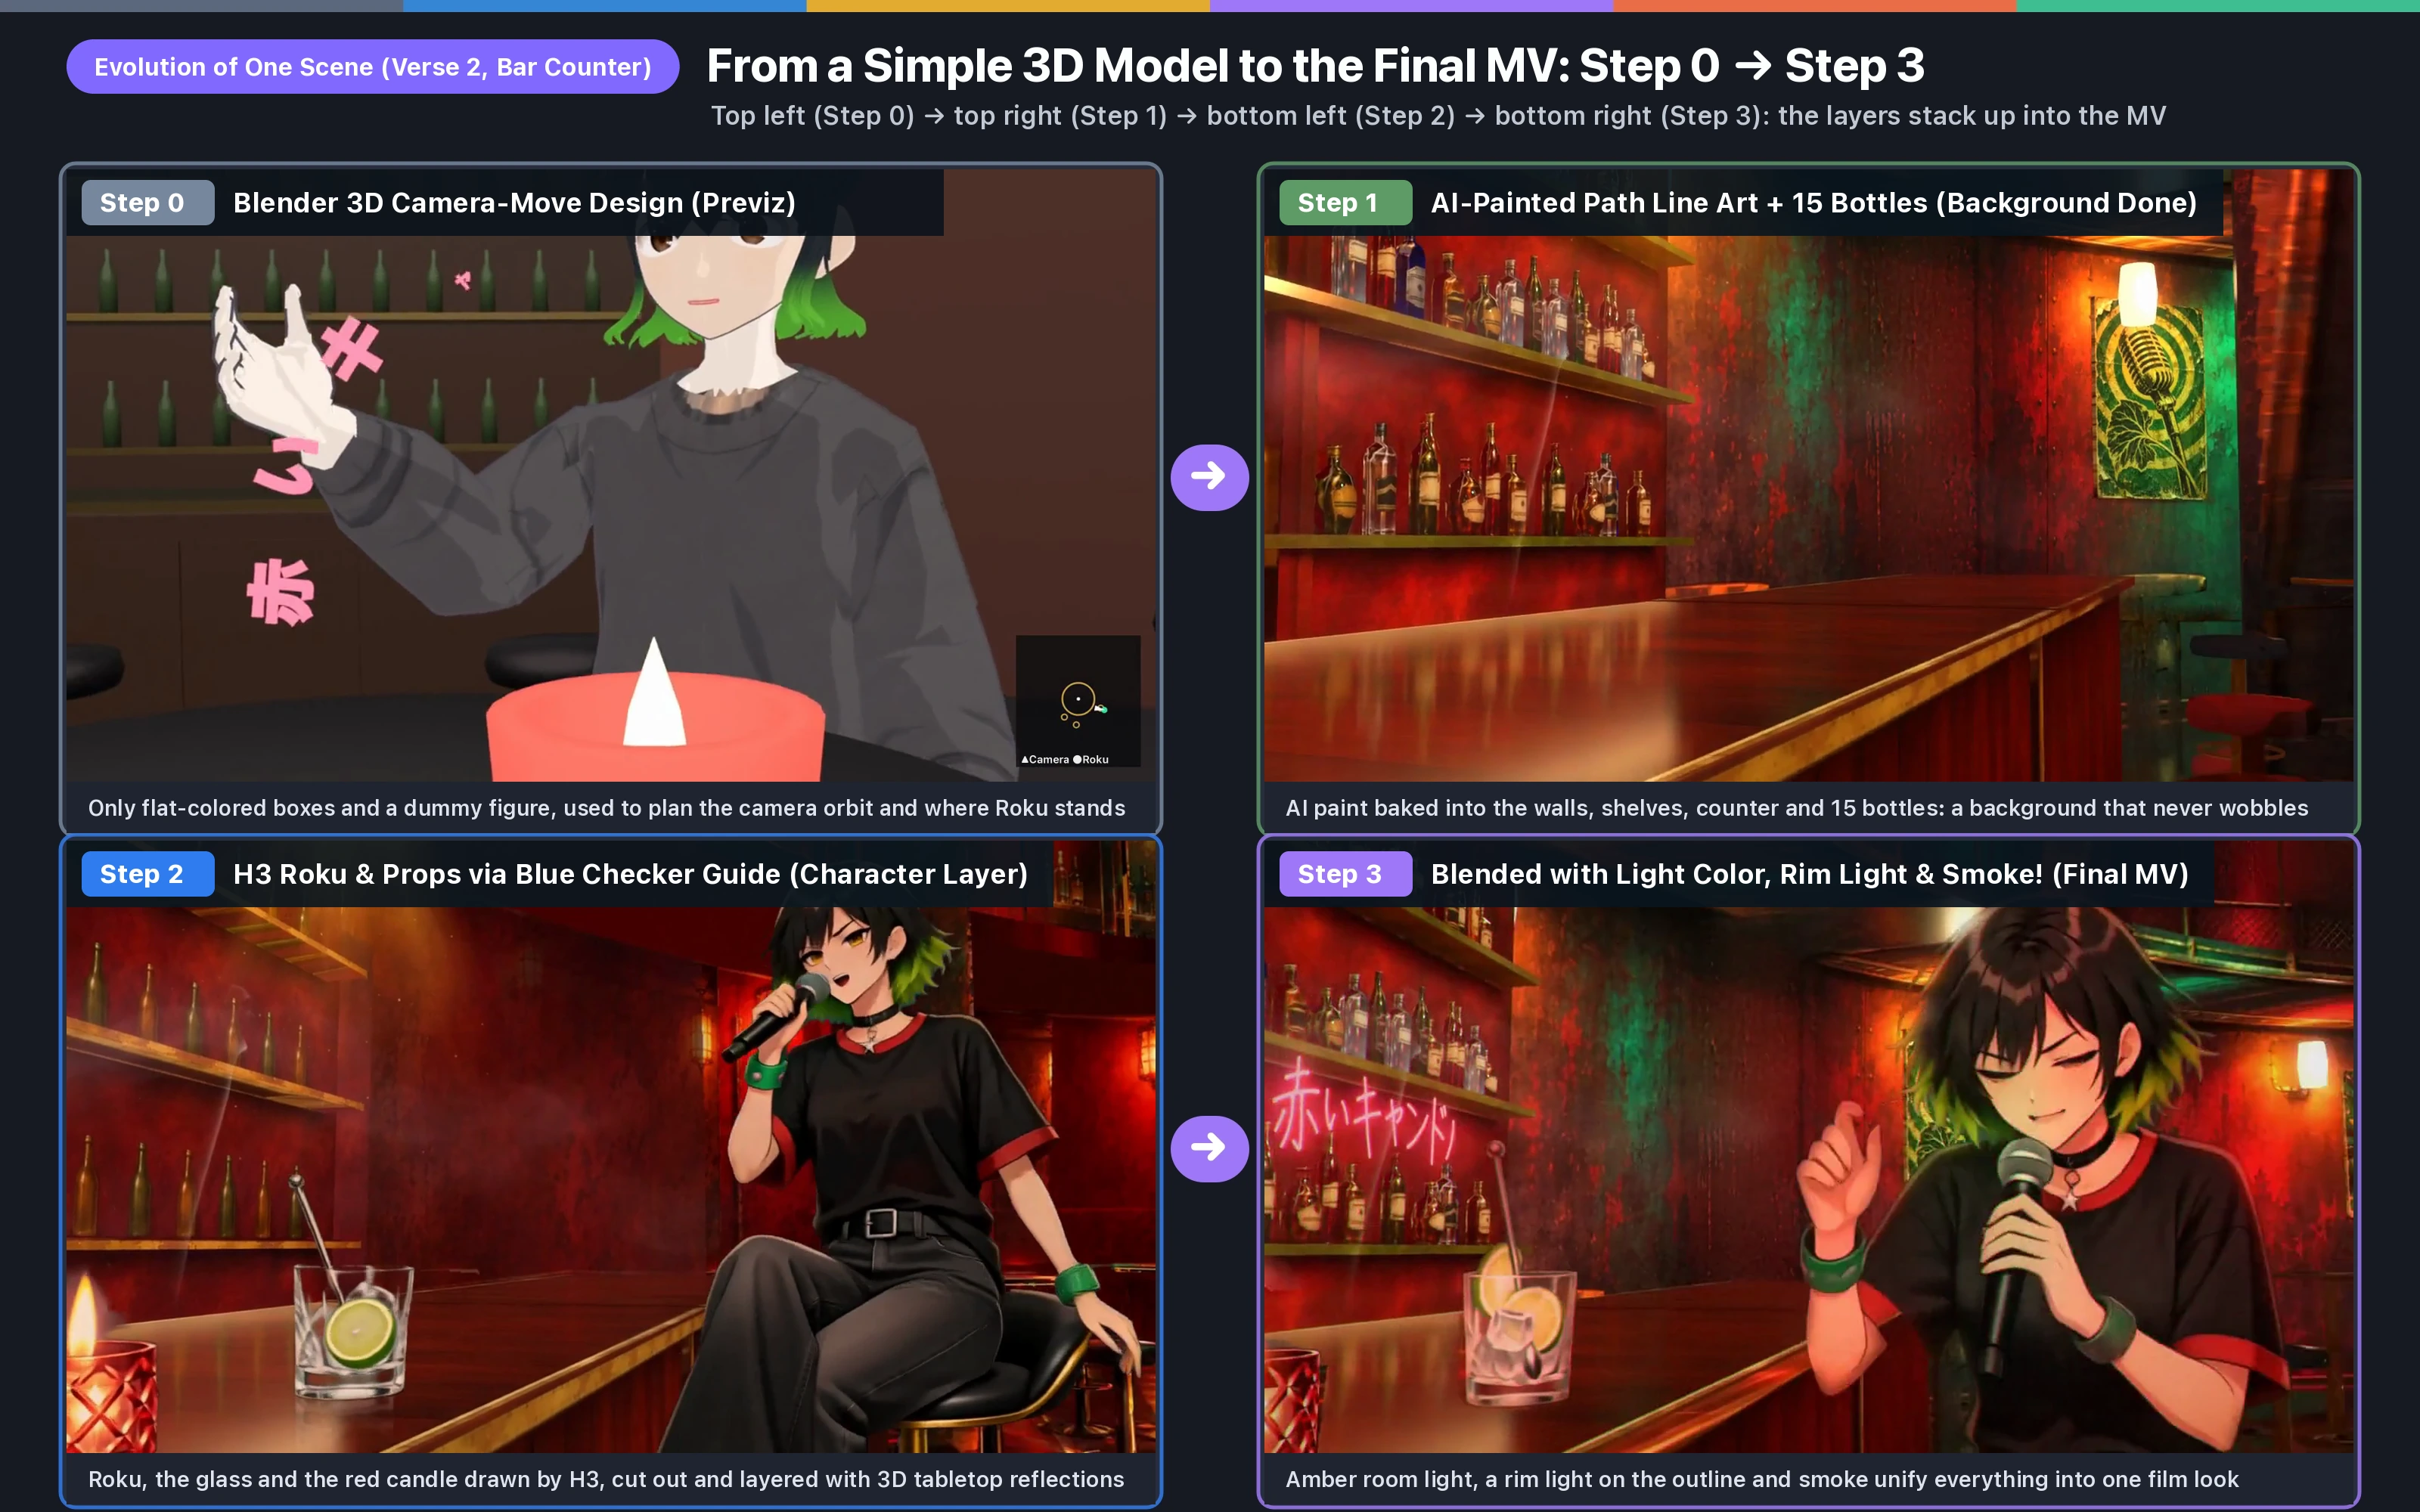
- Step 0 (3D model & camera-move design): Build a simple 3D room and furniture in Blender, and make a blueprint (previz) of "when and where the camera passes" that follows the song's progression.
- Step 1 (camera-map AI painting of the 3D room): Paint the 3D line art seen from the camera's path with image AI (
gpt-image-2.5), then apply it object by object (walls, shelves, 15 kinds of liquor bottles, and so on) to create "a 3D background whose art style never falls apart, wherever you shoot it from." - Step 2 (H3 MAX generation over a blue checker guide & cutout compositing): Using a guide video in which the room is turned into "a fine blue checkerboard pattern," have video AI (fal.ai
H3 MAX) draw Roku and the props in her hands (a glass and a candle), then key out only the blue checker and layer the result over the Step 1 background together with tabletop reflections. - Step 3 (finishing with light, color and smoke): Layer on "the room's light colors, shadows matched to the room's color, a rim light along the outline, and smoke that moves with the camera" to fully blend the AI-drawn Roku into the 3D room.
2. Step 0 (3D Design): Build a Simple 3D Room and Camera Moves in Blender
The most important foundation of a one-shot MV is to decide "what is where in the room, and what path the camera takes" with a simple 3D model first, before you run any video AI.
First, we used Python's librosa to extract every beat time and the length of each phrase from the song (54.83 seconds). Matching those, we placed a simple 3D model of the underground bar in Blender (stage, amps, drums, audience tables, bar counter, liquor shelves) along with a human-shaped guide.
Following the song's progression, we split the 54.8 seconds into 5 blocks (① the audience table at the start → ② the stage in chorus 1 → ③ the move during the interlude → ④ the bar counter in verse 2 → ⑤ the shout & chorus 2) and designed the camera's push-ins, pull-backs and orbits. Here is the resulting previz video.
Before running any video AI (at zero cost), we check on plain single-color 3D models and a human-shaped guide whether the song's beat and the speed of the camera's push-ins, pull-backs and orbits lock together nicely.
3. Step 1 (Background Layer): AI-Paint Line Art Drawn Along the Camera Path and Camera-Map It onto the 3D Room and Bottles
Once Step 0 has fixed the simple 3D model and the camera moves, the next step is to evolve them into "an underground-bar background with the density of a hand-drawn anime illustration."
In a one-shot MV where the camera roams widely around the room, the secret to avoiding seams and flicker from every angle is to "paint the 3D model's outline line art with image AI (gpt-image-2.5), then bake it onto each object in the room (walls, shelves, amps, liquor bottles, etc.) with camera mapping."
For example, here is how "the bar shelves and liquor bottles," which appear large in verse 2, go from a simple 3D model to the finished background, shown in 3 stages!
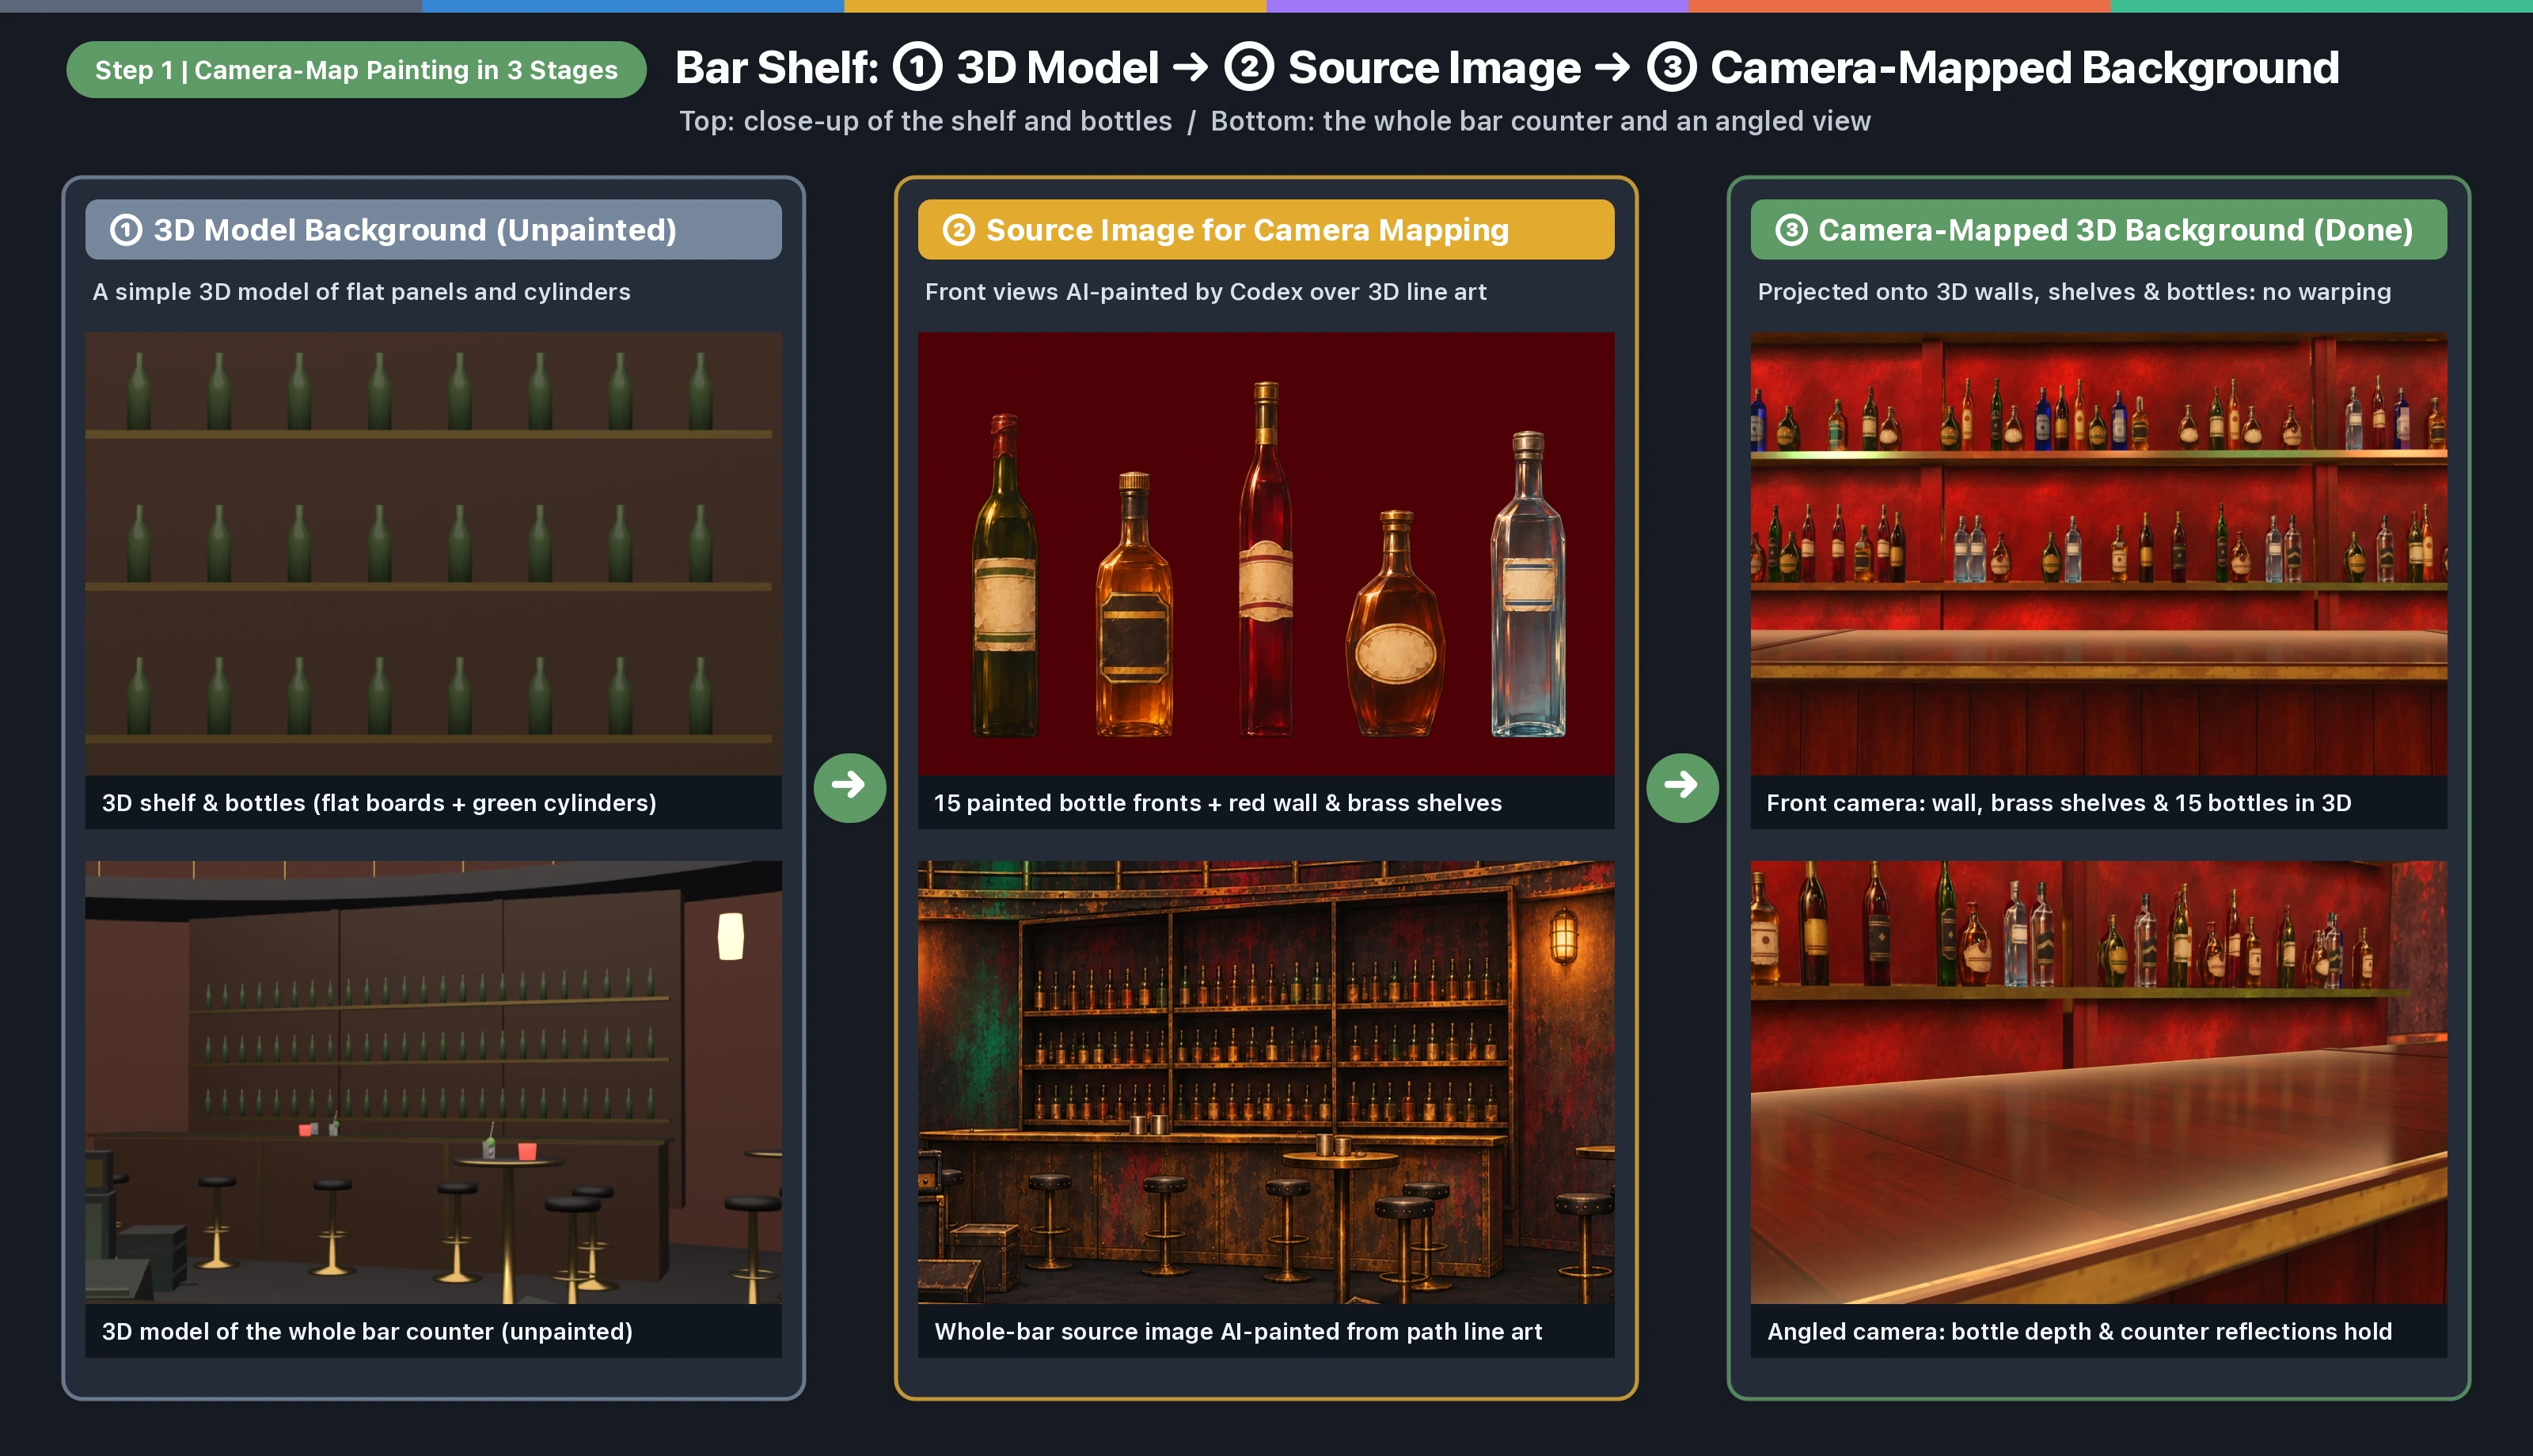
1. ① 3D model background (before painting, left):
- Before painting, the walls and shelves are single-color boards, and the bottles on the shelves are nothing more than simple green 3D cylinders (5 bottle shapes).
2. ② Source image for camera mapping (center):
- We export the 3D outline line art as seen from the camera's path and have image AI (gpt-image-2.5) paint "the texture of the red walls, the brass shelf boards and the amp grilles" and "front-view illustrations of 15 kinds of liquor bottles (liquid colors, labels, glass shine)."
- Key point: Don't let the AI paint light shafts in the air, smoke or tabletop reflections into the source image (if it does, they look stuck to the wall, so light and reflections are calculated on the 3D side).
3. ③ 3D background after camera mapping (finished, right):
- The painted source images are projected head-on onto the 3D walls, shelves and 15 bottle types (camera mapping / UV baking), then rendered with 3D mirror reflections on the counter top and spotlights added.
- Because every bottle and shelf has an actual 3D shape, even when the camera swings around at an angle, as in the bottom-right image, the bottles' depth and their reflections on the counter top never break down.
Here is the full-length "background only" video that came out of this!
The finished "background only" video: the simple 3D model from Step 0 with camera-map painting, 15 kinds of liquor bottles, 6 kinds of posters, and 3D reflections on the floor and counter top built in. Wherever the camera swings during the 54 seconds, there is no flicker or breakage at all!
4. Step 2 (Character Layer): Generate Roku with H3 MAX over a "Blue Checker Guide," Cut Her Out and Layer Her over the Background
Once Step 1 has given us the 3D background space, we create the character (Roku)'s animation with video AI (fal.ai H3 MAX / minimax/h3-max/reference-to-video) using the same camera motion, and layer it on top.
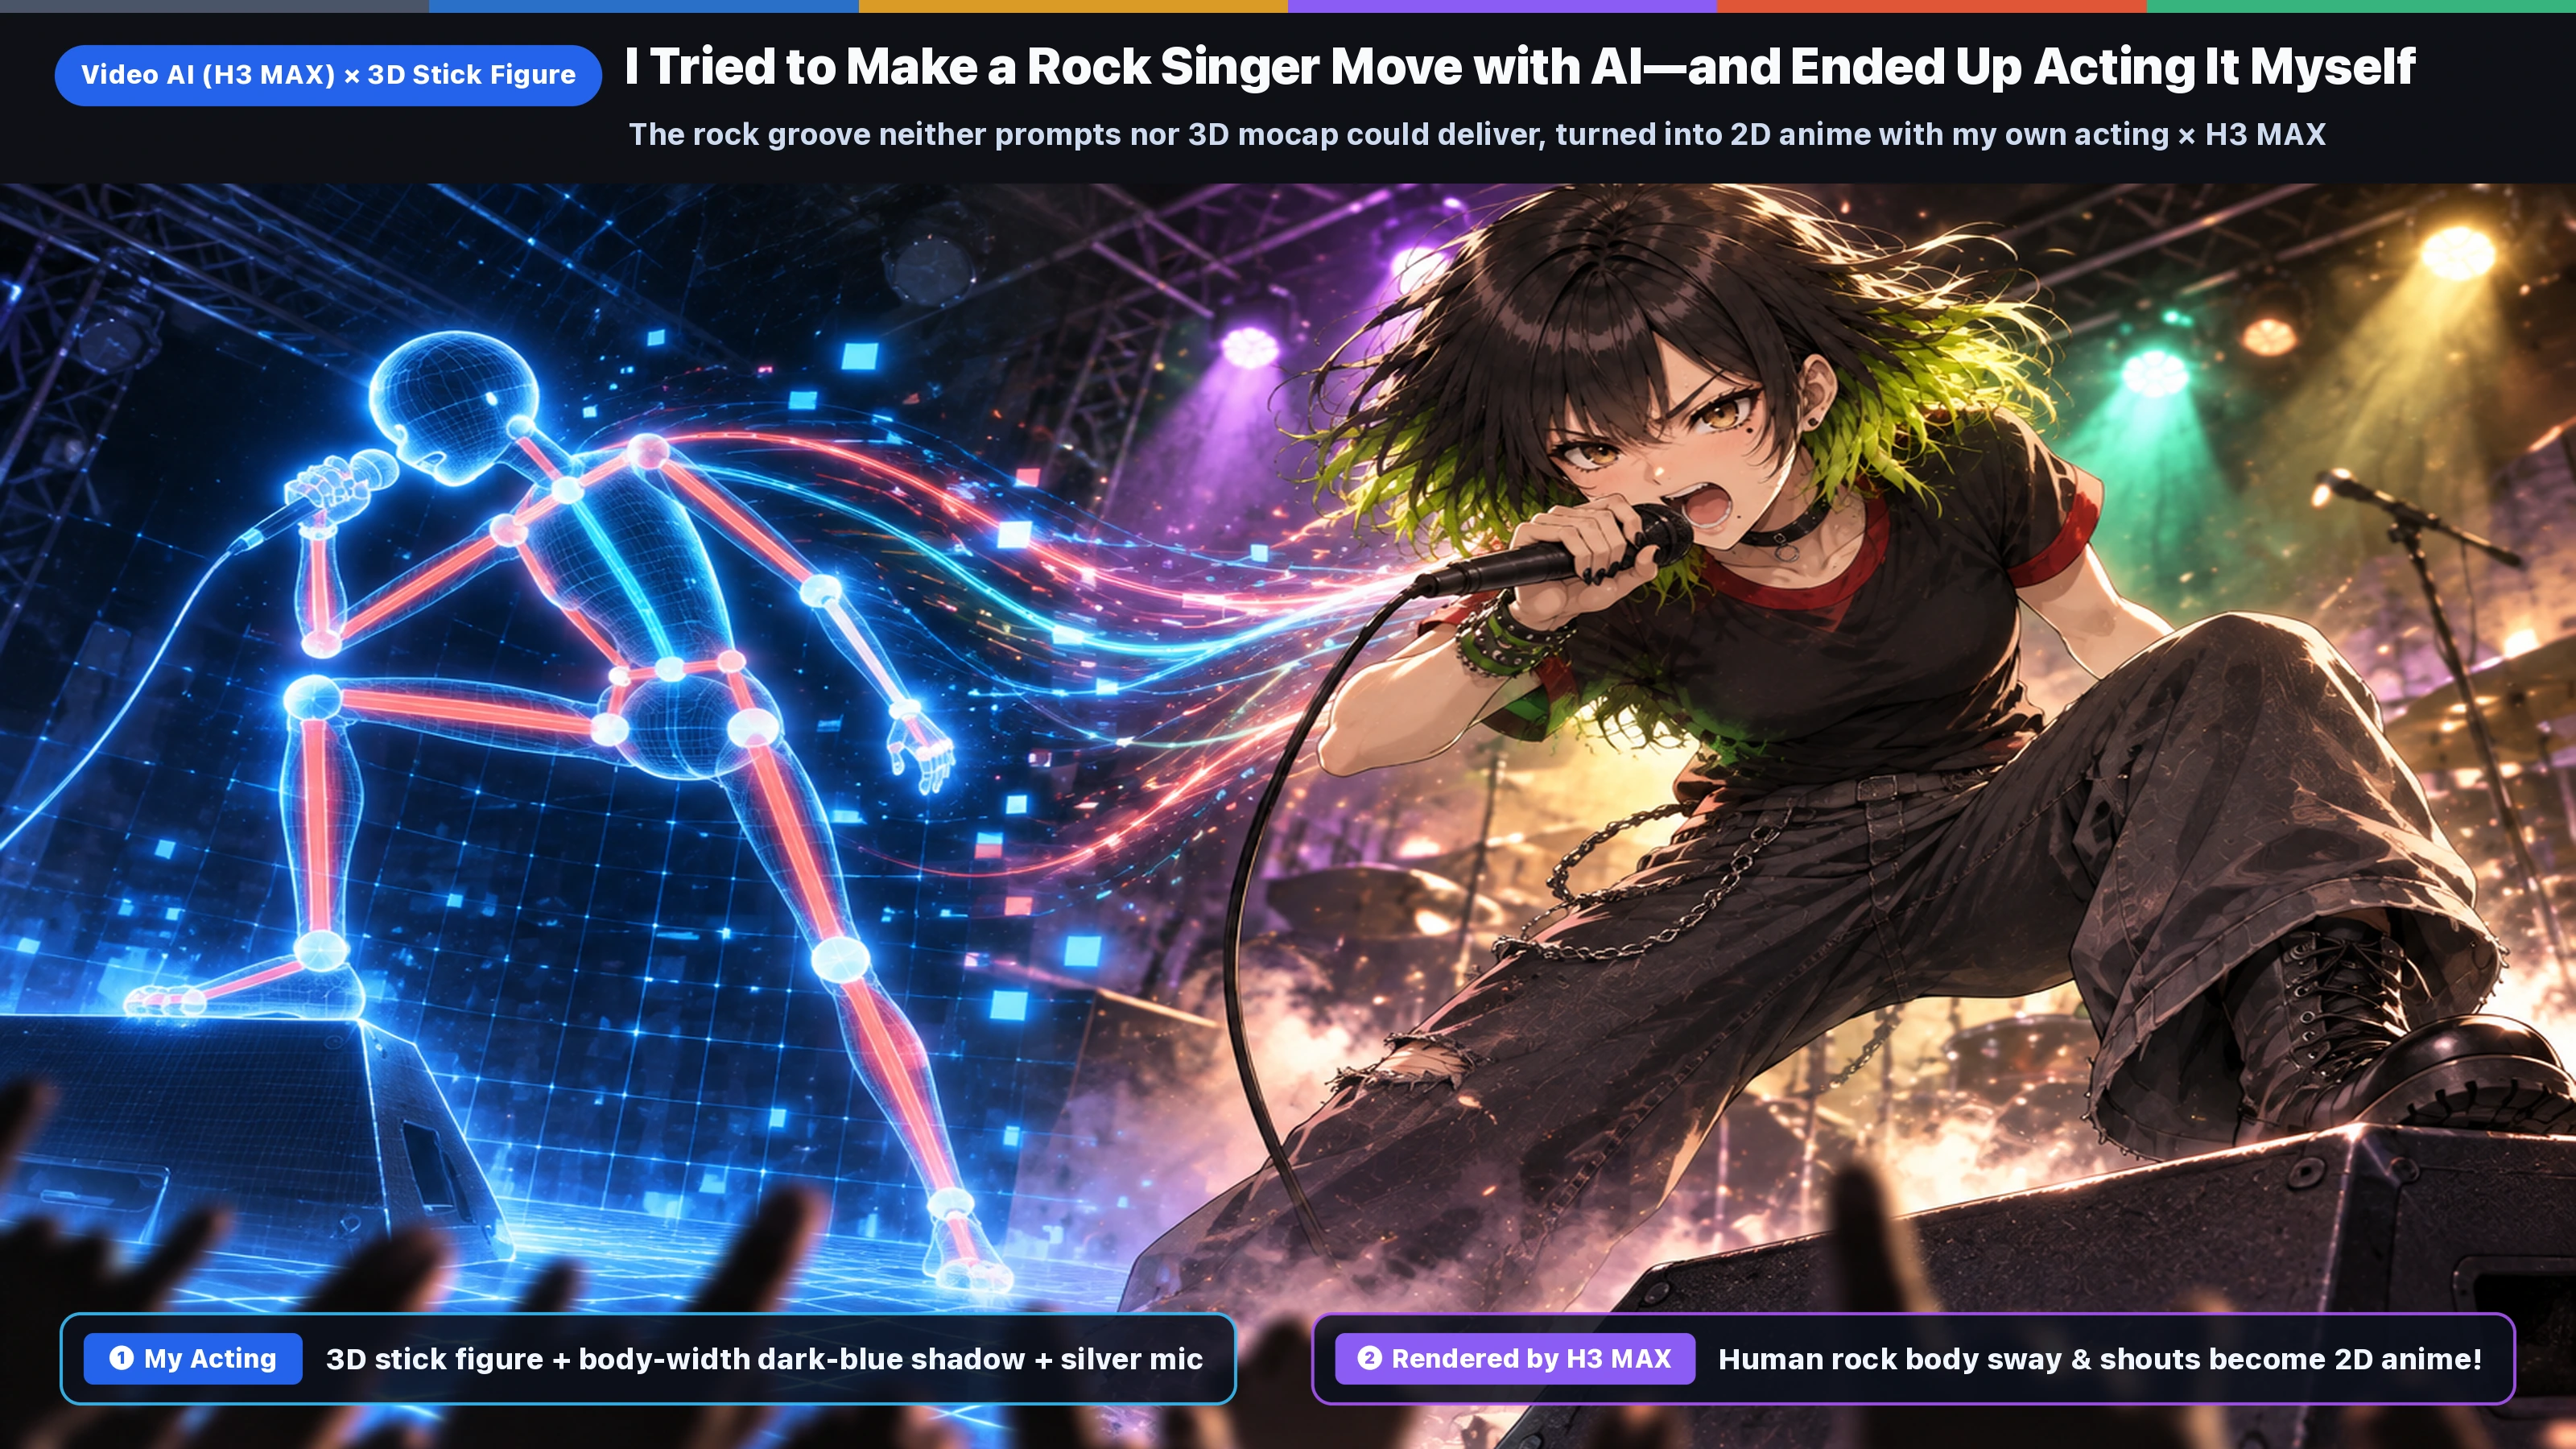
(*How we created Roku's full-body rock moves is explained in detail in Article ②: I Tried to Make a Rock Singer Move with AI—and Ended Up Acting It Out Myself: A 2D Anime MV with Video AI (H3 MAX) × 3D Stick-Figure Capture, published at the same time!)
Here we composite in 4 stages: "① doll + blue checker → ② Roku + blue checker (H3 generation) → ③ Roku cutout → ④ Roku + background." Here are the 4 stages side by side with actual frames!
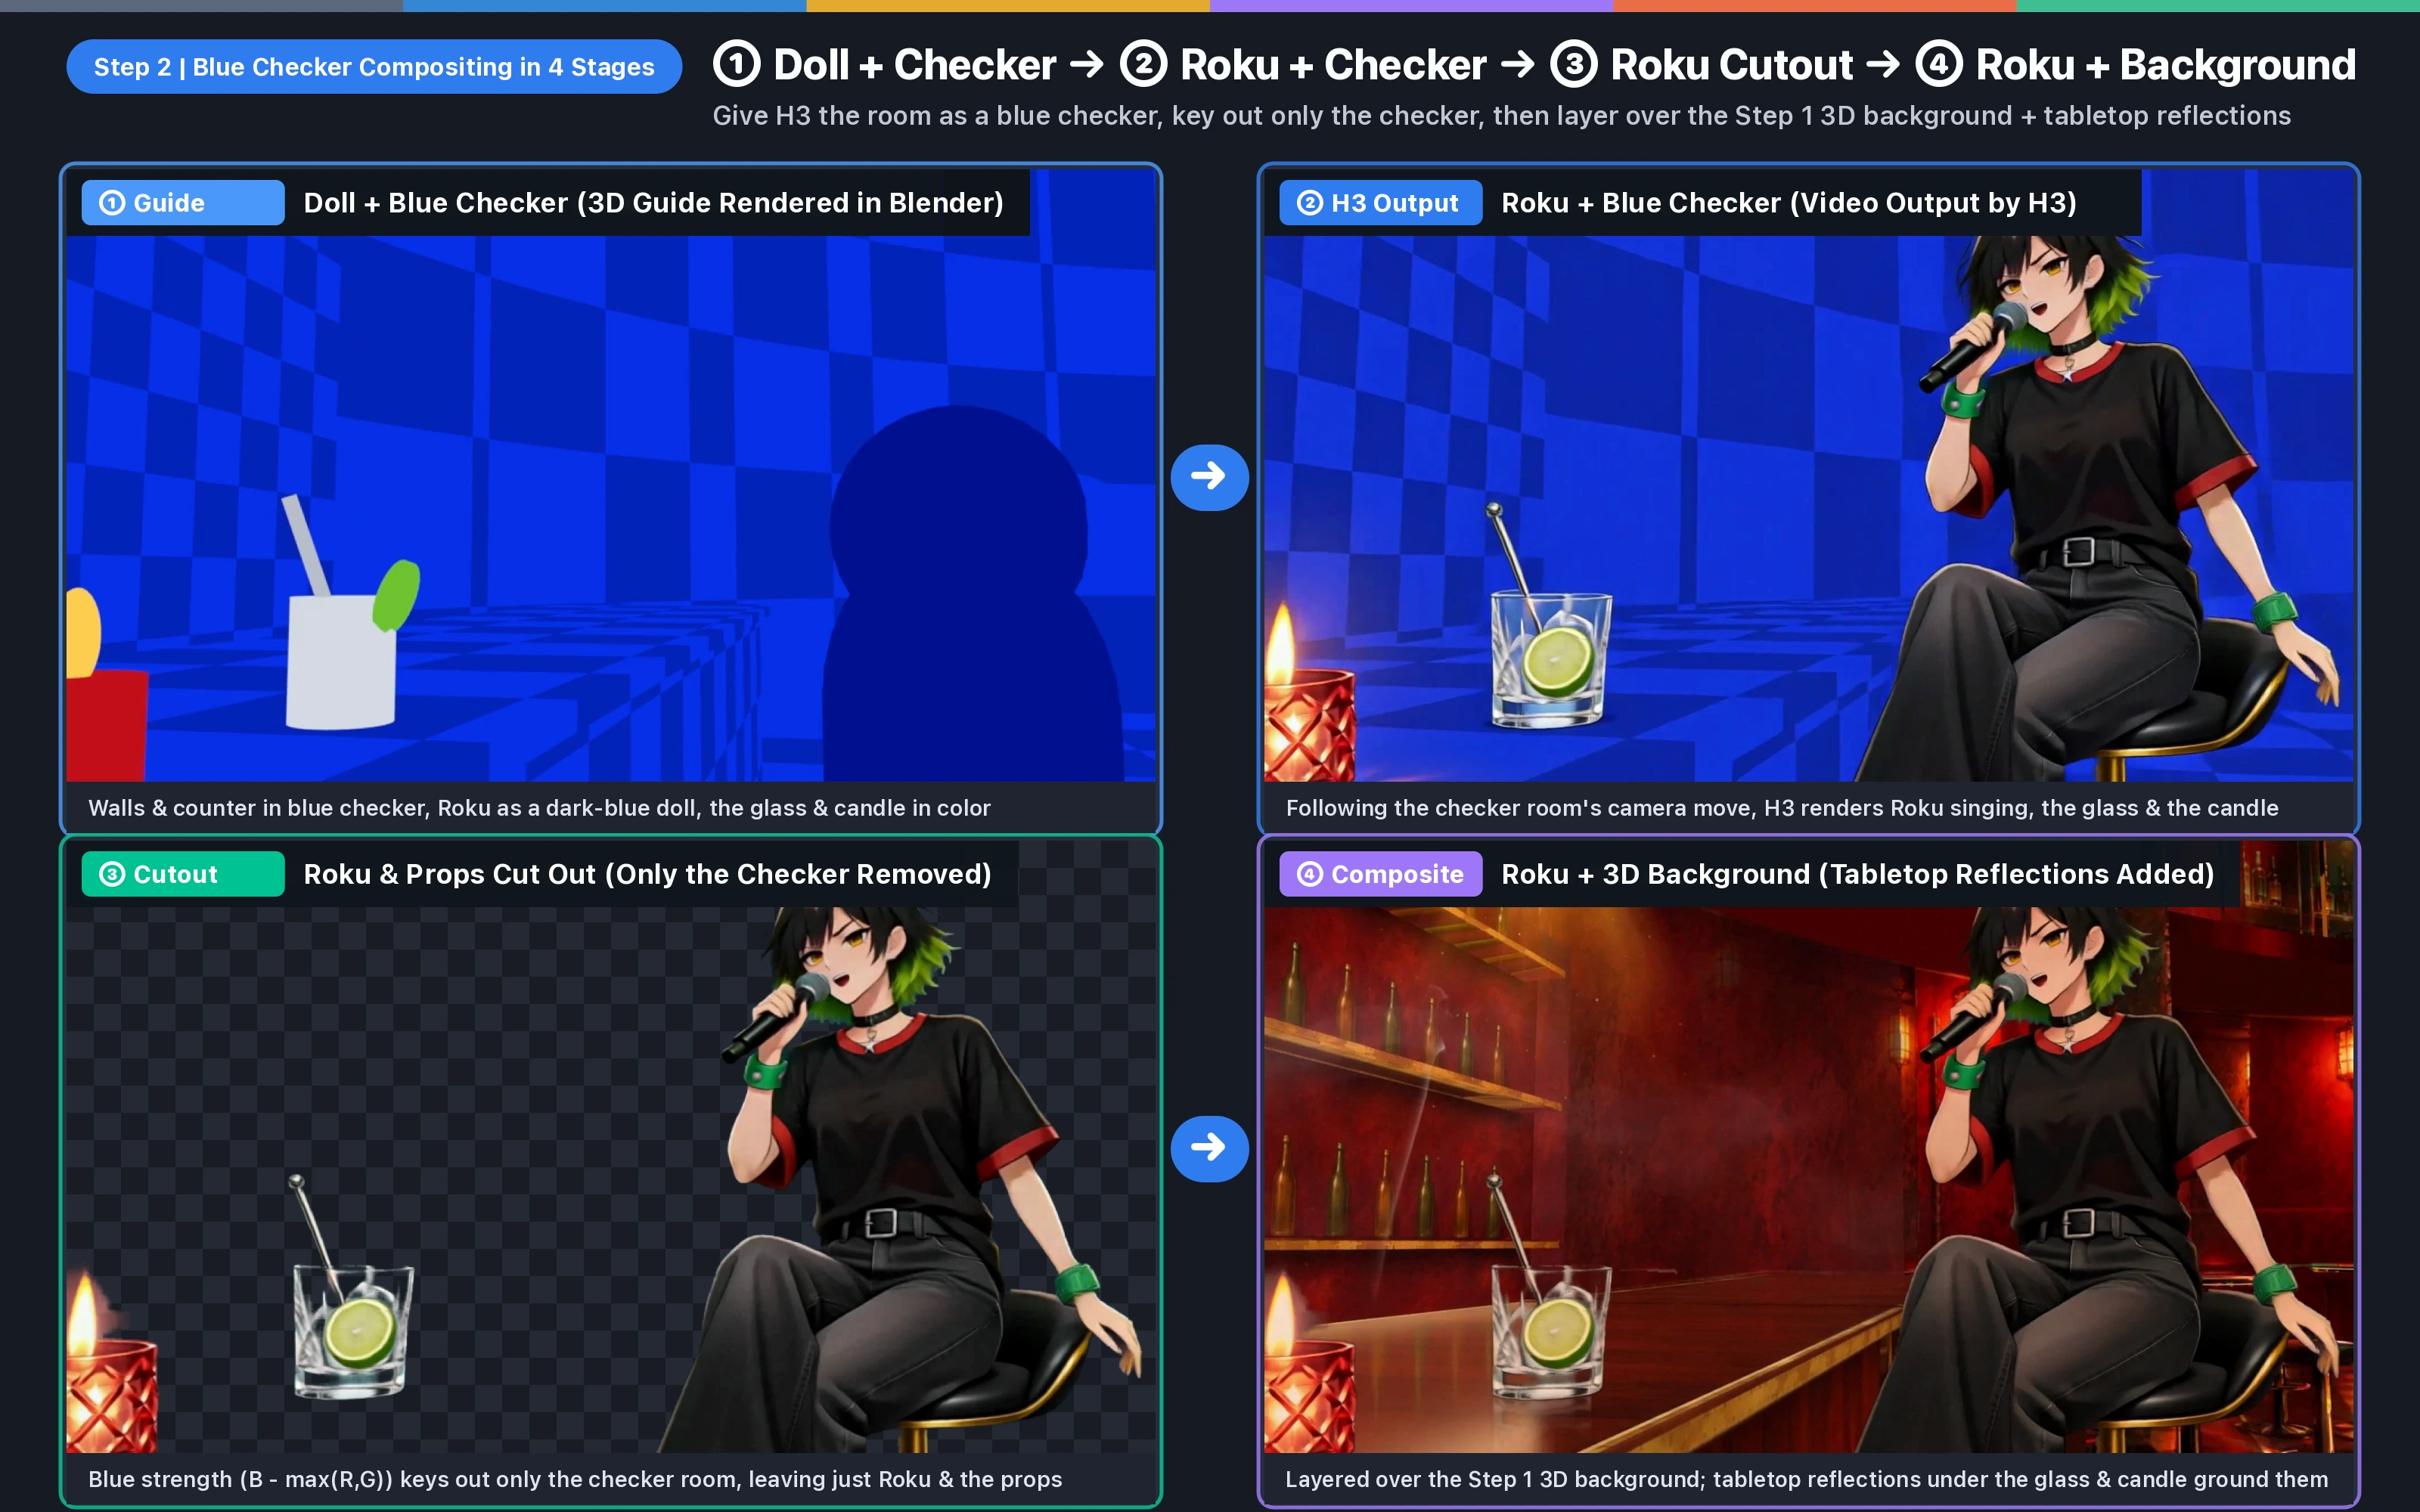
1. ① Doll + blue checker (3D guide rendered in Blender, top left):
- Everything that will be replaced by the Step 1 background (the walls and the counter itself) becomes "a fine blue checkerboard pattern," and we export a guide video in which only what H3 should draw is colored: "Roku (a dark-blue doll)," "the stool she sits on," and "the glass and red candle she touches."
- The checker pattern conveys the perspective and rotation of the moving camera accurately to H3 (in the prompt we write matte blue studio set surfaces so it doesn't draw extra background objects).
2. ② Roku + blue checker (video output by H3, top right):
- When you pass the guide video and Roku's reference image to H3, it follows the camera moves in the blue checker room and cleanly renders Roku singing, the ice and lime in the glass, and the flickering candle flame.
3. ③ Cutting out Roku & the props (making only the blue checker transparent, bottom left):
- Using blue strength (B - max(R, G)), we chroma-key only the blue checker background to transparency and cut out just Roku, the stool, the glass and the candle (the blue inside the clear glass is keyed out too, so the counter behind it shows through naturally).
4. ④ Roku + 3D background (composited with reflections on the tabletop, bottom right):
- We layer the cut-out Roku and props over the Step 1 3D background. Along the way, H3's slight camera lead or lag is matched exactly with "fractional-frame interpolation (frac_bg)," and by adding 3D mirror reflections of the tabletop (a flipped copy) only directly below the glass and the candle, they sit firmly on the counter.
Here is the bar-counter composite video made through these 4 stages!
Only the blue checker areas are cleanly chroma-keyed out, then composited with the 3D bar-counter background made in Step 1. Thanks to fractional-frame interpolation and the tabletop reflections, the glass, the candle and Roku sit perfectly on the counter!
5. Step 3 (Finish): Blend the AI Character into the 3D Background with Light, Color and Smoke
When you cut out H3's Roku in Step 2 and layer her over the 3D room, the position and reflections match, but at first you get a state where "only the character is too crisp and looks slightly afloat above the background (it feels like a pasted-on cutout)."
When we analyzed it, there were 4 reasons the character looked like she was floating above the background:
- Difference in crispness (sharpness): Against the soft texture of the 3D background, H3's outlines are too sharp.
- Difference in ambient light: The colors of the room's red and teal spotlights don't fall on Roku, who was painted with H3's even lighting.
- Difference in blacks: Roku's black T-shirt is pure (neutral) black, while the room's shadows are a reddish black.
- Air (atmosphere) or the lack of it: Between the camera and Roku there is none of the haze or light bleed typical of an underground bar.
To fix this, we did not regenerate anything with video AI (zero cost) and instead applied the following 2 processes with a Python compositing/finishing script (look.py):
- ① Blending the character into the room (
look.integrate): Multiply Roku by the light-color ratio of the surrounding background, add the room's shadow color to the dark areas (the black shirt), wrap the light from behind her around the inside of Roku's outline (10–22 px) (light wrap / rim light), and finally soften the outline by just 0.8 px. - ② Air and light across the whole space (
look.atmos): Over the entire video, layer light bleed on bright areas (bloom), light shafts from the ceiling lights (god rays), vignetting, film grain, and smoke that drifts through the space in sync with the camera's motion.
Here is a test video comparing the strength at 4 levels: "original (no processing), weak, medium and strong" (we used "medium" for the final).
A 4-way split comparison. In "medium (bottom left)," the underground bar's red and teal lights and its smoky air sit on Roku's black T-shirt and skin, so she and the 3D background blend into one complete picture!
And here is the full MV that brings together everything from Step 0 to Step 3!
The final master combining Step 0's 3D camera design, Step 1's camera-map painted background, Step 2's blue checker × H3 character compositing, and Step 3's light-and-smoke blending.
6. Copy & Paste! AI Agent Prompt for "3D Room × AI Painting × H3 One-Shot MV Production"
The prompt below is a starting point for having an AI agent (Claude Code, Codex, Antigravity, etc.) set up this 3-layer one-shot MV pipeline in your own project. Adapt it to your assets and song, and review the result of each step as you go.
# For AI Agents: Specification for a One-Shot MV Using a 3D Room × Camera-Map AI Painting × H3 Compositing

You (the AI agent) combine headless Blender (Python `bpy`), image AI, video AI (fal.ai `minimax/h3-max/reference-to-video`) and Python compositing (OpenCV/NumPy/FFmpeg) to build a "one-shot-style animated MV" whose background never breaks, no matter how freely the camera moves around the room.

## Step 0: Audio Analysis and the 3D Camera Path (Previz)
1. Use `librosa` to extract the track's BPM, beat times and vocal intensity envelope (RMS), and identify the sung interval (start/end seconds) of each lyric line.
2. Build a simple 3D model of the stage/room in Blender and design the camera and character paths to match the song's structure (section blocks of about 5 seconds).
   - Rule: Avoid game-style framing that keeps following the character's back; get ahead of them and frame them from the front or front three-quarter. Connect bust-up close-ups and full-body wide shots with big moves.
3. Before running any generative AI, export a previz video that combines the temporary 3D mannequin with the audio, and get the user's approval.

## Step 1: Build the 3D Background with Camera-Map AI Painting (Zero-Swap Method)
1. **Line-art painting of structures and camera-map baking**:
   - For standing objects such as walls, pillars, shelves and stage equipment, export line art from multiple viewpoints along the camera path (6–10 viewpoints), and have image AI paint only "the colors and shading on the surfaces and the color pooling around light sources" (do not let it paint light shafts in the air, smoke or reflections).
   - For box-shaped objects, pick the single viewpoint that sees them most head-on; for walls, assign viewpoints by angle; bake each as a per-object texture (never create a switching boundary in the middle of an object).
2. **Front-view painting of props, 3D reflections and atmosphere**:
   - For props such as the bottles on the shelves, export orthographic outline line art of the 3D shapes, UV-project the front-view paintings made by image AI, and place them randomly.
   - Give floors, the stage surface and tabletops 3D mirror reflections, and render with spotlights layered on top.

## Step 2: H3 Character Generation, Cutout and Background Compositing with a Blue Checker Guide
1. **Create the guide video (doll + blue checker)**:
   - Replace every background object that will be drawn in 3D (walls, the counter body, etc.) with "a fine blue checkerboard pattern," and create a guide video, with exactly the output frame count, in which only the character, the chair and the props in hand that H3 should draw are colored.
   - Do not put words that suggest the location in the prompt; describe it in positive form as `matte blue studio set surfaces`.
2. **Blue-key cutout, fractional-frame interpolation (`frac_bg`) and tabletop reflections**:
   - From H3's output video, make only the blue checker room transparent using blue strength (`B - max(R, G)`), and cut out the character and props.
   - For each frame, measure the camera progress of the blue checker, compute a fractional background frame number smoothed with a Gaussian (σ = 1 frame), and layer the cutout over the Step 1 3D background interpolated between the neighboring frames. On tabletops, composite only the flipped reflection of the contact area.

## Step 3: Look Integration That Blends Everything with Light, Color and Smoke (`look.py`)
1. **Blend the character (`look.integrate`)**:
   - To remove the 4 causes that make the character float above the background (resolution difference, ambient light, lifted blacks, atmosphere), composite with ① multiplication by the light-color ratio of the surrounding background, ② adding the room color to the dark areas, ③ a light wrap (rim light) of background light along the inside of the outline, and ④ a very slight blur (0.8 px).
2. **Atmosphere of the whole space (`look.atmos`)**:
   - Finally, layer high-luminance bloom, god rays from the ceiling lights, vignetting, film grain, and smoke that flows in sync with the image's phase correlation (the camera motion) over the whole video, and export.
7. Related Guides (the #035 “Secret” Making-Of Series & More on H3 and Blender)
- Article ②: I Tried to Make a Rock Singer Move with AI—and Ended Up Acting It Out Myself: A 2D Anime MV with Video AI (H3 MAX) × 3D Stick-Figure Capture (EN)
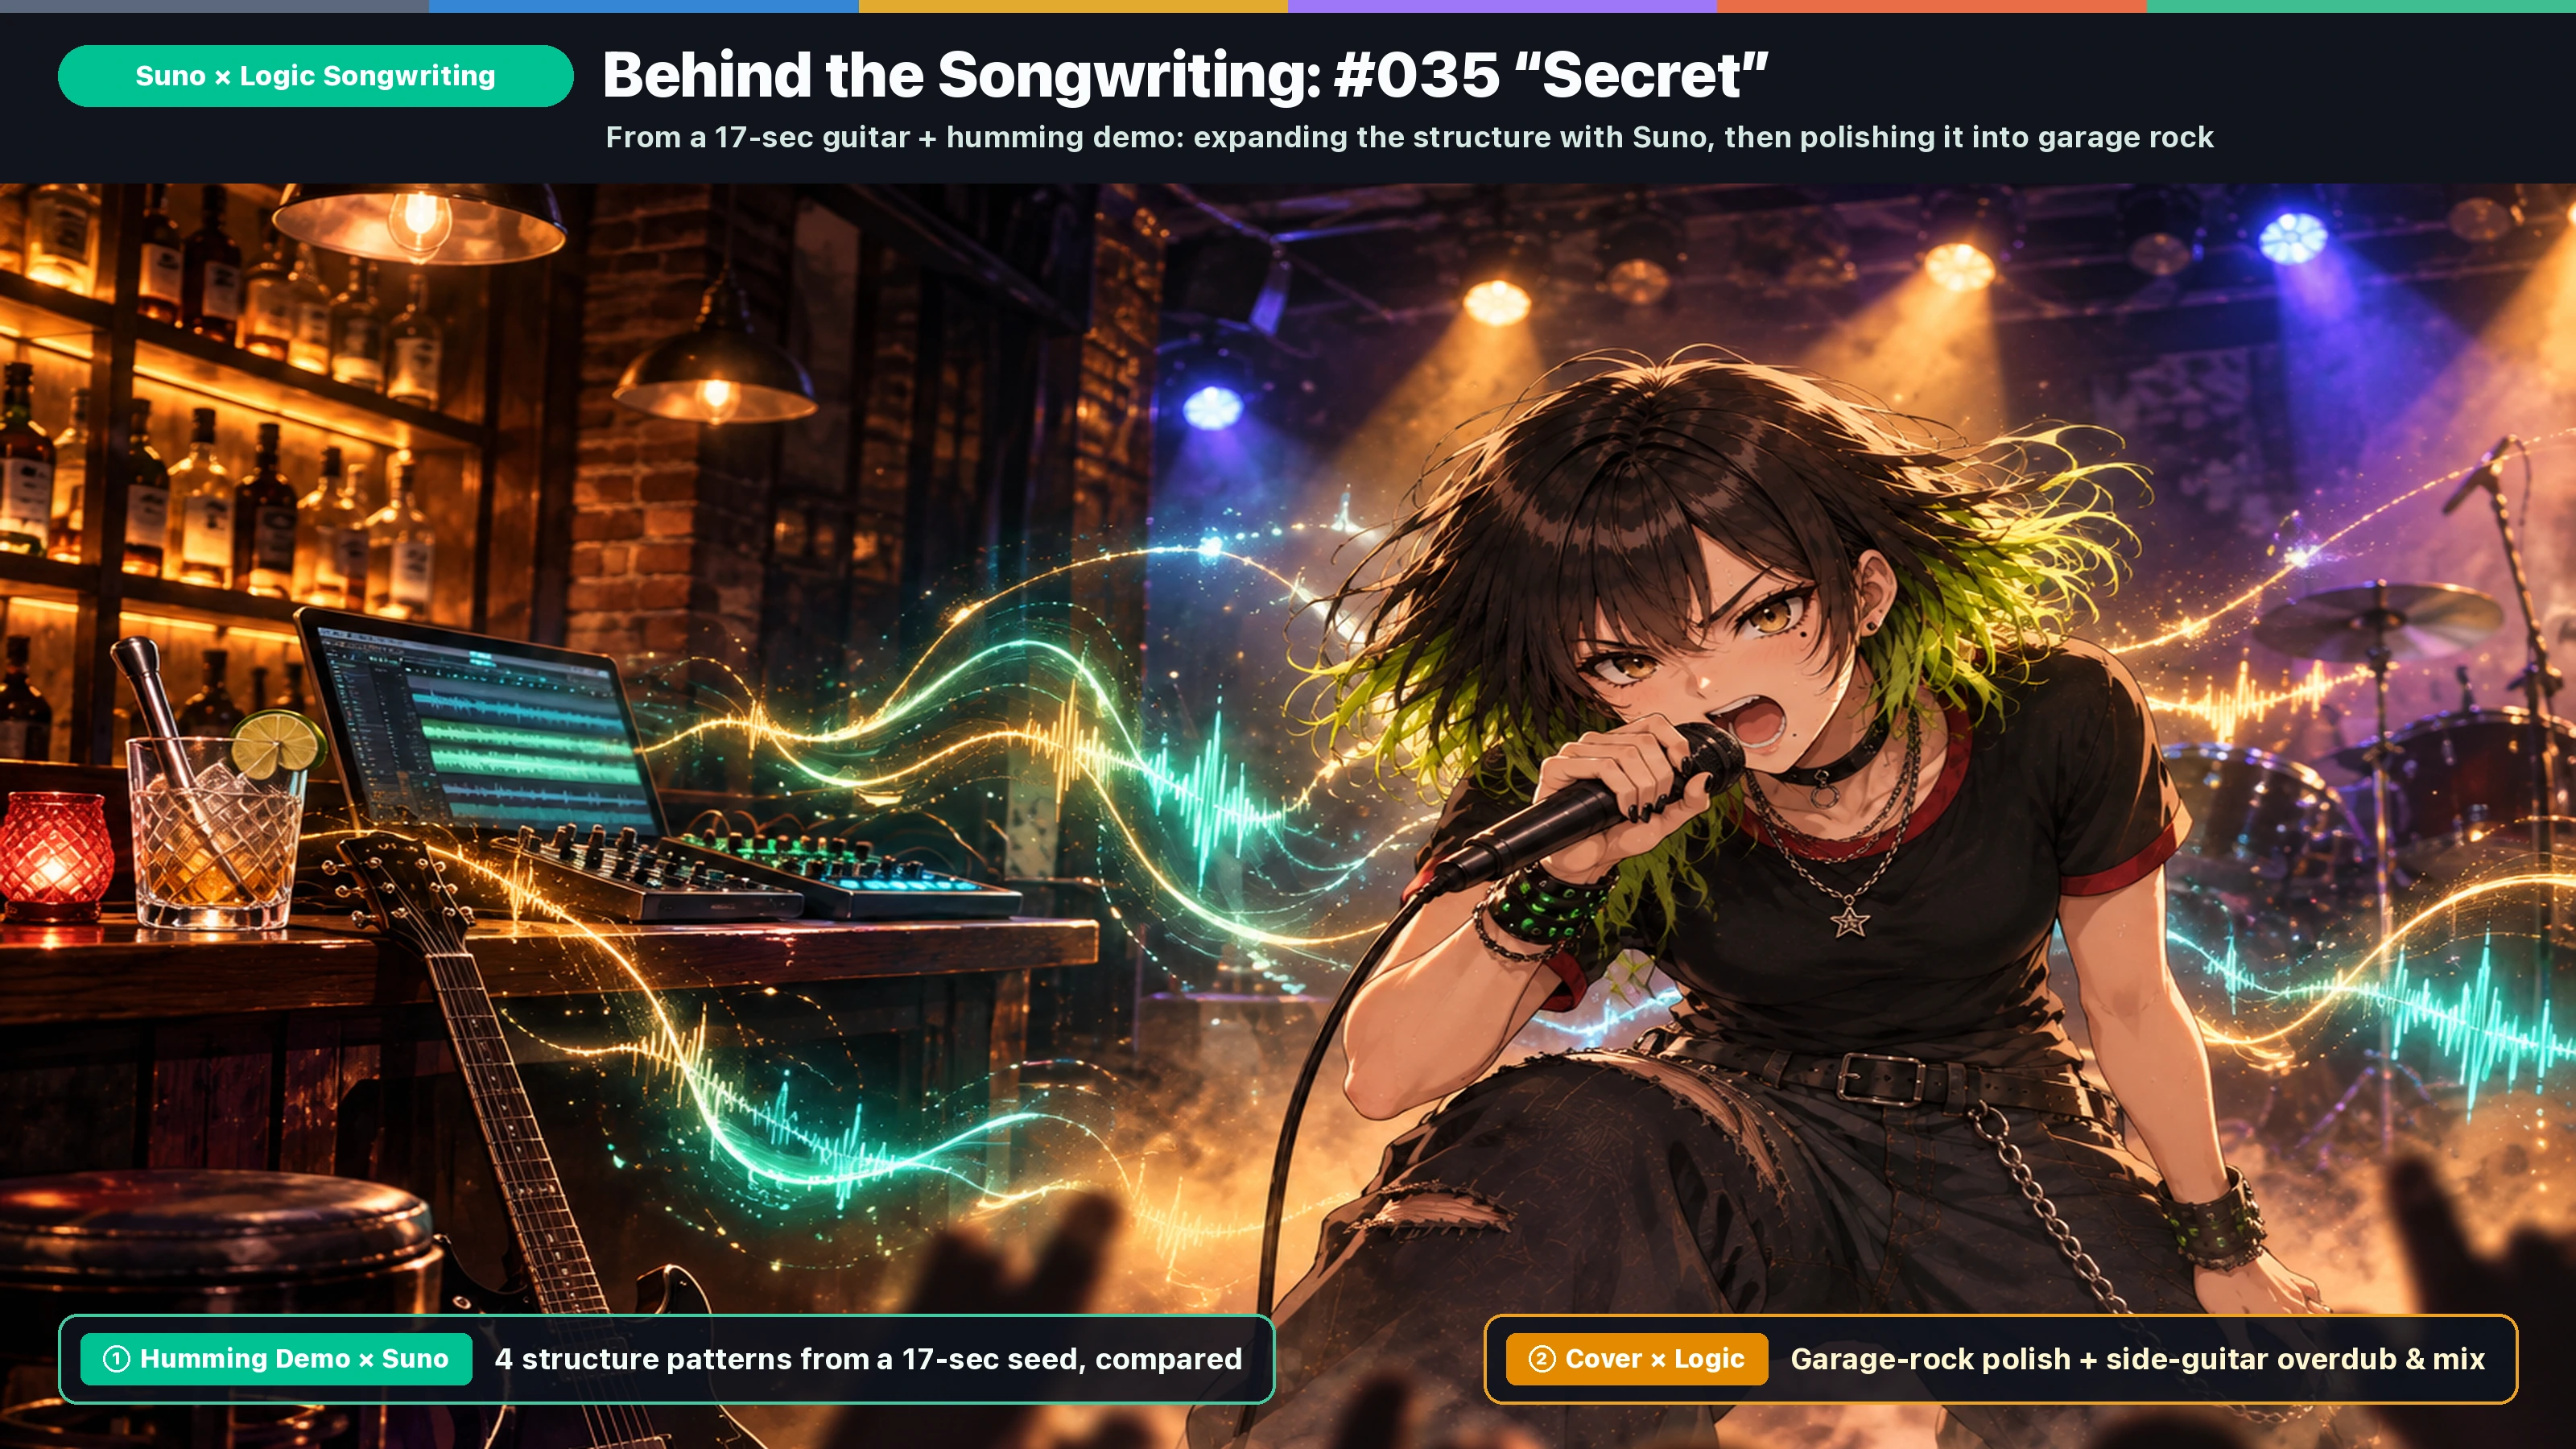
- Article ③: Original Songwriting with Suno + Logic: Behind the Scenes of #035 “Secret” (EN)
- Image & Video AI Basics: Making Illustrations & Anime Videos of the Same Character with gpt-image-2.5 and fal.ai (H3) (JP)
- Blender 5.2 Crash Course for 2D Illustrators & MV Creators (JP)
- Consistent Rooms & Props in AI Video: A Blender 3D Room Set + One Master Painting per Camera (EN)