Hi, I'm Rey! I produce a 6-piece virtual rock band called WASHABI using a hybrid human + AI workflow.
When producing music videos with AI video generators (such as H3 MAX Turbo on fal.ai), cutting between short ~5-second clips works great. Most current video AI models generate 6 to 10 seconds per clip, and once you speed them up slightly (1.25x–1.5x) to remove that floaty AI slow-motion feel, each cut lands right around 5 seconds.
However, as soon as you want a long, continuous camera move—like pulling the camera backward down a street for 32.5 seconds in a single unbroken shot as the vocalist walks toward the lens—pure video AI hits a wall:
- If you stitch 5-second AI video clips together, the background buildings, shop signs, and utility poles morph and melt at every stitch boundary.
- Conversely, if you lock the start and end frames too tightly, the image just scales flatly in 2D without genuine 3D parallax.
To solve this with our AI agent director Maru, we built a pipeline that combines Meshy (image-to-3D), Blender 5.2, and Camera Projection Mapping with progressive AI inpainting.
Camera projection mapping is a classic anime background technique (used extensively in films like Makoto Shinkai's *Your Name.*). By projecting 2D AI-painted anime background art onto 3D geometry in Blender, we achieved 100% hand-painted 2D anime brushwork that moves with true 3D parallax and zero polygon/clay look.
In this post, we break down every step of the pipeline with side-by-side comparison videos—and at the very end (Section 8), we share a copy-pasteable AI Agent Specification you can hand directly to Claude Code, Codex, or Antigravity to reproduce the entire workflow automatically!
- Consistent Indoor Rooms & Props in AI Video (EN): Blender 3D Room Set + Single Master Painting per Camera
- Meshy Basics (JP): Meshy Beginner's Guide: Turning 1 Illustration into a 3D Model on the Free Plan (JP)
- Blender 5.2 Basics (JP): Blender 5.2 Crash Course for 2D Illustrators & MV Creators (JP)
1. The Final Result: Stitched Video AI vs. 3D Camera Projection Mapping
Seeing is believing—first, compare stitching 5-second AI video clips together (Left: NG) versus our Meshy + Blender Camera Projection Mapping pipeline (Right: OK):
In the left video, buildings and utility poles warp and shift at the 4.5s and 9.0s stitch points. In the right Camera Map version, every building holds its exact architecture as the camera pulls back.
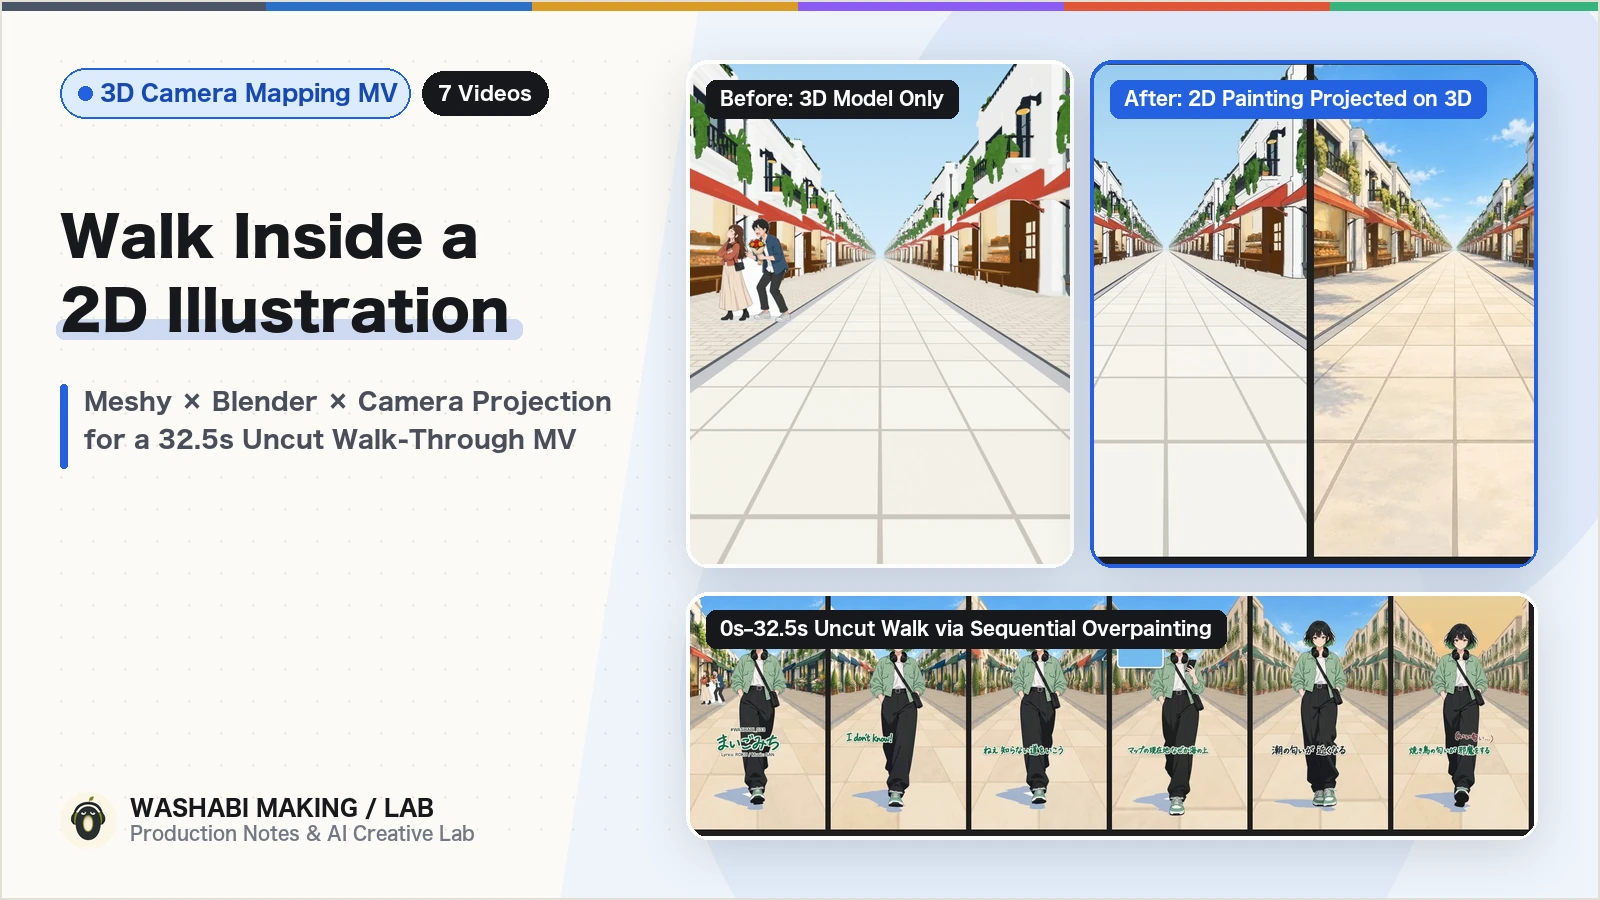
Next, compare raw Meshy 3D models with extracted line art (Left) versus Camera Projection Mapping with AI-painted background art projected onto the 3D geometry (Right):
Projecting the 2D painted background onto the 3D geometry completely eliminates the clay-like 3D mesh texture while keeping full 3D perspective and parallax.
Here is how we built this step by step.
2. Step 1: Flat 2D Billboards vs. Meshy 3D Buildings
Our very first test was placing flat 2D building illustrations ("cardboard cutouts" / billboards) along a road in Blender, extruding only the awnings and signs slightly. However, as soon as the camera moved, the flat "paper-theater" effect was obvious.
So we brought in Meshy, an AI tool that generates 3D models (.glb) from a single 2D illustration.
How to Design Input Illustrations That Meshy Converts Cleanly
If you feed a flat front-elevation drawing into Meshy, it struggles to guess the depth of the side walls.
We had our AI agent generate input illustrations with gpt-image-2.5 using three strict rules:
- One single building per image on a pure white background (no neighboring buildings, no utility poles)
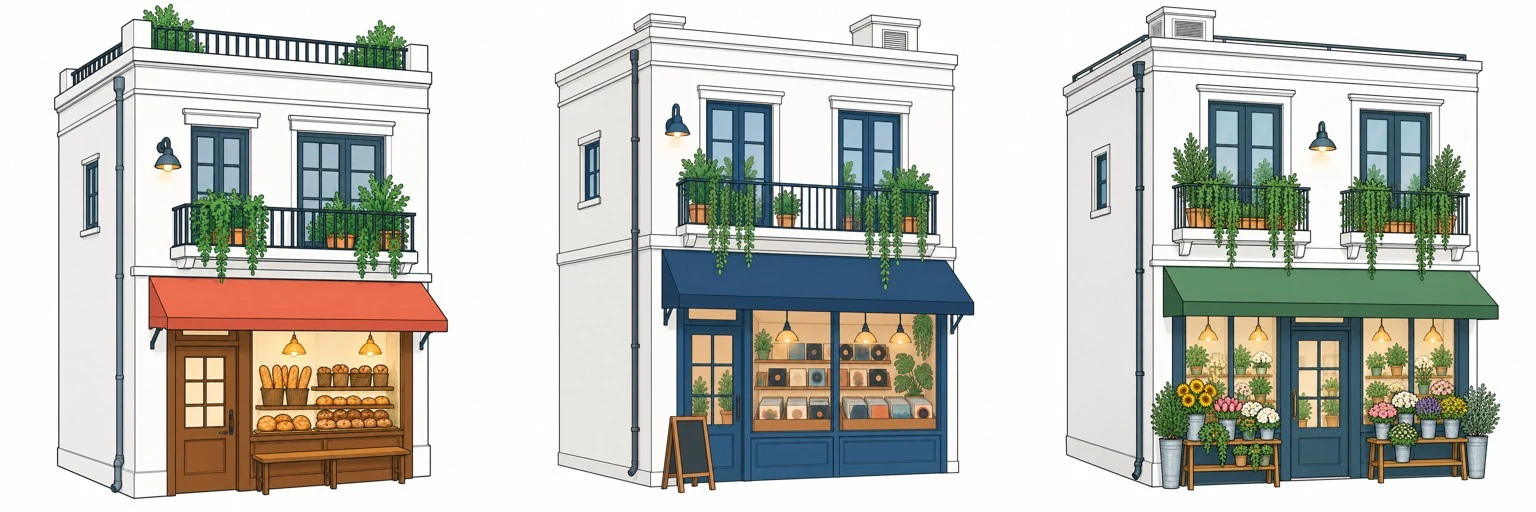
- A 30° front-left three-quarter view from slightly above, showing the front facade, the left side wall, and the roof in one clear perspective
- Place buildings on the left side of the street as-is, and mirror-flip them for the right side of the street (avoid text on shop signs so mirroring looks natural)
Meshy Settings: The Free "Meshy 6 Lite" Model Is Plenty for Street Backgrounds!
Meshy offers both Meshy 7.1 Flagship and Meshy 6 Lite (which includes 10 free GLB downloads per month on the free tier).
We tested both side by side and found that Meshy 6 Lite produces more than enough 3D relief and architectural depth for background buildings moving past the camera.
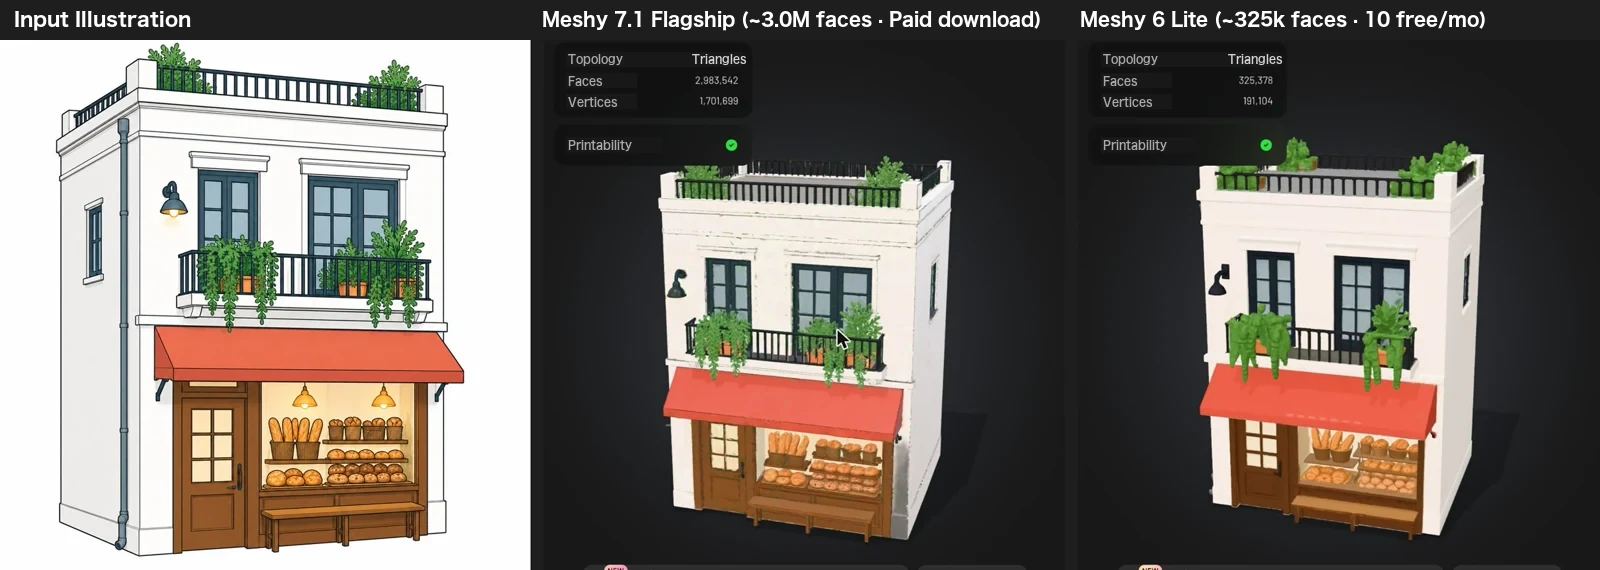
1. Image Enhancement: OFF — Leaving this ON causes Meshy to repaint your clean anime illustration into a semi-realistic 3D render before modeling.
2. PBR Maps: OFF — Since we use unlit Emission shaders in Blender, PBR metallic/roughness maps are unnecessary and turning them OFF preserves the original flat illustration colors.
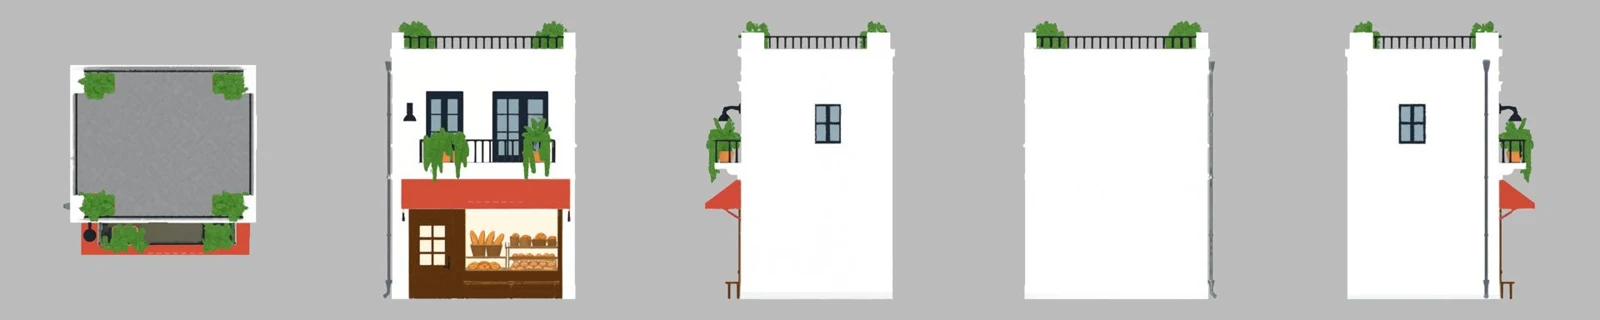
Here are the downloaded Meshy 6 Lite .glb models inspected from all four sides and top-down inside Blender—awnings, bay windows, and storefront planters all have genuine 3D depth:
Here is the comparison between flat 2D billboards (Left) and Meshy 3D buildings (Right) arranged along our Blender street:
The Meshy 3D street (right) has real volumetric depth and side walls, but without line art it looks washed out and soft compared to the 2D drawings on the left.
While the 3D parallax on the right is much better, the raw Meshy models look washed out and lack crisp outlines, making them look out of place behind a 2D anime character. That brings us to Step 2.
3. Step 2: Extracting Crisp Line Art & Cel-Shaded Foliage in Blender 5.2
If you place a 2D anime vocalist (Roku) in front of raw Meshy models (below), the lack of ink outlines makes the 3DCG background clash with the character.
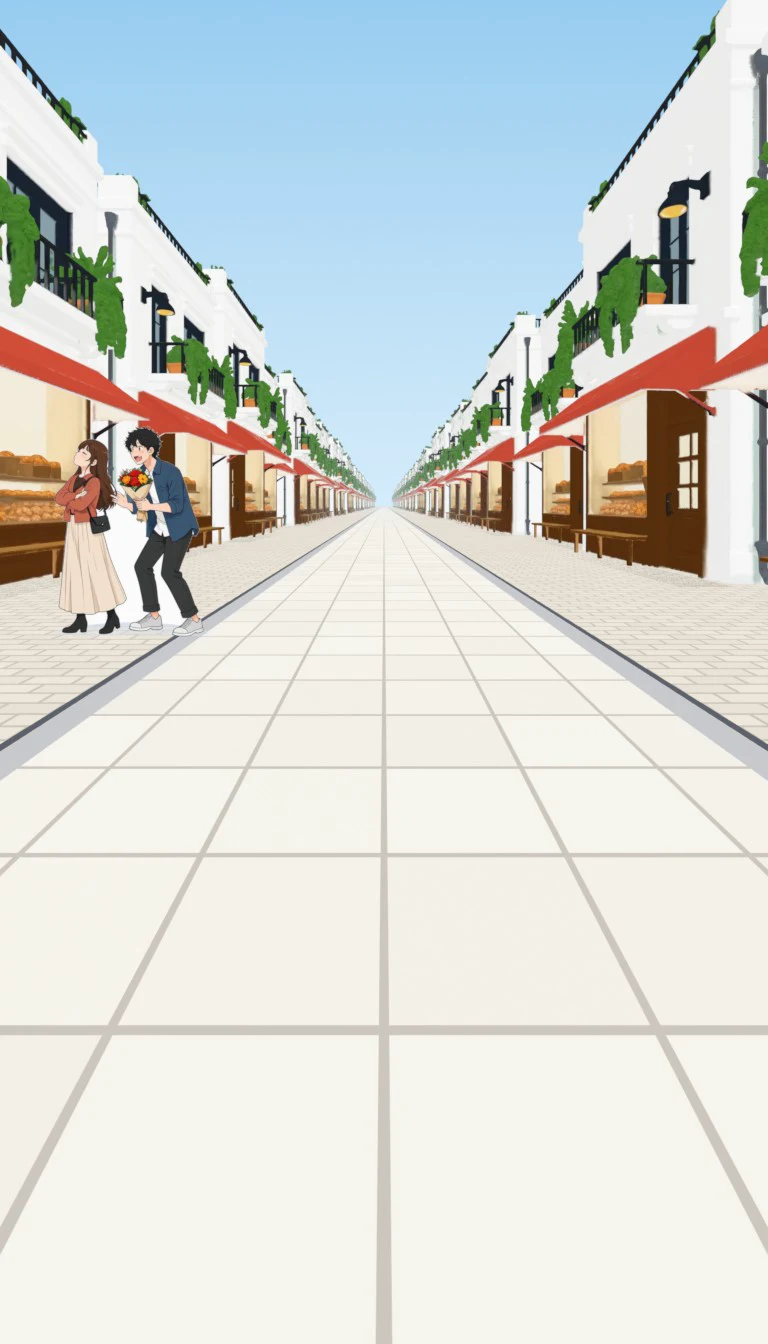
However, enabling Blender's built-in Freestyle or Line Art modifiers on dense Meshy meshes (which contain millions of triangles) makes each frame take minutes to render.
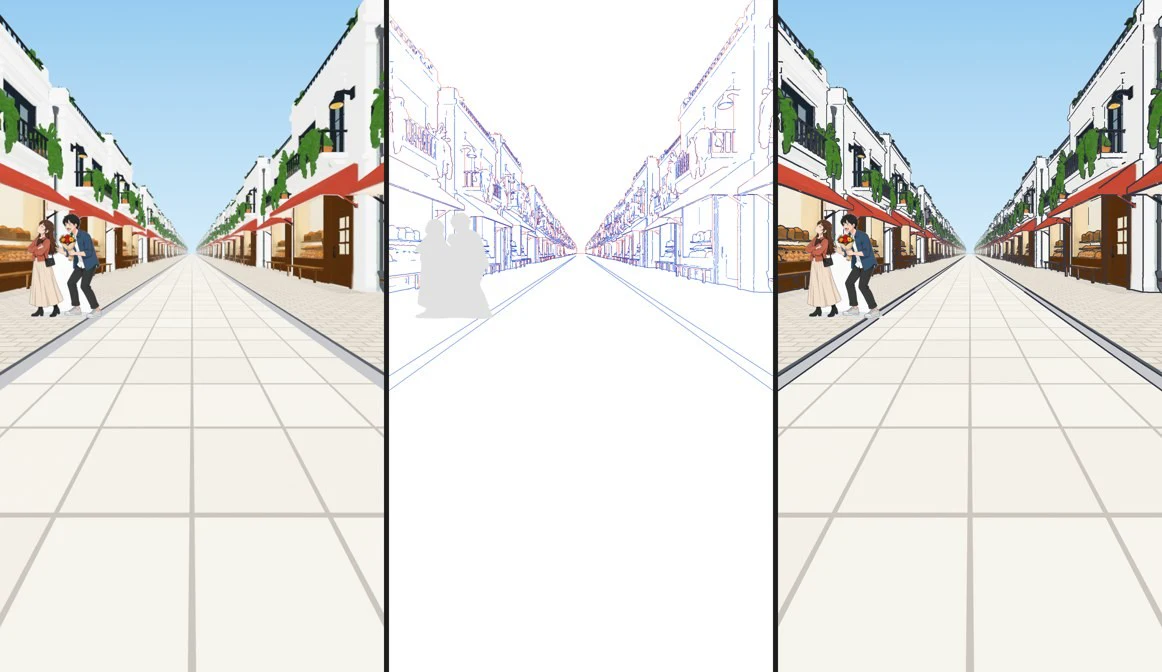
Instead, we configured Blender 5.2's compositor (File Output node) to export 32-bit EXR Depth and Normal passes, and wrote a fast Python post-processor to extract clean anime line art in milliseconds per frame:
- Outer Silhouette Lines: Computed from the second derivative (Laplacian) of inverse depth (
1 / Depth) to draw dark navy (#343846) outlines where buildings overlap. - Crease / Corner Lines: Lightly smoothed the
Normalpass first (to ignore tiny bumps in Meshy's mesh surface) and drew lines only along architectural corners sharper than 40°. - Distance Fade: Gradually attenuated line opacity beyond 10 meters so distant buildings don't turn into a dark smudge of ink.
Additionally, because 3D trees and storefront plants look like blobs of green clay in raw 3D, our script detects green foliage by hue, quantizes it into a flat 3-tone cel-shaded palette, and adds fine ink outlines between leaf clusters (v2).
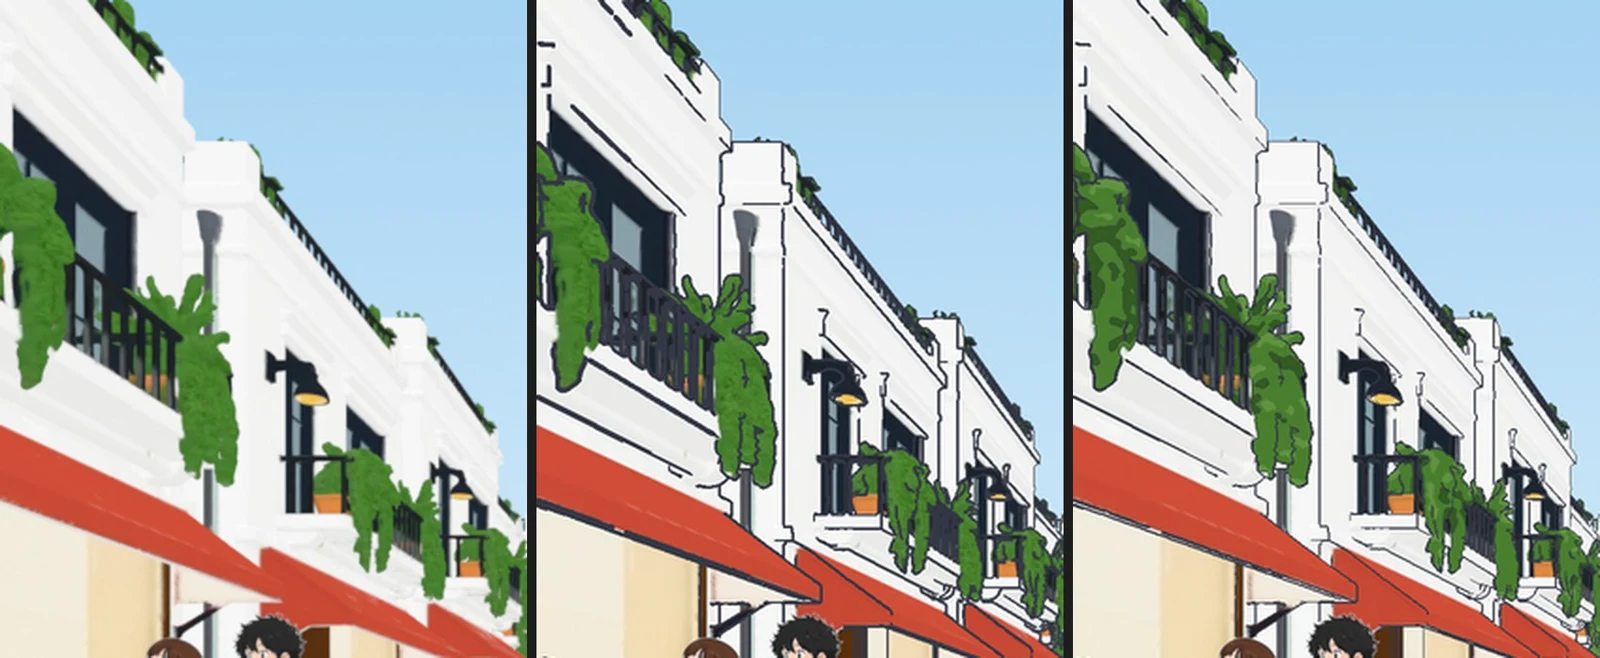
Compare the motion with no outlines, initial thick outlines (v1), and refined outlines + cel-shaded foliage (v2):
Adding Depth + Normal outlines immediately defines the architectural shapes of the street.
Refining line weights and cel-shading the greenery brings the street much closer to a 2D anime background.
4. Step 3: Why We Chose Camera Projection Mapping Over Video AI (`3d-to-video`)
Even with clean outlines and cel-shaded plants, the walls and roofs still had a subtle "3D mesh gradient."
Our first thought was to feed the Blender render into fal.ai's minimax/h3-max/3d-to-video model to let video AI repaint every frame.
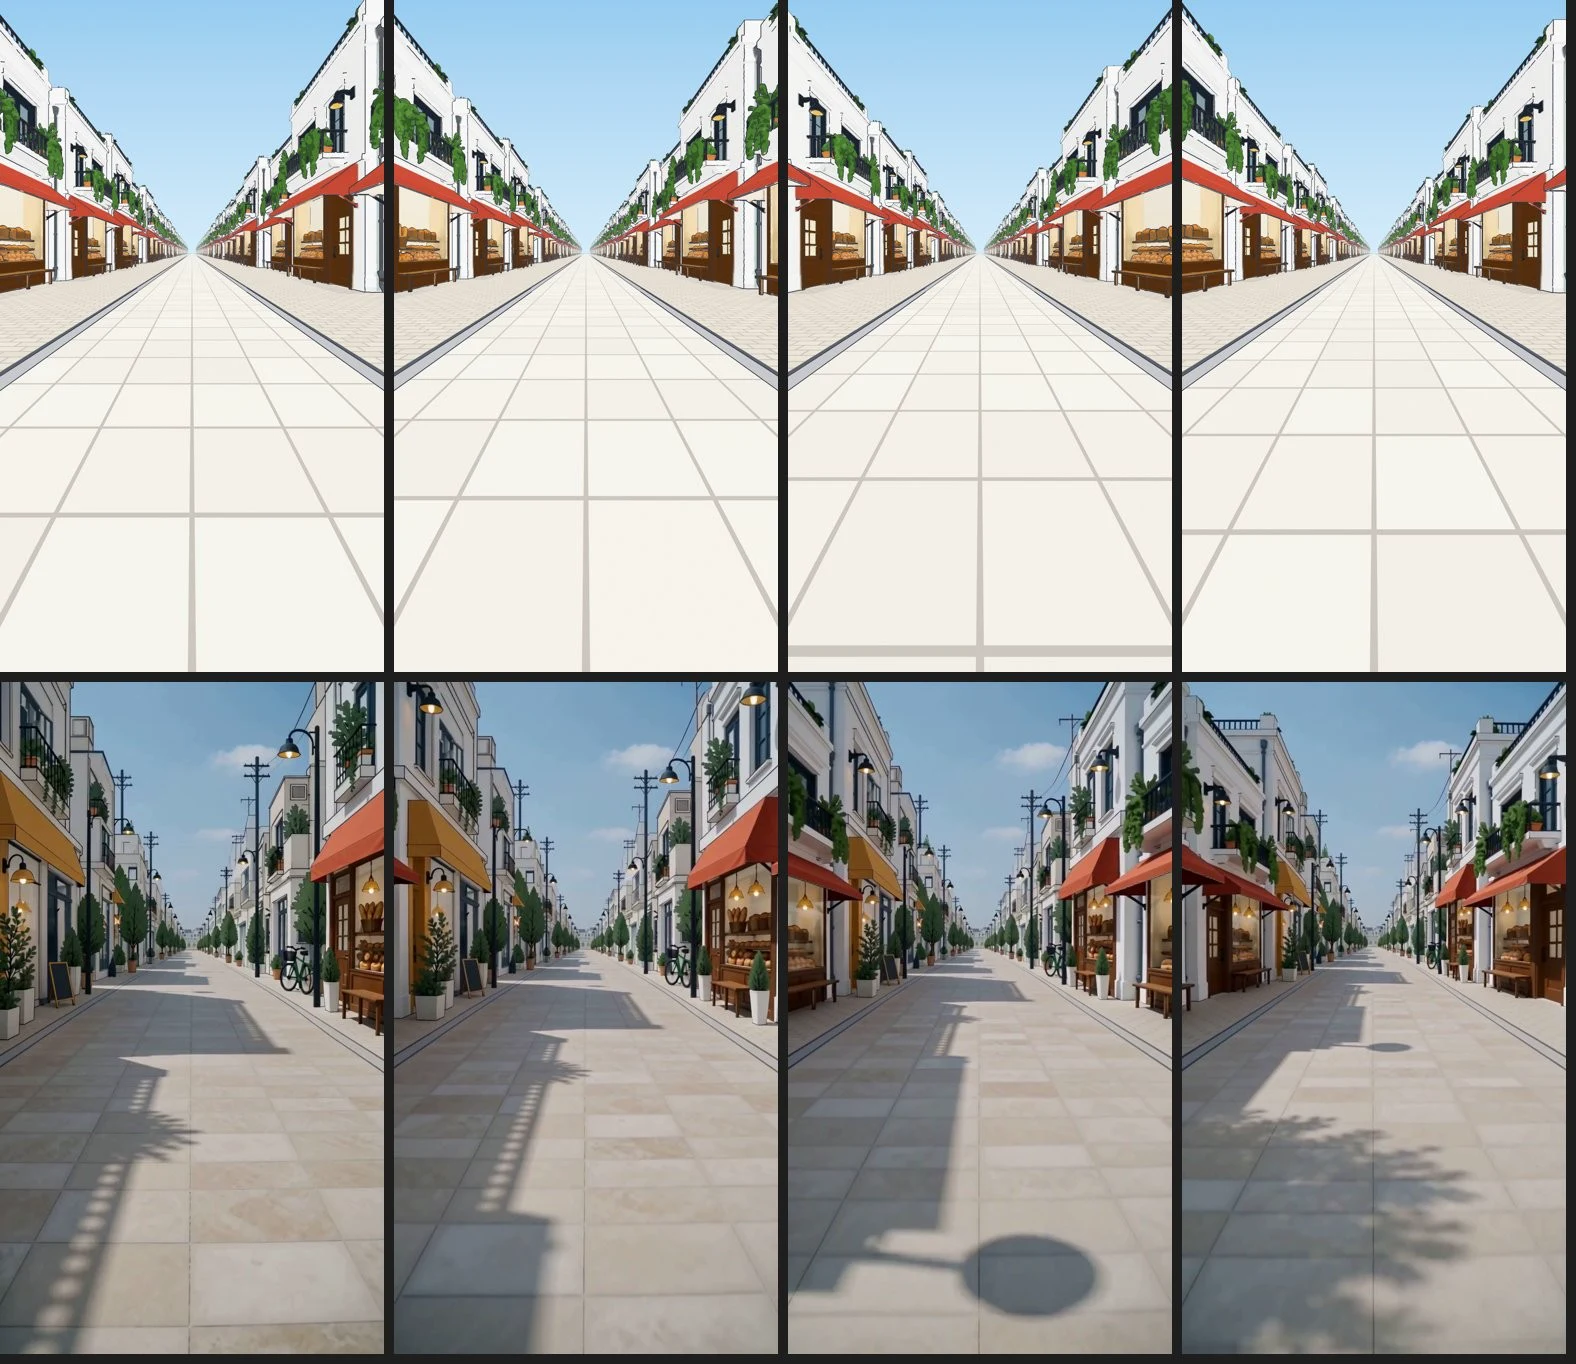
H3 3d-to-video follows the 3D geometry and camera motion faithfully, but turns the art style into a photorealistic 3D CG movie.
While 3d-to-video preserved the camera motion and building geometry remarkably well, it shifted the texture into a photorealistic 3D CG movie look that clashed with our 2D anime character.
Enter Camera Projection Mapping
Instead of asking a video AI to repaint every frame, we switched to Camera Projection Mapping: every 1.5 seconds along the camera path, we take a Blender snapshot, have an image AI (gpt-image-2.5) paint it into a hand-drawn 2D anime background, and project that painting back onto the 3D street geometry like a slide projector.
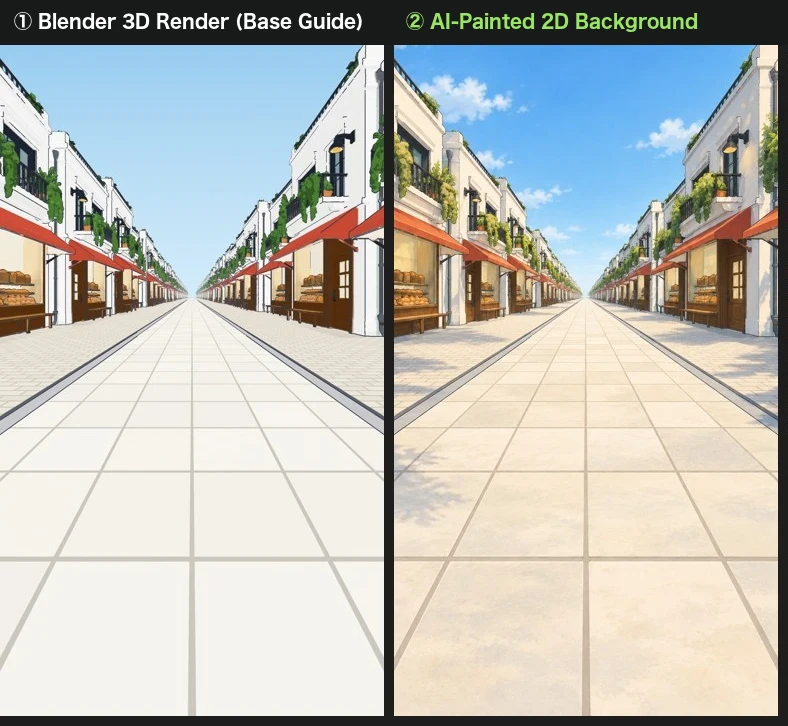
With this approach, every pixel on screen is 100% 2D hand-painted artwork, while the perspective and parallax follow Blender's 3D geometry with zero frame-to-frame flicker or morphing.
5. Step 4: Progressive Inpainting Across a 32.5-Second Pullback Shot
If a camera barely moves, a single projected painting is enough. But when the camera pulls backward down a street for 32.5 seconds, new buildings constantly enter the left and right edges of the frame.
To handle this seamlessly, we built a Progressive Camera-Map Inpainting Pipeline that steps backward every 1.5 seconds (~1.95 meters of camera travel):
- Viewpoint 1 (0.0s): Render the initial view in Blender, paint the entire frame into a 2D anime background with Image AI, and project it onto the 3D street.
- Viewpoint 2 (1.5s): Move the camera 1.5 seconds backward with Viewpoint 1's painting already projected onto the scene. The center/distant street is already painted; only the newly revealed buildings on the left and right edges (~10% of the frame) appear unpainted.
- Masked Inpainting of Only the New Regions: Lock all already-painted pixels and ask Image AI (via masked
images.edit) to paint *only* the newly revealed 10% border so it blends into the existing street. - Repeat at 3.0s, 4.5s, 6.0s... Once a building is painted, it is never repainted—the street simply extends forward seamlessly.
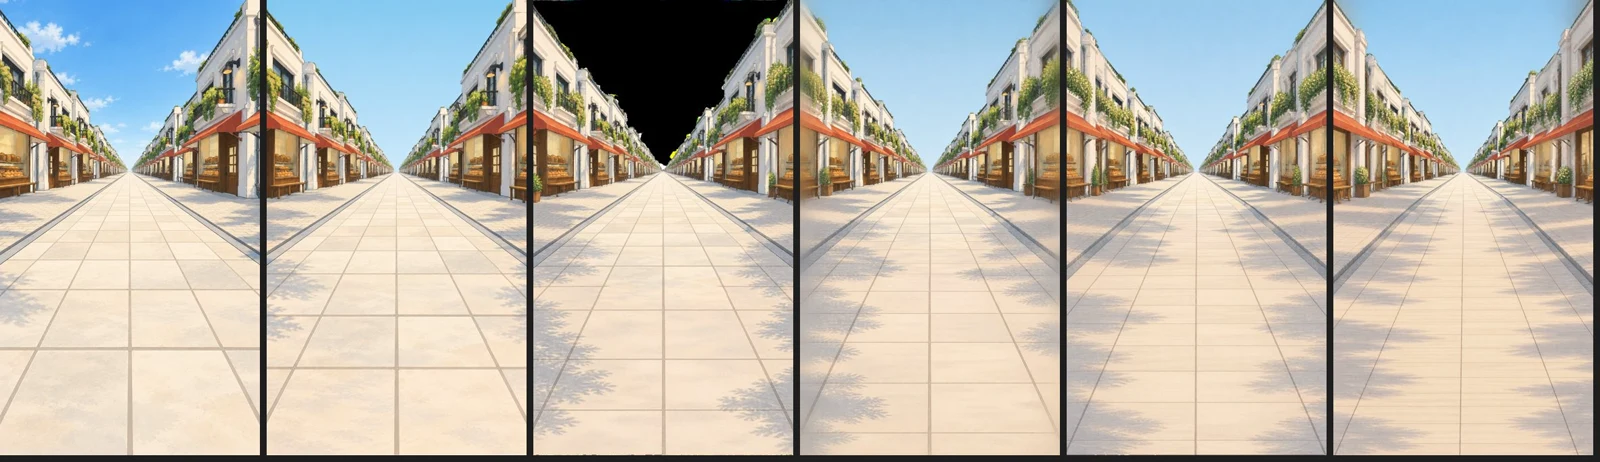
6. Scaling to the Full 32.5 Seconds (6 Pitfalls Solved Automatically by Our Agent Spec)
When we scaled from a 5-second test to the full 32.5-second shot (23 viewpoints / 975 frames), we hit several classic 3D + AI edge cases:
- Passing 23 individual textures into a Blender shader hit the GPU texture slot limit and turned the render magenta (Solved by packing all 23 paintings and Depth maps into a single sprite-sheet atlas)
- Letting AI inpaint the street pavement at every step caused the road shadows to get progressively darker (Solved by separating the ground plane and tiling a single seamless top-down cobblestone texture)
- Subtle brightness shifts between AI inpaint steps and spline acceleration wobble (Solved via Lab-color median matching along the 80px seam and formula-driven camera placement)
You don't need to memorize or debug any of these yourself—all 6 fixes are baked directly into the AI Agent Specification in Section 8 below!
7. All 23 Progressive Paintings & The Final 32.5-Second One-Shot MV
Here is the complete atlas of all 23 progressive paintings (with ground separation and Lab color matching applied), followed by the final 32.5-second unbroken street pullback from our track "#033 Maigomichi (Lost Way)" with sky, 2D vocalist Roku, and background street performers composited!
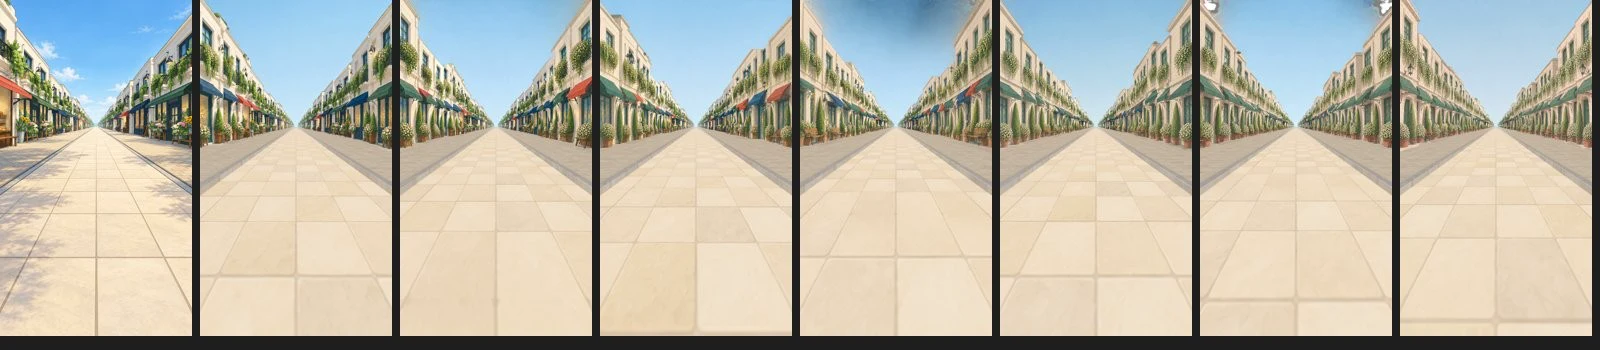
Across 32.5 seconds of continuous backward camera travel, the buildings never warp or flicker, moving with genuine 3D parallax and warm 2D anime brushwork.
8. Copy-Pasteable! AI Agent Specification for "3D Street + Camera Projection Mapping"
We packaged the entire workflow and all 6 troubleshooting rules from this article into a ready-to-run specification for AI coding agents (Claude Code, Codex, Antigravity, Cursor, etc.).
Copy the markdown block below into your project (e.g., camera_map_knowhow.md) and tell your AI agent: "Build a camera-mapped 3D street background following this specification."
# AI Agent Specification: 3D Street + Camera Projection Mapping for Anime MV Backgrounds

This specification guides an AI agent to build long one-shot camera moves (pullbacks, crane-ups, flyovers) with a 2D hand-painted anime aesthetic by combining Meshy (single-image to 3D `.glb`), Blender 5.2 (headless Python layout & rendering), and Image AI (progressive camera projection mapping).

## 1. Hybrid Architecture (Division of Labor)
- **3D Geometry (Meshy + Blender)**: Generate individual building `.glb` models in Meshy from single 2D illustrations (30° front-left three-quarter view, pure white background, Image Enhancement OFF, PBR Maps OFF) and arrange them along a street in Blender.
- **2D Painted Texture (Camera Projection Mapping)**: Sample viewpoints every 1.5 seconds along the camera path, paint them into 2D anime background art using Image AI (`gpt-image-2.5`), and project each painting from its capture camera onto the 3D geometry.
- **2D Characters**: Keep main characters as 2D anime video layers (keyed/rotoscoped) composited on top—do not convert main characters to 3D meshes.

## 2. Progressive Inpainting Pipeline (Sequential Masked `images.edit`)
1. **Viewpoint 1 (0.0s)**: Render the Blender draft (with Depth/Normal line art + cel-shaded foliage) and pass it to Image AI to paint the full frame into a 2D anime background.
2. **Viewpoints 2..N (every 1.5s / ~1.95m of backward camera travel)**:
   - Render the next viewpoint with all previous paintings already projected onto the 3D scene.
   - Distant/central buildings already visible in earlier viewpoints remain painted; only newly revealed buildings entering the left/right edges (~10% of the frame) appear unpainted.
   - Call Image AI (`images.edit` with a mask covering only the unpainted region + a small feather border) to paint just the new geometry.
   - **CRITICAL RULE**: Never time-blend between two projected paintings—blending two AI paintings creates double-edges and brushwork shimmer. Each 3D surface point must permanently lock to the *first* viewpoint painting in which it was visible.

## 3. Six Mandatory Engineering Rules (Pitfall Prevention)
1. **Pack All Viewpoints into a Single Texture Atlas (Prevent GPU Magenta Overflow)**:
   - Binding individual image and depth textures per viewpoint inside a Blender shader exceeds the GPU texture slot limit around ~7 viewpoints, turning the render bright magenta.
   - Always pack all viewpoint paintings (e.g., 23 viewpoints) into a single tiled sprite-sheet image, and pack all viewpoint Depth maps into a single tiled EXR atlas, so the Blender shader samples only 2 textures total.
2. **Separate the Ground Plane (Prevent Progressive Road Darkening)**:
   - Letting Image AI inpaint the street/sidewalk at every step causes shadows on the road to accumulate and darken over time.
   - Exclude the ground plane from camera projection mapping; instead, generate a single seamless top-down cobblestone/tile texture (e.g., 10.8m repeat period) and tile it along the street in UV space.
3. **Lab Median Color Matching Along the Seam (Prevent Brightness Jumps)**:
   - Each Image AI inpaint call returns slightly different luminance/tint. Matching global frame averages fails when dark borders enter the frame.
   - Measure the median Lab color exclusively on **already-painted building walls above the horizon within 80px of the inpaint boundary**, subtract the delta from the newly painted region, and auto-retry if `|ΔL| >= 8`.
4. **3x3 Neighborhood Min-Max Depth Occlusion Check**:
   - Comparing single-pixel Depth values causes projection leaks on angled walls and grazing edges. Always test visibility against the `min..max` Depth range of a 3x3 pixel neighborhood.
5. **Drive Camera Motion by Formula, Not Bezier Keyframes**:
   - Blender's default Bezier keyframe interpolation introduces acceleration/deceleration that shifts viewpoint spacing. Compute camera coordinates analytically per frame inside a `frame_change_pre` handler.
6. **Lock the Sky as a Static Background Layer from Viewpoint 1**:
   - Render the 3D street with a transparent sky (`film_transparent = True`, alpha = 0) and composite Viewpoint 1's painted sky behind all frames so clouds never stretch or warp.