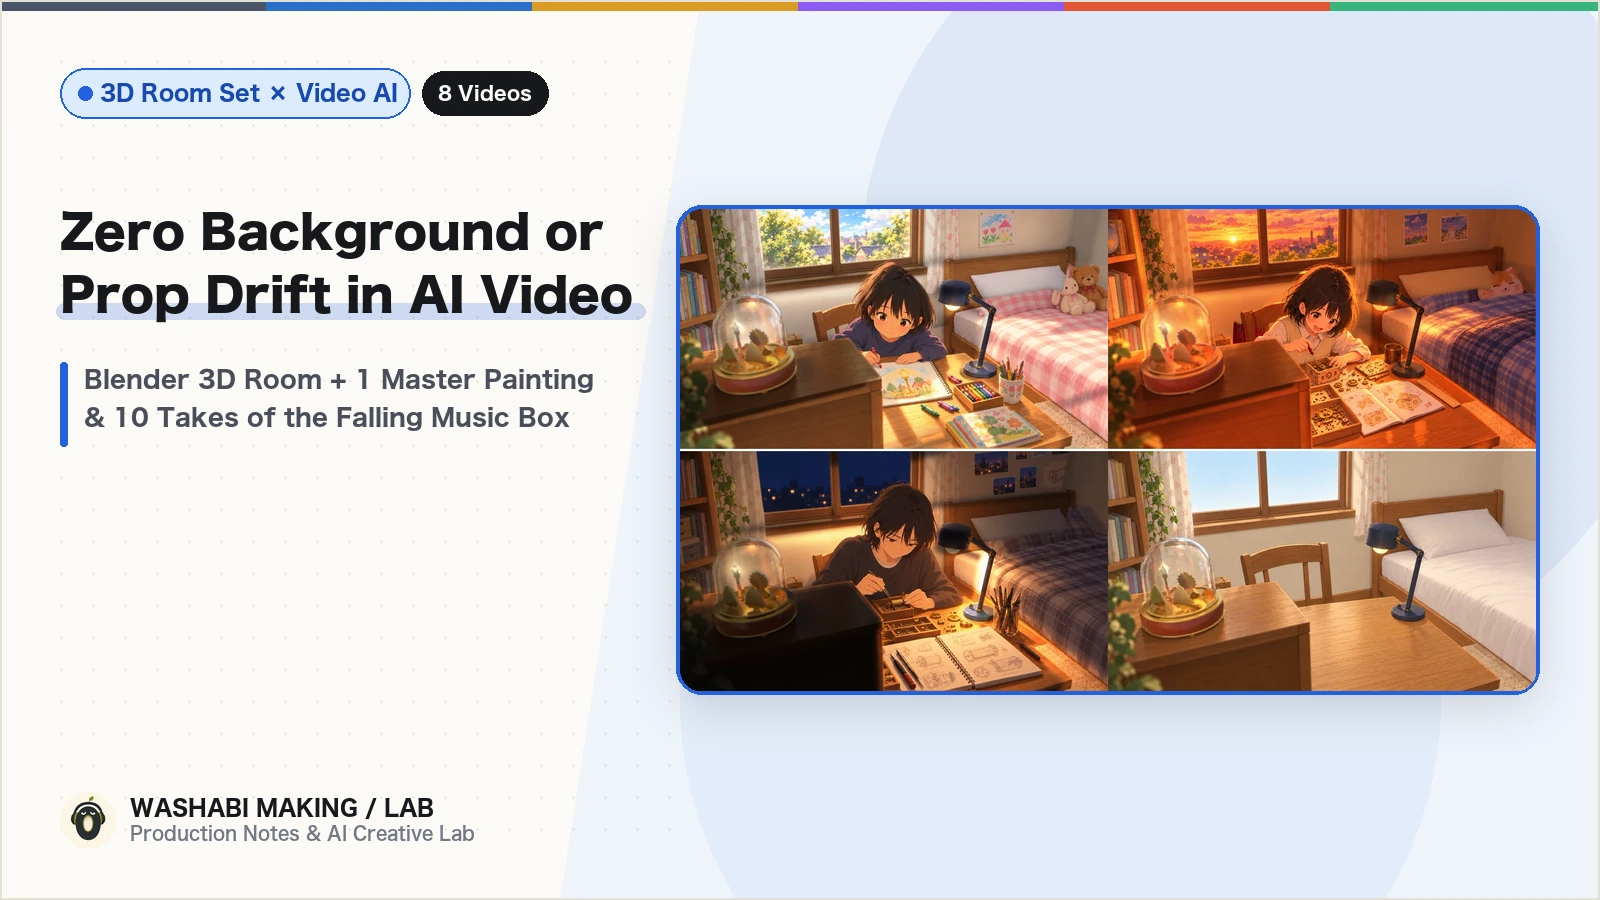
Hi, I'm Rey! I produce a 6-piece virtual rock band called WASHABI using a hybrid human + AI workflow.
When creating a story-driven music video with image generation AI (gpt-image-2.5 / Codex) and video generation AI (H3 MAX Turbo on fal.ai), the hardest wall you hit is keeping the exact same room and the exact same prop consistent across multiple camera angles and times of day.
In the music video for our song "#034 Lamp", the story follows a girl named Ran in the same bedroom as she grows from age 7 (day) → age 11 (sunset) → age 16 (night), followed by a dramatic sequence where her treasured glass-dome streetlamp music box falls off a shelf, shatters on the floor, and is repaired at dawn (15 indoor cuts in the same room, 18 cuts total).
When we first tried the standard AI workflow (generating each cut's start frame from scratch with Image AI and passing it to Video AI), every single cut slightly changed the number of bookshelf shelves, the thickness of the window frame, the curtain pattern, and the miniature inside the music box.
To solve this with our AI agent director Maru, we developed a workflow around "building a simple 3D room set in Blender, painting just ONE empty master room illustration per camera, and multiplying 16-bit 3D lighting passes to change the time of day."
This post explains technical steps like "building a 3D room in Blender," "multiplying 16-bit lighting ratios," and "compositing with 3D occlusion masks"—but you don't need to do any of this by hand!
In fact, during this entire production, I (Rey) never opened the Blender GUI once. I simply told our AI agent (Claude Code / Codex / Antigravity) how we wanted the pipeline to work, and the AI wrote the Python scripts, ran Blender headlessly, calculated the lighting, and composited every frame automatically.
At the very end of this article (Section 7), you'll find a copy-pasteable AI Agent Specification that lets your AI agent build this entire pipeline from scratch!
In this post, we share 8 Before / After comparison videos and break down four key topics:
- How we kept the bedroom furniture 100% pixel-locked while transitioning across ages 7 → 11 → 16 and day → sunset → night
- The 3-step pipeline: "One Empty Master Painting per Camera" + "3D Lighting Ratio Multiplication" + "3D Mask Compositing"
- Bonus Case Study: 10 failed takes of the falling music box (floating in midair, morphing into a golden statue, flying toward the lens)—and how we fixed it
- Copy-pasteable AI Agent Specification for "3D Room Set + Consistent Indoor MV Production"
- Suno Cover 16-Style Comparison for "#034 Lamp" (EN): Dressing Up a 1-Minute Ballad in 16 Genres—How the Music Box Arrangement Was Born
- Moving Camera Outdoors (EN): From 2D Illustrations to a 3D Street: Meshy + Blender Camera Projection Mapping
1. Before / After Video Comparisons: How Much Difference Does It Make?
First, compare our initial version where Image AI repainted the room for each cut (Left: Before) against our final version locked with a 3D room set + one master painting per camera (Right: After):
Comparison #1: Fixed-Camera Growth Montage (Age 7 Day → Age 11 Sunset → Age 16 Night)
At first glance the framing looks similar, but at each transition (age 7 → 11 → 16) the bookshelf depth and window frame shift, breaking the illusion of time passing in the exact same room.
Because the window frame, curtains, desk, bookshelf, and foreground 3D music box are locked to the exact pixel, adding 0.75s crossfades makes only the lighting and the girl's age melt smoothly through time!
Comparison #2: Multi-Angle Sequence Where the Music Box Falls & Breaks (23.4s–39.0s)
Next is the sequence cutting rapidly between "Front of Desk," "Shelf Close-Up," "Broken Music Box on the Floor," and "Low Angle Under the Desk":
Every cut changes the layout of the desk and the internal structure of the music box.
Room architecture, lighting, and desk clutter match across every camera angle, and the music box tilts off the shelf while keeping its exact glass dome and miniature streetlamp intact.
Why did the early version drift on every cut, and how did the final pipeline lock everything down to the pixel? Here are the 3 core steps.
2. Step 1: Build a Simple 3D Room in Blender & Paint Only ONE "Empty Master Room" per Camera
When you ask an image AI to generate *"a 7-year-old girl in a daytime bedroom"* and then *"an 11-year-old girl in a sunset bedroom,"* the character's pose and proportions influence the diffusion process—causing the AI to redraw the window mullions, bookshelf shelves, and curtain folds slightly differently every time.
To prevent this, we separated 3D room structure & lighting from 2D hand-painted texture:
- Build a simple 3D room set in Blender: Place simple 3D geometry for the desk, chair, bookshelf, window frame, bed, desk lamp, and our hero prop—the glass-dome music box—along with 3 fixed cameras (Wide 3/4 view, Desk Front view, and Floor Close-up).
- Paint only ONE "empty room (
I_master)" per camera using Image AI (Codex): Instead of drawing the character right away, we render the empty 3D room under neutral daytime lighting and have Image AI paint one single empty room illustration per camera.
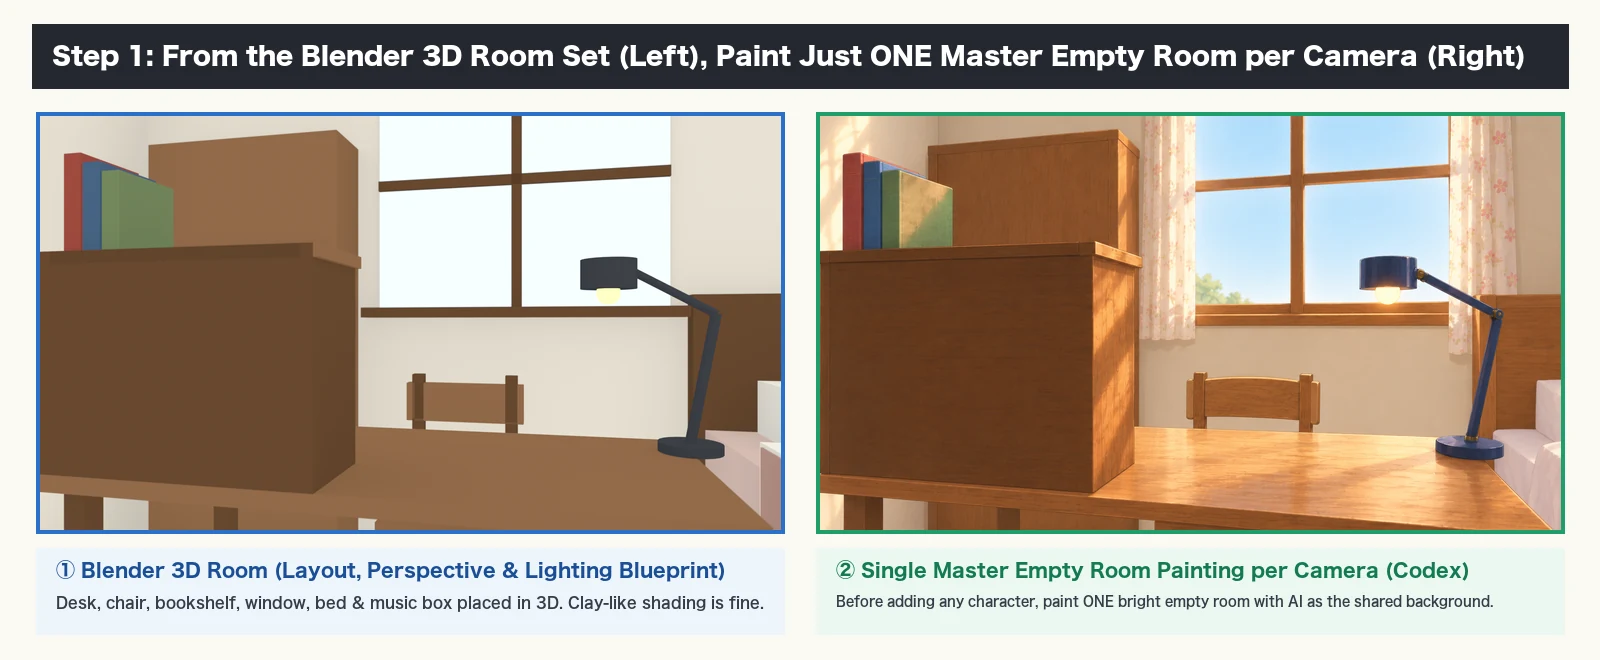
This single empty room painting per camera serves as the locked foundation for every cut shot from that camera angle—across daytime, sunset, night, darkness, and dawn. Because the room itself is only painted once, the wood grain on the desk and the floral pattern on the curtains never change!
3. Step 2: Multiply 16-Bit "3D Lighting Ratios" Onto the Single Room Painting to Create Sunset, Night & Dawn
You might wonder: *"If you only paint one daytime room per camera, how do you get sunset, night with the desk lamp on, pitch darkness, or dawn?"*
If you ask Image AI to *"turn this room into night,"* it will subtly alter the furniture edges and window frames all over again.
Instead, we rendered lighting-only passes in Blender's 3D space and multiplied the light ratio directly onto the single painted room image!
- Inside Blender, keeping the camera and white-albedo room geometry fixed, we render 16-bit TIFF lighting passes for: ① Neutral Base Daylight, ② Warm Orange Sunset, ③ Night + Desk Lamp ON, ④ Pitch Dark (Moonlight Only), and ⑤ Cool Blue Dawn.
- Then, for every pixel of our single painted room (I_master), we multiply by the 3D illumination ratio:I_target = I_master × (L_target + 0.08) / (L_neutral + 0.08)
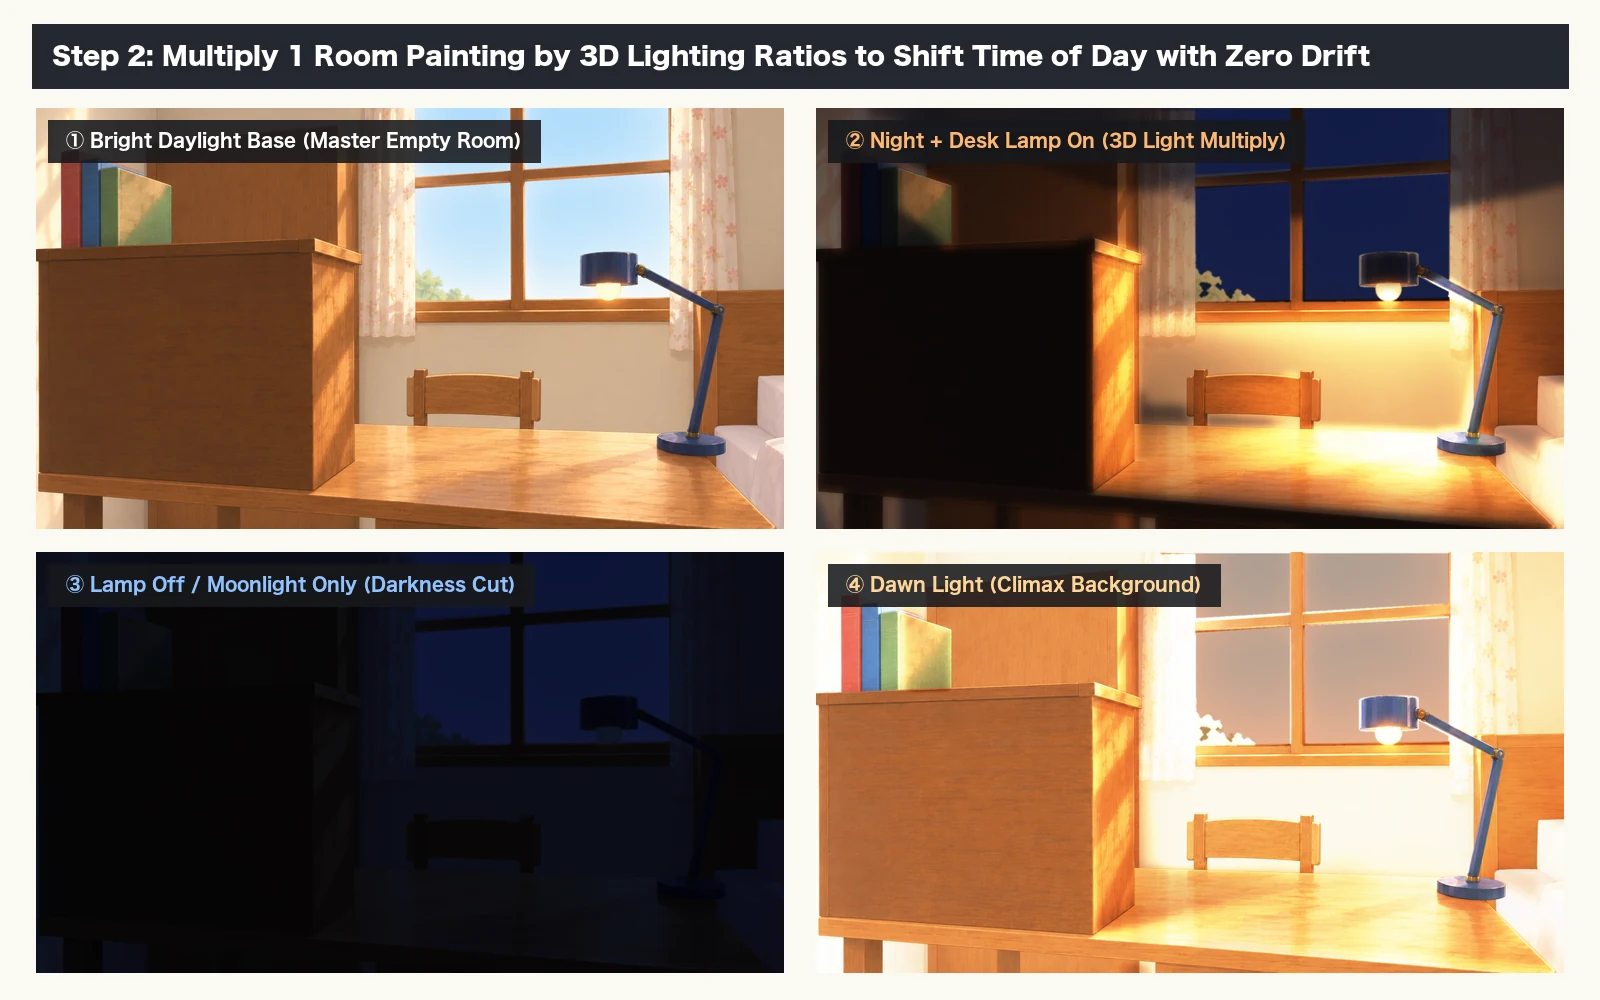
Because Image AI re-generation is zero, the furniture outlines, wood grain, and curtain patterns do not move by even a single pixel—yet the desk lamp casts physically accurate 3D falloff and shadows across the wall and desk!
4. Step 3: Composite Only the Character & Desk Surface via 3D Masks, and Restore the Hero Prop in 3D
Once we have the time-of-day background (I_target), we add the character and tabletop items (sketchbook, gears, tools):
- Over the relit background
I_target, we composite a 3D dummy mannequin (proxy) and the 3D music box from Blender to create a guide image, then ask Image AI (Codex) to draw the character and tabletop items. - However, if we used the raw AI output directly, the curtains, bookshelf, and foreground music box would still suffer minor AI drift.
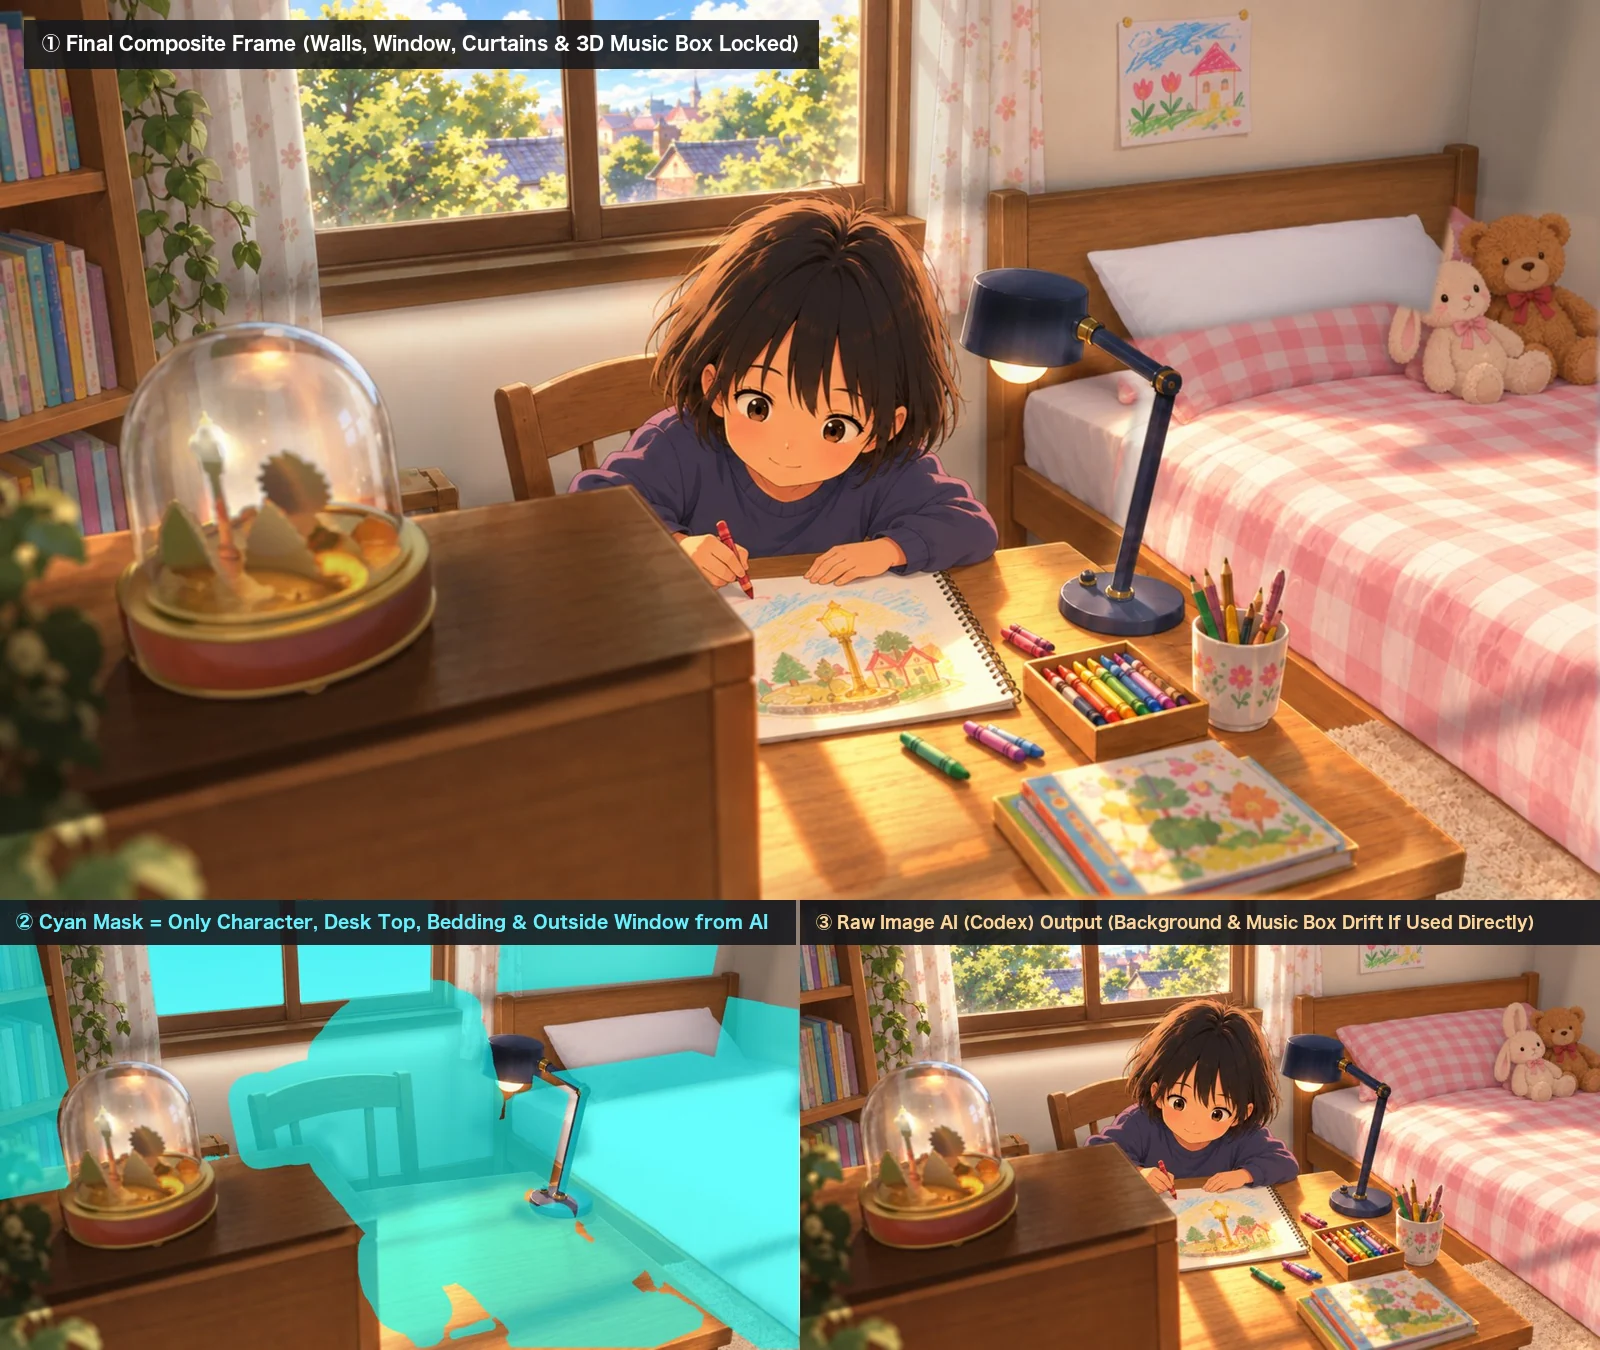
- So we use exact 3D furniture & occlusion masks exported from Blender. As shown in the cyan overlay below, we take ONLY the character, chair, desk top surface, bed duvet, and outdoor sky from the AI image—while locking the walls, window frame, curtains, and bookshelf 100% to our empty master room.
- Finally, for the glass-dome music box in the foreground, we discard the AI's drawing and composite Blender's 3D render of the music box (complete with glass dome reflections and miniature streetlamp) directly on top.
Here are the finished start frames for Age 7 (Day), Age 11 (Sunset), and Age 16 (Night) alongside the shared Empty Master Room (Bottom Right):
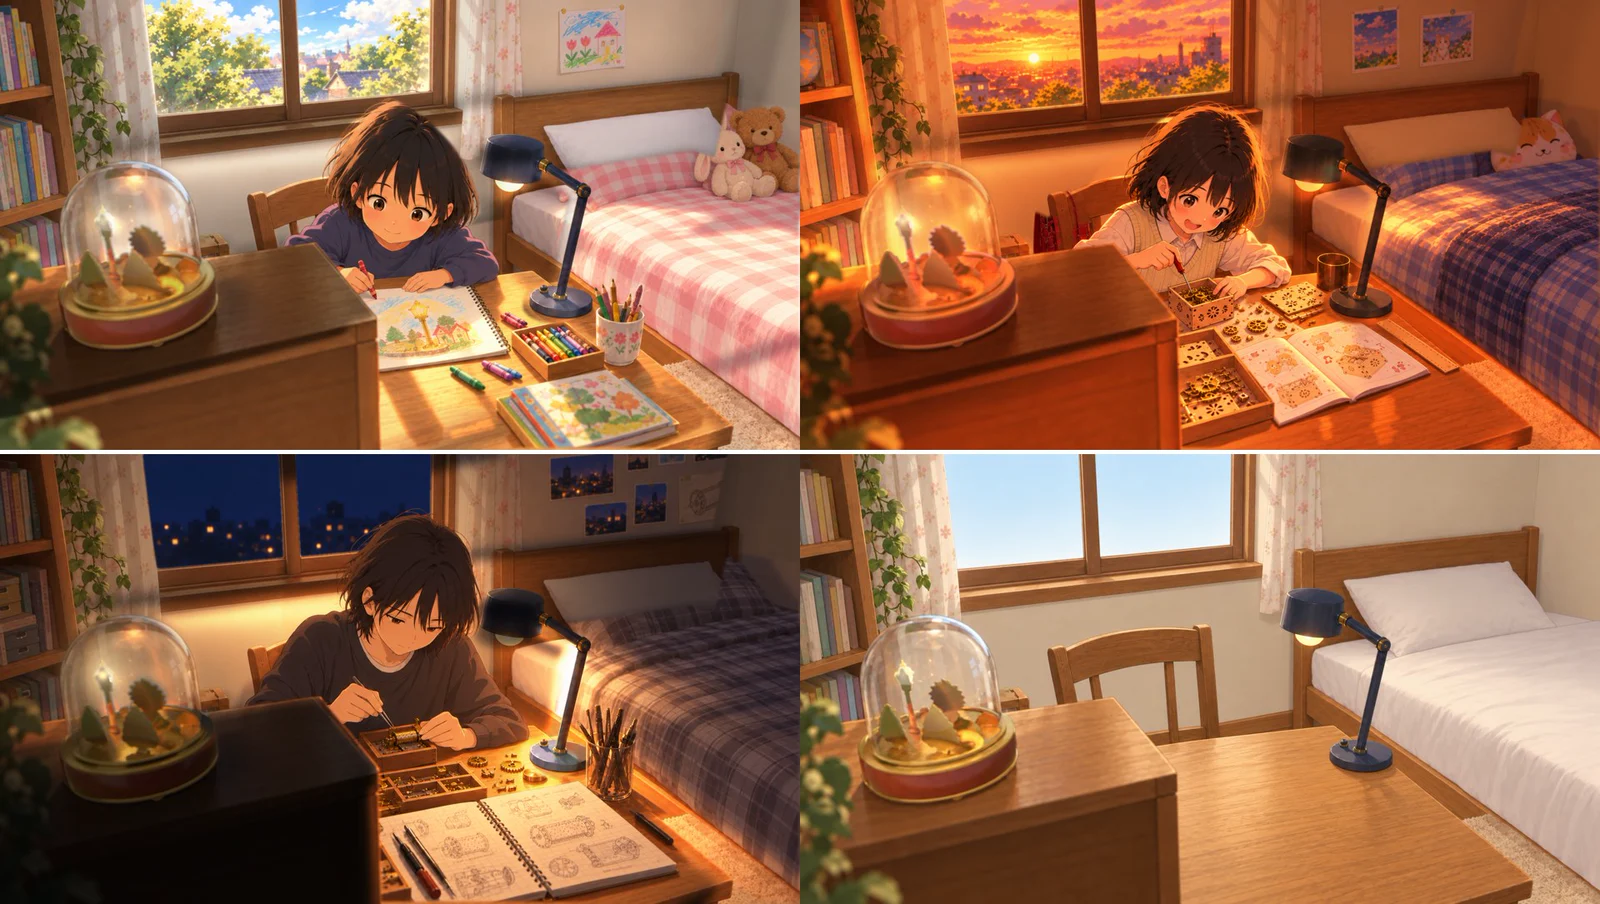
Notice how the drawings taped to the wall, the bedding, and the tools on the desk evolve as Ran grows up, while the window frame, curtains, bookshelf, desk, lamp, and foreground music box remain locked to the exact millimeter!
5. Step 4: Bonus Case Study—10 Failed Takes of the "Falling Music Box" & How We Solved It
While our room and static props were now rock-solid, the hardest shot in the entire MV was Cut c08 at 28.9s: when 16-year-old Ran slams her hands on the desk in frustration, causing the music box on the upper shelf to tilt and fall.
No matter how clean your start frame is, if you ask an AI video model (H3 MAX Turbo) to animate a complex prop falling and shattering in a single shot, both physics and object identity fall apart.
Take a look at 3 classic failure modes we hit across our 10 takes:
Given only a start frame and a text prompt ("the music box falls off the shelf"), the music box slid off the edge and floated weightlessly in midair.
Given a shattered music box on the desk as the end frame, the glass dome dissolved mid-fall and the miniature lamp morphed into a mysterious golden statue.
Given a mid-air end frame without 3D scale locking, the music box flew forward toward the camera lens instead of dropping straight down.
Why Did It Fail 10 Times, and What Fixed It?
Through trial and error, three rules solved the problem completely:
- Don't ask one AI video clip to handle both "falling off the shelf" and "shattering on the floor" (Split the Cut!): Asking video AI to interpolate all the way from the top shelf to shattered pieces on the floor covers too much distance, causing the object to melt or float. Instead, we split the action into two cuts just like traditional cinema/anime editing: Cut A (
c08): tipping 38° off the shelf edge and starting to drop, and Cut B (c09): already shattered on the floor. Showing the start of the fall and the aftermath lets the viewer's brain connect the impact naturally! - Render BOTH the Start Frame (0°) and the Tipping End Frame (38°) Using the Blender 3D Music Box: Instead of letting Image AI draw the tilted music box in the end frame, we rotated the 3D music box in Blender 38° around the shelf corner and dropped it 5 cm, compositing that exact 3D render into the end frame. That locked the prop's scale and internal geometry 100%, stopping it from flying toward the camera.
- Lock Static Tabletop Items to the Exact Pixel Between Start and End Frames: For the end frame where Ran gasps and looks up, we only updated the pixels around her head and shoulders, copying the pixels for the crumpled paper and tools on the desk directly from the start frame. (If static tabletop items differ by even a few pixels between start and end frames, video AI will make the paper squirm and writhe during the shot!)
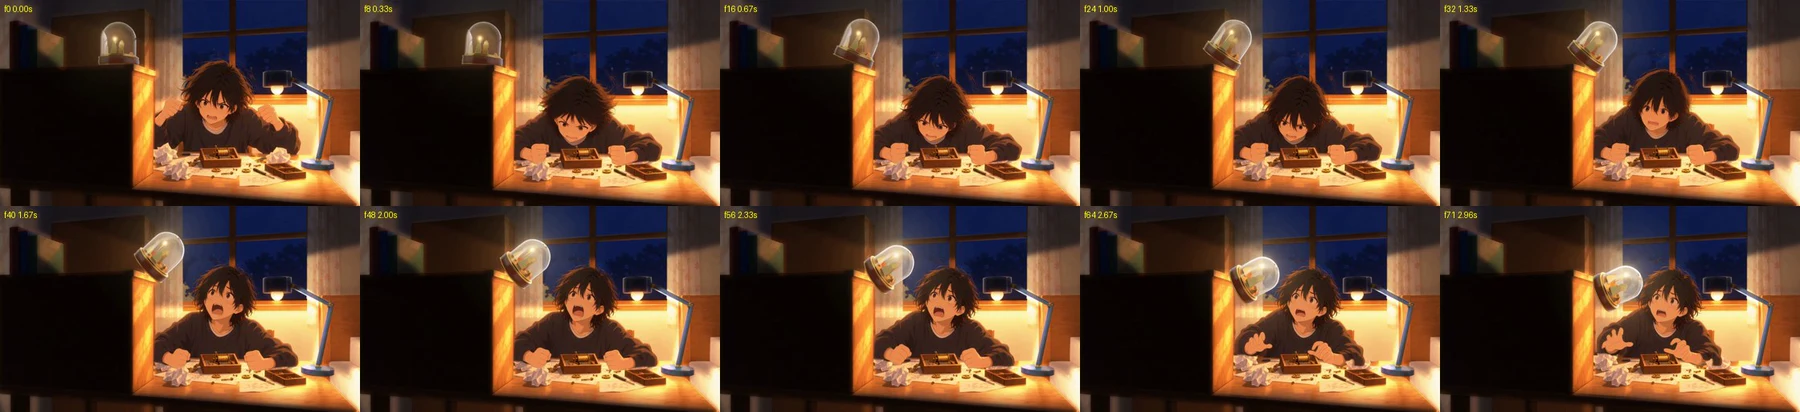
Here is Take 10—the final completed sequence joined with the surrounding cuts in the MV:
The glass dome and miniature streetlamp keep their exact shape as the music box tips off the shelf edge, cutting cleanly to the shattered music box on the floor!
6. Summary: "Camera Map" for Moving Outdoor Shots, "3D Room Set" for Multi-Cut Indoor Stories
Combining our previous Meshy + Blender Camera Projection Mapping workflow with this 3D Room Set + Per-Camera Master Painting pipeline solves virtually every background consistency problem in AI anime video production:
- Long continuous camera moves outdoors → Camera Projection Mapping (projecting progressive 2D background paintings onto a 3D street every 1.5s)
- Multi-cut indoor stories across changing times of day & ages → 3D Room Set Pipeline (one empty master room painting per camera × 16-bit 3D lighting ratios + 3D hero prop restoration)
7. Copy-Pasteable! AI Agent Specification for "3D Room Set + Consistent Indoor MV Production"
We distilled this entire pipeline into a general-purpose implementation prompt for AI coding agents (Claude Code, Codex, Antigravity, Cursor, etc.) that works for any room, character, or story.
Copy the markdown block below and tell your AI agent: "Build our multi-cut indoor video scene following this specification."
# AI Agent Specification: Consistent Multi-Cut & Multi-Time-of-Day Indoor Video Production via Blender 3D Room Set + Per-Camera Master Painting

You (the AI agent) will build a multi-cut, multi-time-of-day indoor animation sequence where room architecture, furniture, and hero props never drift by even a single pixel—without requiring the human user to open the Blender GUI—by combining headless Blender Python (`bpy`), Image Generation AI, Python mask compositing, and Image-to-Video AI.

---

## Phase 0: Pre-Production Alignment (Ask the User First)
Before writing code, confirm these 4 items with the user (propose defaults if unspecified):
1. **Room Setting & Lighting Variations** (e.g., bedroom, living room, classroom, workshop / day, sunset, night with lamp, pitch dark, dawn)
2. **Characters & Cut Breakdown** (character reference sheets, number of camera angles [2–3 recommended], duration and acting for each cut)
3. **Hero Prop (`Col_Hero_Prop`)** (any key item—like a music box, instrument, clock, or gadget—whose exact shape and internal structure must stay 100% identical across cuts)
4. **Image AI & Video AI Environment** (e.g., OpenAI Image API / Codex, fal.ai `H3 MAX Turbo` / Kling, etc.)

---

## Phase 1: Headless Blender 3D Room Set & Multi-Pass Export (`build_room_passes.py`)
Generate a Python script (`bpy`) and execute it headlessly via `blender -b --python build_room_passes.py`.

### 1-1. Organize the Scene into 5 Standard Collections
Group all 3D objects by role into these 5 Blender Collections:
- `Col_Static_Room` (**Locked Architecture & Static Furniture**): Walls, floor, ceiling, window frames/mullions, curtains, bookshelves—elements that must never move by a single pixel.
- `Col_Window_Glass` (**Window Glass Planes**): Flat glass panes used to swap outdoor sky/scenery per time of day (keep wooden frames/mullions in `Col_Static_Room`).
- `Col_Touch_Surface` (**Furniture Contacted by the Character**): Chair, sofa, desk top surface, bed duvet—regions where the AI-drawn character sits, leans, or places small tabletop items.
- `Col_Hero_Prop` (**Shape-Locked Hero Prop**): The key prop that must remain geometrically identical across cuts. If it includes glass domes or transparent parts, support both opaque-only (`solid`) and glass-included (`full`) render modes.
- `Col_Proxy_Human` (**3D Dummy Mannequin**): Simple sphere-and-cylinder mannequins indicating the character's position, head scale, posture, and facing direction for each cut.

### 1-2. Per-Camera Render Passes (`renders/<cam_id>/`)
Keep cameras to 2–3 key angles (e.g., `Cam_Wide`, `Cam_Front`, `Cam_Close`). Verify framing at 25% resolution first, then export these passes per camera:
1. `<cam>_clean.png`: Empty room 3D draft rendered under bright neutral lighting with `Col_Hero_Prop` and `Col_Proxy_Human` hidden.
2. `<cam>_proxy_<pose>.png` (RGBA): Dummy mannequin rendered with `is_holdout = True` on room furniture so foreground furniture occlusion is baked into the alpha channel.
3. `<cam>_prop_<pose>_<light>_full.png` / `_solid.png` (RGBA): Hero prop rendered with `is_holdout = True` on the room (export per pose if the prop tilts, falls, or moves).
4. `<cam>_light_<time>.tif` (16-bit TIFF): Pure lighting distribution passes rendered with all room materials set to diffuse white (Albedo 0.8) and window glass hidden:
   - `neutral` (uniform base daylight: large ceiling area light + camera-side fill light)
   - Time-of-day lighting passes (`day` sunlight, `evening` warm low sun, `night` practical desk lamp ON, `dark` moonlight only, `dawn` cool blue light)
   - *Tip*: For practical room lamps, record the 2D screen coordinates `(px, py)` of the bulb via `bpy_extras.object_utils.world_to_camera_view(scene, cam, lamp_loc)` into a JSON file.
5. **Binary Region Masks** (rendered via white Emission vs. Holdout/Black):
   - `mask_protect.png`: `Col_Static_Room` (walls, window frames, curtains, shelves—strictly locked to the master painting)
   - `mask_fg_occluder.png`: Furniture in front of the character that must occlude the character's body
   - `mask_behind_window_frame.png`: Window frames/mullions behind the character that should be covered when the character's head/body overlaps them
   - `mask_window_glass.png`: Window glass panes excluding mullions
   - `mask_touch_surface.png`: `Col_Touch_Surface` (chair, desk top, bedding where AI-drawn contact shadows and small items are allowed)

### 1-3. Mandatory Blender 4.x / 5.x Headless Rules (Pitfall Prevention)
- **Iterating Collection Objects**: Never run `for obj in col.all_objects: obj.hide_render = True` directly—mutating `hide_render` invalidates the iterator and leaves random objects visible. Always wrap in `list(col.all_objects)` first.
- **Transparent Glass in Cycles**: Rendering glass over a transparent background (`film_transparent = True`) looks milky unless `scene.cycles.film_transparent_glass = True` (and `film_transparent_roughness = 0.1`) is enabled.
- **16-Bit Raw Lighting Passes**: 8-bit PNG crushes shadow gradients. Export lighting passes with `view_transform = 'Raw'`, `exposure = -3.0`, `file_format = 'TIFF'`, `color_depth = '16'`, and read them in Python via `tifffile.imread()`.

---

## Phase 2: Generate ONE "Empty Master Room Painting (`I_master`)" per Camera
1. Pass `<cam>_clean.png` to Image AI to paint **one single daytime empty room illustration (`I_master`) per camera**—with no character and no hero prop.
2. Overlay 3D wireframe edges onto `I_master` to verify that window frames, furniture edges, and light fixtures align with the 3D geometry.
3. For close-up cameras (`Cam_Close`), apply a ~5px Gaussian blur outside `mask_touch_surface` so the background wall/shelf has natural shallow depth of field.

---

## Phase 3: Time-of-Day Relighting via 16-Bit 3D Lighting Ratio Multiplication (Zero AI Re-Generation)
Never ask Image AI to repaint `I_master` into sunset or night. Instead, compute each time-of-day background `I_target` in Python (NumPy):

- Load 16-bit TIFF passes `L_target` and `L_neutral` and smooth Monte Carlo noise with a Gaussian blur (`sigma = 6`).
- Compute `ratio = (L_target + 0.08) / (L_neutral + 0.08)`
- Compute `I_target = np.clip(I_master * ratio * time_exposure_gain + ambient_tint, 0.0, 1.0)`
- **Practical Lamp Glow**: When an indoor lamp is ON, add a 3-stage warm Gaussian glow centered on the saved bulb coordinates `(px, py)`.
- **Window Sky Lock**: Composite time-appropriate outdoor sky/city lights into `mask_window_glass` (excluding curtain pixels by color threshold), and reuse the exact same outdoor image across all cuts sharing that camera and time of day.

---

## Phase 4: Character Painting & 3D Mask Compositing (`composite_cuts.py`)
1. **Build the Image AI Guide (`ai_input.png`)**:
   - Composite `<cam>_proxy_<pose>.png` (3D dummy mannequin) and `<cam>_prop_<pose>_solid.png` over `I_target`.
   - Pass this guide + character reference sheets to Image AI to generate `I_ai` (the character and tabletop items drawn in place).
2. **Pixel-Locked Mask Compositing Algorithm**:
   Composite `I_ai` onto `I_target` using these 4 rules so the room never shifts:
   - **① Character Extraction**: Extract the character mask from `I_ai` using `rembg` (`isnet-general-use`), keeping only connected components overlapping the 3D proxy mannequin. To prevent dark hair from getting clipped against dark backgrounds, include pixels within 120px of the character mask where `|I_ai - I_target| > 22`, and feather the boundary by 14px.
   - **② Contact Furniture & Tabletop Diff (`mask_touch_surface`)**: Inside `mask_touch_surface`, adopt pixels where `|I_ai - I_target|` shows significant change (newly drawn tabletop items, hands, contact shadows) with a 3px feather, excluding a safety margin around `Col_Hero_Prop`.
   - **③ Strict Occlusion Ordering**:
     - Where `mask_behind_window_frame` shows a color difference between `I_ai` and `I_target`, keep the character (`I_ai`) so background window mullions never cut through the character's head.
     - Overwrite `mask_fg_occluder` 100% with `I_target` so foreground furniture cleanly occludes the character.
   - **④ 3D Hero Prop Restoration (`Col_Hero_Prop`)**:
     - Finally, alpha-composite Blender's `<cam>_prop_<pose>_<light>_full.png` (scaled by time-of-day luminance) on top. This guarantees 100% identical prop shape, scale, and glass reflections across every cut.
     - *Exception*: Only when the character's fingers wrap directly around the hero prop, skip the 3D overwrite so the fingers aren't covered, and let Image AI paint over the 3D guide directly.
3. **Automated Composite Verification (`_check.jpg`)**:
   - Output a 3-panel check image (`Final Composite` | `Cyan AI Mask Overlay` | `Raw AI Output`) for every cut and inspect at 1:1 zoom for double props or window-frame bleed.

---

## Phase 5: Moving Props & Image-to-Video (I2V) Handoff Rules
1. **Split "Falling / Tipping / Breaking Prop" Action into 2 Cuts & Render Both Ends in 3D**:
   - Never ask a single I2V generation to interpolate a prop falling from a high shelf all the way to shattering on the floor—it will float, morph, or zoom toward the camera.
   - Split into **Cut A: "Resting at 0° → Tipping ~35–40° off the shelf edge"** and **Cut B: "Already shattered on the floor."**
   - Render the prop's Start Frame (0°) and End Frame (38° tilt) in Blender 3D and composite both via Phase 4. For Cut B, unparent the 3D prop parts in Blender and scatter them on the floor to create the guide.
2. **Lock All Static Tabletop Pixels Between Start and End Frames**:
   - When using Start + End Frame I2V within a single cut (e.g., character gasps and raises her head), any pixel difference on static tabletop items (papers, tools) between the start and end frames causes Video AI to make the static items squirm.
   - After generating the end frame, **copy all pixels outside the character's moving body parts directly from the start frame** so static areas are 100% bit-identical before sending to Video AI.
3. **Crossfading Fixed-Camera Time-Passage Montages**:
   - For fixed-camera growth or time-passage sequences (e.g., child → teen → adult, day → sunset → night), apply a 0.5–0.75s crossfade between cuts. Because the room and 3D hero prop are pixel-locked, only the character and lighting melt smoothly across time.